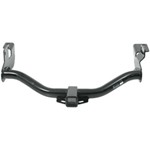
Hey Adam, yes the B and W hitch part #BW47BR that you referenced is a confirmed fit for your 2025 Toyota RAV4 plug in hybrid. What are you planning on using the hitch for?
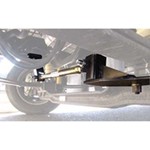
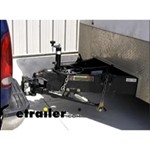
Hey Randy! For the OEM prep package you'll need to reach out to a Ram dealer, but I can help you out with an underbed system for your 2026 Ram 2500 if you aren't dead-set on getting the exact same as the OEM. The closest we have for your…
The difference between the Class II and Class III hitches has to do with their Gross Trailer Weight (GTW), their Tongue Weight (TW), and their Hitch Receiver Size. Class II trailer hitch receivers have a 1-1/4 inch receiver and can be rated up to…
Hi Tom! I included a link to the instructions for the B&W Trailer Hitch Receiver - Custom Fit - Class III - 2" #BW47BR that will fit your 2024 Toyota RAV4 Hybrid. We haven't installed one of these in house quite yet, so no install video,…
Hello Derick, thanks for reaching out. The only way to know if the Curt Helux Shock-Absorbing 5th Wheel Pin Box #C73RJ will work for you is to determine what pin box you have currently. The best way to do this is to find the sticker on the pin box…
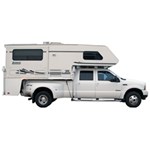
Good question! Can you close the hatch of the vehicle the CVT Timber Creek Annex #RG35ZV is attached to? Yes. However, it should be noted that the hatch is actually acting as a roof support, so some of the roof will not necessarily cave in, but it…
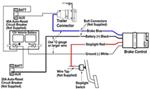
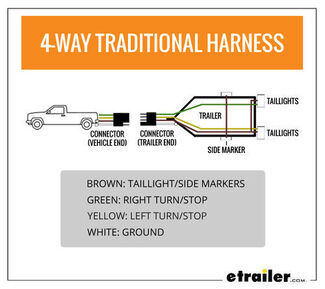
A 4-Way trailer connector has the basic lighting functions only; running lights, left turn signal and brake lights, right turn signal and brake lights, and ground. A 7-Way has these functions and a 12 volt circuit, a circuit for electric trailer…
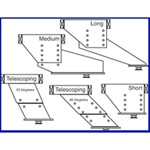
Hey Satran. The tallest 5th wheel hitch we have with a 30,000 lbs capacity is the Reese M5 item #RP68FR. This fits the Ford factory puck system and has three adjustable heights of 14", 16", and 18". The B&W Companion OEM 5th Wheel…
Hey David, yes the Weathertech front floor mats part #WT79VQ that you referenced are a confirmed fit for your 2023 Ford Maverick EcoBoost non-hybrid. How do you like the Maverick? A friend of mine has one and I tell him it's almost like a modern…
You can use the QM3 mounting hardware #TH04997 for the Weekender rooftop cargo box. This will use the carriage bolts as you stated and will fit 4 inch on center holes. I've attached some photos and a video to assist.
Hey Tim. The Blue Ox Trailer Hitch item #BLU46HR fits all models of the 2025 Jeep Grand Cherokee L including your 2-row. What do you plan on using your hitch for?
Hey Eric, Using only 4 of the 5 mounting holes on #DE28YR is not recommended when installing new brakes. There is a chance of failure that could cause a lot more problems, it is best to install them exactly how they should be. With that said by far…