
Replacement Trailer Hub Bearing - L44649
(388 reviews)
Price: $17.62
In Stock
Replacement Trailer Hub Bearing - L44649
Item # L44649
Retail:$19.32
Our Price: $17.62
You Save: 9%
Orders above $99 qualify for Free Shipping
In Stock
Thank you! Your comment has been submitted successfully. You should be able to view your question/comment here within a few days.
Error submitting comment. Please try again momentarily.


- All Info
- Reviews (388)
- Q & A (0)
- Videos (2)
- Photos
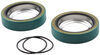
etrailer Trailer Bearings Races Seals Caps - L44649
- Bearings
- Standard Bearings
- 3500 lbs Axle
- Bearing L44649
- etrailer
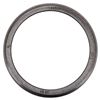
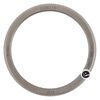
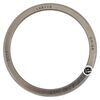
- Race L44610
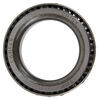
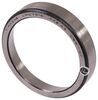
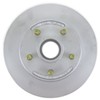
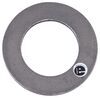
High-quality, tapered roller bearing is designed for high-speed use. Replacement part uses industry-standard number.
Features:
- Inner diameter: 1.063"
- Matching race (sold separately): L44610
- Application:
- Inner/outer bearing for BTR spindle
- Outer bearing for #84 spindle
L44649 Replacement Bearing


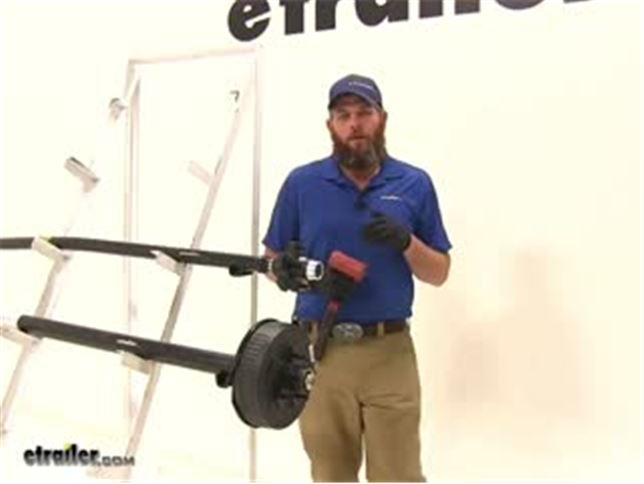
Video of Replacement Trailer Hub Bearing - L44649

Videos are provided as a guide only. Refer to manufacturer installation instructions and specs for complete information.


Video Transcript for Trailer Bearings Races Seals and Caps Rebuild
Speaker 1: Today we're going to take you through the rebuild process on a couple of hubs. We've got an idler hub, and here we've got a hub and drum assembly. Works with electric rigs, but this can also work for just standard discs, if you've got a disc brake style setup.Basically what we're going to show you is how to get all of the bearings out. How to remove the seal. How to remove the race's if they're damaged, then get them replaced in the proper manner. We'll show you how to use an easy loop hub, which we have here.The first thing we are going to need to do is, get the grease cap off the end.
It can have either a rubber plug in it like this one does, or it can be a solid metal cap.These are pressed fit in there, basically by tapping on them on the back side. To remove them, a deadbolt hammer is typically what we're going to use. We're just going to start tapping as we go around. You'll see a little separation start right here, and slowly it'll work it's way off.Now the next step's going to vary a little bit depending on your axle setup. Do you see this is going to have a keeper that goes around the nut.
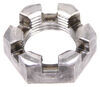
And that prevents that from being backed off, or removed. A lot of times you'll have a castle nut, which will have just little tabs that stick off, and there will be a cotter pin that passes through it. Just depending on your application, you need to get the keeper for the nut off. This style we just kind of pry out. A cotter pin you would just remove of course.Once we have that off ...
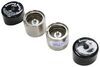
We'll start to take off the nut here, and the washer that's in behind it. Now yours should look a whole lot more dirty than this. There should be a lot of grease packed in, and through the hub, this one's brand new. We thought it'd be nice to show you the components before the grease was on .. Of our washer that comes off.And then here we're going to have our outer bearing.
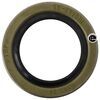
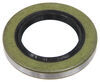
Continue to pull that. We're gonig to have our inner bearing here. That sits in the backside of the hub. And we didn't put it in yet, we will show you how to put it in. But a seal would typically be covering the backside here. We'll show you how to use a seal removal tool, or another tool. To get that pried up and out. To get an access to that inner bearing.Now for a drum style like this, that process for disassembly is going to be just the same. One thing to keep in mind if you're using a disc brake setup. You'll have to remove the caliper before the disc is going to come off.Now once we have the spindle exposed, as we said this is going to be really greasy. We want to get all the grease removed, and the first thing we'll do is inspect it. We want to make sure that it looks just like what we have here. Everything's nice and smooth. We don't see any kind of discoloration, or any marring on the metal. Indicating that our bearing's got hot.If you do have any of those symptoms, at this point it's time to replace those bearings. You don't want to repack them. Get new bearings, and put in there. You might have a bearing that's come apart in here. Another surface to ensure is in good condition, is where your seal is going to go. That helps seal all the grease inside of our hub. With a damaged or broken seal, that grease is going to seep out. Either out of the hub, or in this case into our brake assembly.Now if your axle has brakes, we're also going to check the disc. Make sure it doesn't have any issues, or your hub. And this is going to be a hub and drum assembly. The brakes are going to ride on this machine surface. You're going to check that for signs of excessive heat, discoloration, or cracking. And this is our magnet surface. We'll check that surface for the same issues.Now inside the hub regardless if it's a disc brake, it's a drum brake like this. Or just a standard idler style hub. You're going to have an outer race. Would be right here, it's a small tapered piece of metal your bearing sits in, and rotates on. That's basically the outer portion of the bearing.You have the same thing here on the backside. This is called the inner race. Now if those show any signs of wear, overheating, or cracking. Those are also something we'll need to replace, which we'll show you how to do in just a minute.Now, with your brake assembly exposed, if you do have electric brakes like we have here. It's a good idea to check all the components for wear, cracking, maybe missing pieces. Check your pad thickness to make sure those are in good shape. Basically if you have a non working brake assembly and you put everything back together, you're just going to have to take it apart and do it all over again to get back to the brake assembly. This gives you a really good option to be able to change them out.And most applications are going to use a four, or maybe a five bolt flange to hold them in place. And you'll just remove the lock nuts, or sometimes you'll have a hex nut with a lock washer. You want to remove those, and then simply slide your assembly off after you cut the wiring.The friction material itself should also be checked for any kinds of cracking, or overheating. If you have any grease inside the system at all, it's likely it's gotten on those pads. It's a good idea to get those changed. Now as far as the removal of the races go, it's going to be just the same whether we're using an idler style hub like we have here. A drum brake like we have here. You can basically see where the idler is, here in the middle of the hub. It's going to go all the way around there, and we just have this extra material here to provide our braking surface.Now if you're doing a disc brake style job again, it's going to be just the same here with the races living inside of the actual hub portion. You'll just have the discs there for the brakes to make contact. We're going to use this little bit smaller one, it's a little bit easier to manage to show you how to get these out. We've talked about where the races are. The outer here, the inner being closer to the inside, but on the backside of the race there's a little lip. That lip's meant to stick out just a little bit further than the hub, and provide us an area to put our tool on, and help to drive that out.If you look all the way through there on that inner race, you'll see that little lip that sticks out just from the hub slightly, and it gives us enough area to use our tool on. Now generally to remove these you're going to use a punch, similar to this. Some guys will use a screwdriver. Or a piece of pipe. If you have a piece of pipe that's small enough to fit inside of that diameter, you can take that down through and allow it to rest on that lip.Use our punch, and then just need a hammer. And we'll start working that out. We're going to tap all the way around. Kind of equally, and evenly apply the force to get it to come on out of the bottom for us.You can see now as it starts to come out there's going to be a little gap created between the hub and the race. And we can just keep going, bringing it on out. Then you can inspect the inside of the hub surface there. Make sure no damage or anything has occurred, and repeat that same process for the outer race if you plan on removing and replacing that one.Now in the outer flat edge, you can see we're going to have our tapered edge on this side. If we roll our race over to the flat side, typically there's going to be a manufacturers part number on there. That will help you identify which race it is, that you need to go back in your system. If those are rubbed off, worn off, if you can't read them. You can measure the outside, to outside diameter of the race here. It's a good idea to use a micrometer to get it exact.Now here's your basic micrometer. And again, the outside of the race is what we're going to need to measure. You want to go . I set the thickest point there. Looks like this one's going to be about 1.98. That's going to be the measurement you'll want to supply.Now while we've got this out, let's also look at the proper way to measure our bearing. Instead of the outside for the bearing, we need to measure the inside diameter. That's going to be pretty simple. Let's pull that out, find the largest measurement we can. Which here, looks like it's going to be 1.03. With that information, we'll be able to get the correct bearing, and the correct race, so they'll fit together properly and make a full bearing kit for us.Now here's the race, we're going to show you how to get this put back in. Basically just going to press fit inside of our hubs. We need to get it down on there. Kind of like that. And you'll have a couple options. A lot of times you're going to see do it yourself or at homer, just going to use a wooden block. Just place it on there. That's going to get you started, but at that point you'll struggle in getting it to go all the way down into it's seat.Now to take care of that problem, there are several seal drivers that are available. Seal and race drivers that are available out there on the market. It's designed to fit down inside of our race, inside of our hub and get it down there where it needs to go. This is part number ptw83020, has several different sizes, even if you have multiple trailers it's going to do the job.Now the side with the angle on it, is designed to fit down inside of our race. If we use the other side, that's going to be for driving your seal into place. Just want to hold it, and take it on in with your hammer. You'll see, you just want to insure that our race is all the way up against that line on the hub where it's supposed to mate to.Now when it comes time to pack your bearings you're going to have several different ways of doing this. You can just use your hand, is the traditional method. That's going to be the method probably reserved for the very occasional trailer work kind of situation. If you do it once or twice a year, probably get away with it that way.Next you would go to a, kind of a sandwich funnel style almost. If you look inside of there, you can see the bearing. It's located between the two pieces. Just use a grease gun. Start filling that with grease, and that's going to fill our bearing for us. And the third, with this one you're just going to place your bearing down and in. It should be pretty close to center. And then we've got our cone her that's going to go down and secure that.Now I think this style, wastes a little bit more grease than what this style will. This has a dust cap. You can see, you can keep your grease in there, put your dust cap on there and save it for later use. This will be if your going to do it every couple years. And this particular style would be if you're a more regular user.Let's start by showing you how to use a bearing packer. Similar to this. Again, we've just got our grease inaudible 00:11:07 here on the top. And then just slowly start to fill it. Now I like this style quite a bit. I think even regular users might enjoy it, because you can get a really quick visual look at that bearing. You're not going to have to overdo it, or have to much grease.You can kind of see in there now, we're starting to get grease to come out of it. Couple more pumps, we'll be good. You can see we've got grease coming out all the way around. Where all of our bearings are. Got a little bit of excess there. Just take that around the outside of it. And then we should be able to lift it off. And now you can see what we we're talking about. Just a little bit of excess there, that you're just going to wind up wasting.Now we'll take our bearing, we're going to place it right down in our race. And then we'll cap off the back with our seal. Right now our seal's going to fit in just like our race did. It's going to have a little bit of a pressure fit to it. Now very often in this situation, I see people using the four by four method. Kind of here, just placing that on and tapping it. As an option though, if you do have one of these. You can see that's designed to fit right on the top of the seal. And help drive it in.The biggest thing here is, just going to be getting it driven in squarely. You can see, this side's in a little bit further than this side. I'm going to start this side first. Now since we didn't have the opportunity to show you before, we're going to take a look at pulling a seal. Now this is a seal puller, we carry this on our website part number ptw1219. This is meant to hook underneath the seal. And then you kind of pull up on it, and just like our race you'll have to work all the way around that edge. Just bringing it out a little at a time.If you don't have that available. Another option would be a screwdriver. You just kind of get that under the seal, and turn it. And see, that'll allow you to also pop that out. We've taken care of our race. Our inner bearing. Our seal. The last component, before we put our hub back in place is going to be our outer bearing. Now with this bearing, I'll show you the hand packing method.This is definitely . Slightly dirtier method than the bearing packer. When we get grease on our hand we want to look at the larger side of the bearing. This is the smaller side. We have a larger side In between the inside and outside there's a gap. We can see our rollers in there. We want to grab that, and use that gap and shove grease inside of it. Now this is going to take a little bit, you want to work in the same spot until you get the grease pushed all the way through. We can see on the top there we've got a little bit starting to come through.And once we push it in the bottom, and you see it start coming out the of the top in those little drips, it's going to indicate that, that section's fully packed. Just need to work all the way around their outside edge now and do the same thing. Alright, once that's all the way around . The bearing will be ready for use.Now one more thing I like to do. We can see our inner bearing there, and our outer bearing. Well between the two, got a pretty big gap in there. If you'll take a . Pretty good amount of grease. We're just going to go all the way around. See how we can go all the way around the inside and just line that really well. The more grease we have in here, the less chance we have of any moisture getting in there, which can cause corrosion, rust, pitting. Pretty much things we do not like when it comes to bearings, races, and hubs.Put plenty of grease in there. And then this one does have the easy lube spindle, that'll even fill it in more. Now we can get our assembly slid on. I like to keep my thumbs on that outer bearing, just to prevent it from . inaudible 00:15:28 pushed off there. Now we can put on the original hardware that we removed, in taking off our hub the first time. In our case, we had our washer and our nut.Now most commonly you'll see pliers similar to this being used. We basically want to get that tightened down. Once it's fully tightened down you'll feel some resistance in the hub. We back it off just slightly. That'll give us a little bit more freedom of motion there. Something you don't want however . Is any movement in, or out on your hub. You want to be sure that everything is compressed, and you don't have what's called end play. Which would be the play in and out.Once we've got that set, then you'll put on whatever tight keeper yours came with. Get that put back in place. Now with an easy lube style hub, you're going to place your grease gun on the end, and then you can just fill the remainder of that hub up.Now for your typical applications, you're either going to have a solid cap, or a cap that'll have a rubber plug in it. A solid cap's going to be for an axle without the grease inaudible 00:16:51 here on the end. Goes on there. Just knock it on with your rubber mallet. Same with the one with the plug. Just gives you a removable area there, be able to cap that off.We'll show you how to put that on. Now as alternatives as well, a lot of times on boat trailers and marine kind of situations. You'll see a bearing buddy. This is going to apply a little bit of pressure on the grease, you'll fill it up. This kind of comes out just a little bit. That applies constant pressure on the grease to make sure we don't have any air, or anything like that. Then there is also an oil bath hub available. Now this is going to be for use with seals that are going to be designed specifically for oil bath use. You'll have to change that seal.We're using a double lip seal. There are also single lip seals available. Of course a double lip seal is going to give you just a little additional security. Keep that in mind when you order. But let's get this knocked on there now so you can see how that works. We just want to take the cap, we're going to center it. This is going to be very similar to what we did with the seal. And then just gently start tapping it around the outside. And it'll seep down on there for you.It's really going to be the same thing that you'll do with any of the end caps. Now with this side done, it's a good idea to take care of all the other hubs. Get them all on the same maintenance schedule. And as long as you'll periodically check the grease, take your trailer out for a trip occasionally. Just to keep everything lubricated. It should extend the life of these parts, and give us years of good service.
Customer Satisfaction Score:
95% were satisfied with this product
5% of customers were not satisfied
- Wrong item was ordered
- etrailer mistake
- Arrived Damaged
Customer Reviews
Replacement Trailer Hub Bearing - L44649 - L44649
Average Customer Rating: 4.7 out of 5 stars (388 Customer Reviews)
High-quality, tapered roller bearing is designed for high-speed use. Replacement part uses industry-standard number.by: Elvis06/12/2023
The description of this item is confusing; it states both wire rope & polyester strap leading me to think that it may include the rope/strap. This is also furthered by images showing the winch with the nylon strap. Before placing my order I contacted customer service and asked them twice, I was told by one person that the strap was included. I was also told that if it was missing for whatever reason they'd send me the strap. Another person, via phone, told me that it was not included.
At this point it was either place the order and possibly be missing the strap, or place the order and have an extra strap for no reason which I would have to ship back on my dime to return.
I placed my order just for the winch, banking that the first customer service person was correct and the strap was included. When I received the order and no strap was included I contacted customer service and was told that I was misinformed by one of their customer service reps and that they could send me a prepaid shipping label to return it. I then asked if instead I could get some sort of discount or free shipping on placing the order for the strap I needed for the winch, since I was given the wrong info. I was told no both via chat and phone. Customer support would rather pay to ship the item back to them, rather than giving me free shipping on my new order for the strap and also gain an additional sale. Makes no sense to me.
Overall this item gets one star because of the poor description/images. Hopefully etrailer updates this listing, or at least this review helps someone get all the right parts they need without having to reorder/wait longer.
by: Dean 04/27/2024
these are good bearings. super-fast shi pping
by: Clark10/13/2023
This was perfect for mounting my small snowmobile trailer tire with a slight modification. I wanted a side mounted spare holder and there are not any that I could find for my trailer tire. I used this mount but modified it slightly using one of the hubs I replaced on my trailer to mount to this. See photos.
by: Earl 04/09/2024
no problems best of quality.
by: Timothy10/02/2022
They was the wrong ones I will not ever buy anything from this company again and will tell all o know not to buy from them I ordered a full disc brake kit pad was missing you did send me that but 2 months
later brake line kit the the piece that connect the lines together was missing still have not replaced brakes yet because I have to buy more parts that should have came with the kits I bought from you and then you send me the wrong bearings Wow
by: Nicholas 03/09/2024
Proper fit for my 2014 wildwood 30kqbss. Looking forward to longer safer travels across the nation!
by: Gilbert 09/29/2023
good product. good fit. good bearings.
would buy again.
by: Victor R06/15/2019
The only reason I do not give you 5 stars is because your web site. When internet ordering, it should instantly state when a part is out of stock. Even nicer would be expected restocking dates. The parts received were exactly what I ordered for my electric brake conversion from surge brakes at far less expense than reparing the internally rusted surge brake system. There was a plethora of information on your web site to assist me in ordering the correct parts for the conversion. Plus there were videos to see how to complete the conversion and how parts were installed and adjusted. Customer service was excellent.
by: Rusty v02/08/2017
Ordered bearings and races for both hubs on my bass boat. Quality seemed better than local auto parts bearings. Also purchased other items on this order and was very pleased with products and customer service I received from etrailer. Informative, fast shipping, and courteous company to work with. Top notch!!
by: James B04/05/2018
Thank you for your assistance with my purchase of new hubs for my boat trailer. They are exactly as described and they fit perfectly on my trailer. I am attaching a few photo's of the hubs installed. I would recommend your company to everyone who needs hubs........EXCELLENT SERVICE.


by: Gary V10/29/2019
I needed these bearings for my boat trailer. Easy purchase, super fast delivery, and the right product. Installed them the same day and took the trailer along on vacation to the Florida Keys. Launched the boat in salt water several times, then towed it home again. Back home I just did a good lube with marine grease through the nipple on the bearing saver. Since then I have towed and launched many times in salt water and the bearings are still as good as the day I installed them. Good quality product that lasts well if you take care of it.
by: Frank 03/18/2023
I really appreciate the help and the knowledge that your people have about the products that I was wanting to purchase. Taking the time and explaining what was involved really help my understanding on how and what to order the next time around. I always feel confident that I'm receiving the correct items needed. Thank you for your patience.
by: Martin J.08/12/2016
Want to help out the next customer looking for the bearing, cups, and seals for 2000-01 tracker trailstar trailer. 1st you have to dismantle one of the hubs and see what trailstar decided to put in there the day they built it. You will find the rear cups and seals are considered "Special for some reason". Not a problem for etrailer, they have them in stock and the quality is excellent and are exact replacements. The parts I had to order were cup L68110, cup L44610, seal 168233, bearing L68149 and bearing L44649. Oh yeah, customer service should get a 10 star review. I had an issue with shipping co. because of new driver in my area. Etrailer got all up in their business for me and I didn't have to do anything. Customer service also called me the next day to see if everything was delivered and satisfactory. We need more companys like etrailer.com . Excellent!!
by: Tyson11/27/2022
Again, I haven’t put enough wear on these bearings to give 5 stars. So far, so good.
by: Martin J.06/27/2015
Want to help out the next customer looking for the bearing, cups, and seals for 2000-01 tracker trailstar trailer. 1st you have to dismantle one of the hubs and see what trailstar decided to put in there the day they built it. You will find the rear cups and seals are considered "Special for some reason". Not a problem for etrailer, they have them in stock and the quality is excellent and are exact replacements. The parts I had to order were cup L68110, cup L44610, seal 168233, bearing L68149 and bearing L44649. Oh yeah, customer service should get a 10 star review. I had an issue with shipping co. because of new driver in my area. Etrailer got all up in their business for me and I didn't have to do anything. Customer service also called me the next day to see if everything was delivered and satisfactory. We need more companys like etrailer.com . Excellent!!
by: John05/01/2021
I put these bearings on a 21 ft travel trailer. The original bearings were poorly greased and got too hot. With these bearings and a good quality grease these bearings never overheated even with driving in hilly terrain with frequent breaking. Definitely recommend!
by: Jrf07/10/2020
I had a hub and bearing go out on a boat trailer going down the road. Tried matching separate parts locally, but were not available. Was able to order all the parts from etrailer at one time. They had on hand and shipped right away. Parts were exactly what I was looking for. Perfect fit. Now if I would have known that the other side would have failed in the next 12 months I would have done them all at the same time.
by: Jim03/28/2019
I could not be happier,
What a diiference to have not just good brakes, but great brakes. Plus, the install was so easy, all the hardware was a perfect fit, instructions were right on the money (btw, I'm a retired engineer from a nuclear plant and I wrote procedures, so I'm picky) Anyway, towed the boat 1,000 miles and what a reassuring feeling to know that the equipment is in good working order and does the job when called upon.
I'm attaching a couple of pictures so you can see what I did.
Thanks again, I will be using etrailer in the future anytime I need something, feel free to pass on my comments
by: Troy09/17/2018
I bought this kit last year to replaced the existing brakes and bearings on our 2010 Jayco 23B. We went on eight different camping trips this year and they work great! We noticed a huge improvement when applying the brakes to slow down or stopping the camper altogether. I highly recommend this kit because they were easy to install and the noticed stopping power.Please feel free to ask me any questions regarding this kit.
by: Robert05/25/2020
I am reviewing the components and etrailer as they are not installed yet. Online ordering was easy - I was contacted immediately with shipping time and tracking numbers - it all went really well. The components showed up on time and in good condition. The boxes were a little hammered but UPS does that. Thanks etrailer good service - good prices: what else do you want?
by: Donald03/14/2018
I am very pleased and satisfied with service and feedback from you guys. I got my part for my trailer in a very timely manner and more importantly it was the right part. Thank you very much. I highly recommend you to others.

Donald

3/14/2019
I’ve had no issues with the bearings and plan on buying all of them from you as needed. Thanks
by: Scot 09/21/2016
Because my trailer was used i had no idea how repairs were made or if they were made. I am so pleased etrailer.com has reviews most good, some bad and videos with detailed descriptions. I carefully picked through all of it and decided, wisely, to order what was recommended and some extras to be sure. It paid off. I have ordered several things from etrailer.com over the year and never disappointed when i used the sites vast resources. It is so well put together and the "Gold Standard" is the customer support and follow through. I only need to go here for my boat trailer needs. Thanks
by: Charles06/04/2018
So,
I needed new bearings and seals for a 1980 travel trailer wherein the axle, hubs and bearings had no markings. Diana (CSR) helped me work through through the options and was able to identify the correct parts. The bearings and seals came in and were a perfect fit. Everything was on time and intact. Very happy with my first etrailer buy.
by: Gregory 09/15/2022
Purchased bearing races, tapered roller bearings, seals and dust cap to have for spares for our 2012 Catalina Santara 281BHS travel trailer. Quality products .
by: Shane C.06/08/2020
Fit great. Customer service was excellent. The lady I spoke with on phone really knew about trailer s an bearings. She is the reason I ordered an the reason I will order in future. She took her time listened to my trailer problem gave advice An helped me. My trailer is older an bearings weren't what should be on it. But she was right an parts fit great an l have put 2000 miles some new bearings.
25
388
Show More Reviews
See what our Experts say about this etrailer Trailer Bearings Races Seals Caps
- Recommended 5 on 5 1/2" Hub Assembly For Timbren Axle-Less Trailer Suspension SystemThat sounds like an awesome project! The Timbren Axle-Less Trailer Suspension System # ASR3500S06 you were looking at can use idler hub's or hub and drum assemblies with 5 on 5 1/2" bolt pattern. If you are planning on adding trailer brakes you will need Dexter Trailer Hub and Drum Assembly for 3,500-lb Axles # 84557UC3 which includes the correct # L68149 Inner Bearing, # L44649 Outer Bearing, # 58846 Grease Seal, and races. You will also need Electric Trailer Brake Kit # AKEBRK-35-SA If...
view full answer... - Oil Seal Recommendation for 1997 Ranger Boat Trailer with Bearings 204114 141478We've had this question before and based on the bearing numbers you mentioned the correct seal is the part # XLPROLUBE1980SEAL. The Inner Bearing # L68149, Inner Race # L68111, Outer Bearing # L44649 and Outer Race # L44610 would also be what you'd need.
view full answer... - Recommended Trailer Idler Hub Assembly To Replace 8-91A Dexter Hubs With L44643 BearingsThe Dexter Trailer Idler Hub Assembly # 8-91-05UC1 comes with the Bearings # L44649. You do have the option to order 2 of the Trailer Hub Bearing # L44643 and simply use these when you install the hub as they both use the same size Race # L44610. I would recommend using the etrailer Trailer Idler Hub Assembly # AKIHUB-440-2-G-1K as it already has all the correct parts for your axle.
view full answer... - How Do I Know Which Bearings Fit The Axle On A 2003 Magic Tilt Boat TrailerThe correct bearings for your 2003 Magic Tilt boat trailer will depend on the axle capacity. There are a few way of figuring out said capacity, but your title/registration paperwork should have this included. If you cannot locate you paperwork, you can also check the axle for a tag/label. These do fall off over time though, so if it is gone, the easiest way to confirm which you have will be to contact Magic Tilt with your VIN. This is something they keep on file for just this kind of thing...
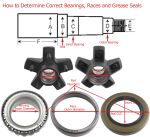
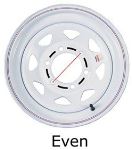
view full answer... - How to Determine Correct Hub Replacement for 1994 Jayco Eagle SD with Dexter AxleI'm happy to help find a hub replacement for your Jayco Eagle, but in order to find the correct one, I'll need to know the inner and outer bearing numbers as well as the grease seal inner and outer diameter. You could alternatively use a digital caliper # PTW80157 to measure the portion of the spindle on which each component rides. From your photos it appears your wheel bolt pattern is a 4 on 4, but you'll want to confirm that just to be sure. Below are a couple diagrams to help.
view full answer...
- Replacement Hubs and Related Parts for Older Snowmobile TrailerReplacement hubs (and bearings, races, seals, etc) for your "new" trailer can be selected easily by just confirming a few details from the trailer. First you need to find the sticker or plate on the axle that indicates the axle weight capacity. Then you need to pull the old bearings, inner and outer, to find their part numbers to let you select correct replacement bearings, races, seals and the hubs that work with those parts. Last, you need to match the wheel bolt pattern to ensure your...
view full answer... - Replacing Hubs, Bearings, Seals, and Races on a Trailer Yes the Dexter Axle UFP Idler Hub - 5 on 4-1/2" - E-Coated - 2,100-lbs Item # DA54FR is compatible with your axle. However, we do not have a hub kit available with the bearings and seals. I recommend Replacement Trailer Hub Bearing - Item # L44649 and Grease Seals (pair) Item # RG06-020
view full answer... - Does the 3.5K Dexter Nev-R-Adjust Electric Trailer Brake Kit Come with BearingsThe Dexter Nev-R-Adjust Electric Trailer Brake Kit # 23-468-469 comes only with the brake assemblies. For the correct bearing kit that fits hub and drum assemblies like part # AKHD-545-35-EZ-K or # 84656UC3-EZ which are used with these brakes you need Kit # BK2-100. This comes with an # L44649 bearing and matching race, an # L68149 bearing and matching race, plus a 10-19 seal with an ID of 1.719" and an OD of 2.565" as well as a cotter pin and tang washer. I have attached installation...
view full answer... - Solution for Replacement Hub on 1993 Ranger Trail Trailer With L68149 Inner and Outer BearingA # L68149 inner and outer bearing is not a standard combination. Your # 010-180-00 is also not a very common grease seal. Unfortunately, there are no replacement hubs available that match this combination. The first thing I would do is verify that they are in fact # L68149 bearings. The part number may be stamped on the side, or you can measure the inner diameter using a digital caliper like the # PTW80157. Assuming that is correct, since there are no replacement hubs available the best...
view full answer...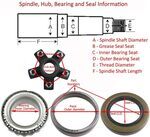

- AL-KO 7230 Hub and Brakes Replacement PartsDexter did acquire AL-KO axles and the Dexter Trailer Hub and Drum Assembly for 3,500-lb Axles - 10" Diameter - 5 on 4-1/2 # 84546UC3 is the full assembly replacement. If you just wan to replace the bearings and seal then you will want # L44649, # L68149, and # 58846. For your brake assemblies, you will use the Replacement Trailer Brake Magnet Kit for Dexter and Hayes / AL-KO 10" Trailer Brakes # BP01-110. Then for the brake shoes you either use the 10" x 2-1/4" Electric Brake Shoe/Lining...
view full answer...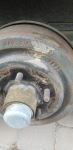
- Recommended Disc Brake Conversion For Tandem Axle Boat Trailer With 13 Inch WheelsWe don't have a kit for 13 inch wheels, but I can give you all the components you need. For your rotor/hubs, you will need 2 of the Kodiak Disc Brake Kit - 8" Rotor/Hub - 5 on 4-1/2 - Dacromet - 3,500 lbs # K2HR35D-8. This will require 4 of the # L68149 bearings, 4 of the # L44649 bearings and 2 of the Grease Seal - Double Lip - ID 1.719" / OD 2.565" - for 3,500-lb Axles - Qty 2 # RG06-050. Then you will need the tandem brake lines, and I recommend the Kodiak Hydraulic Brake Line Kit...
view full answer... - What is the Replacement Wheel Hub Needed on the Axle of a 1996 Jayco 1207 Popup TrailerWe have a hub that will fit your 1996 Jayco popup trailer. The Dexter Trailer Hub assembly, # 8-91-05UC1-EZ, that you referenced will work on your trailer axle. This hub uses the # L44649 bearings and has a 4 bolt lugs. Measuring the current hubs bolt pattern will tell you for sure if this hub will work for you. I have attached an article that will explain how to find what your wheel bolt pattern is on your current hub. If you do not have grease zerks at the end your axle spindles, then...
view full answer... - Will Trailer Hub and Drum Assembly # AKHD-545-35-K Work On EZ Loader TrailerThe bolt pattern of the # AKHD-545-35-K is a 5 on 4-1/2, but you will need to know what size your spindle is on your trailer to make sure the drums will work. The easiest way to see what you need is to pull the hub and drum and get the numbers off of the bearings. It will be stamped or etched on the side of the bearing as shown in the attached photo. If you cannot find the numbers you will need to use a digital caliper like part # PTW80157 and measure the spindle where the bearings ride...
view full answer...
- Replacement 5 on 4 3/4 Hub With LM67048 Inner Bearing and LM11949 Outer BearingWith your hub having an inner bearing # LM67048 and outer bearing # LM11949, it sounds like you have an agricultural style hub, like the Redline Trailer Hub Assembly # AH15450ECOMP. However, this will have a 4 on 5 bolt pattern and this will be the only bolt pattern this hub is offered in, unfortunately. With that being said, the best option we can recommend will be to replace your axle with something that uses more common parts. Though you will need to measure a few things, picture included,...
view full answer...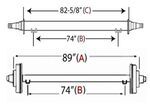
- Compatible Idler Hubs and Hub/Drums for Use with Timbren Axle-Less Suspension SystemTimbren Axle-Less Trailer Suspension System # ASR1THDS03 requires hubs that use inner/outer bearings # L68149 and # L44649. This set of bearings is popular and all idler hubs and hub/drums that use these bearings appears on the page I linked for you. A cost-effective hub/drum option is the 10-inch etrailer AxleTek hub # AKHD-545-35-K or for an idler hub part # AKIHUB-545-35-K.
view full answer... - Replacement Hubs and Bearings for a 1-1/16 spindleIf you have a straight, 1-1/16 inch spindle, the correct bearing kit may be Bearing Kit item # BK1-150. This kit comes with the inner/outer bearings item # L44649, which has an inner diameter of 1.063 inches, along with a 1.500 inch inner diameter grease seal and item # L44610 inner and outer race. If you grease seal has a 1-3/8 I.D. you will want the Spindle Grease Seal Set for item # L44649 Inner Bearing and 1.980 Bearing Buddy item # BB60005. Another option since you are looking to...
view full answer... - Beaing Buddy for L44549 Outer BearingI wasn't able to find any information on an L44549 but it's very likely that you actually have the much more common # L44649 bearing. It's really easy for grease, dirt, and time to cause that "6" to look like a "5" on the bearing number. Just to be sure I recommend taking a measurement of the inside diameter of the bearing with a digital caliper. If you get an inner diameter of 1.063 inches then you have the # L44649 bearing in which case the Bearing Buddy Bearing Protectors # BB1980A...
view full answer... - Are the Inner and Outer Bearings the Same on Trailer Hub and Drum Assembly # 8-257-5UC3-EZThe inner and outer bearings on Trailer Hub and Drum Assembly # 8-257-5UC3-EZ are same part number, L44649. I have included an image of the # R104BTREZ spindle showing how both the inner and outer bearing surfaces of the spindle are the same diameter, as well as a video review of Dexter Trailer Hubs and Drums 8-257-5UC3-EZ for you to check out.
view full answer...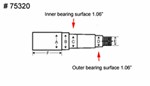
- Replacement Hub for Hammer Blow Hub Part HB732 on Old TrailerMy online research did not turn up any direct replacement parts for the HB732 hub you referenced. However, we can help you select new replacement hubs. The things you need to know in order to select replacement hubs are: the bolt pattern on your current hubs (and wheels); the bearing numbers from your inner and outer bearings; the grease seal number; and the axle's weight rating. For example, Dexter Hub # 84546UC3 has a 5 on 4-1/2 bolt pattern, works with inner bearing # L68149 and outer...
view full answer...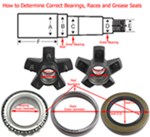
- 5200 lb Axle Brake Assembly Torque SpecsAccording to Dexter Axle, the attachment bolts for a 5-bolt brake assembly should be torqued to 30-50 foot/lbs. If you don't have a torque wrench handy, if you tighten the bolts until the lock washers flatten out, you'll be pretty darn close to that range.
view full answer... - Will Dexter Hub # 84545BX, Kenda Tire/Wheel # AM3S440, Redline Spindle # TRU47FR Handle 1600 LbsThe Dexter Trailer Hub Assembly, part # 84545BX, is rated for 1750 lbs. So two of the hub assemblies will work on a 3500 lb axle. The hub does come with one # L44649 outer bearing and race, one # L68149 inner bearing and race, one # 58846 grease seal, and a grease cap. The TruRyde Spindle, part # TRU47FR, is rated for 1750 lbs and two spindles will work on a 3500 lb axle. This spindle will work with the bearings and seal in the Dexter hub assembly # 84545BX. The Kenda Loadstar ST205/75D14...
view full answer... - What is Included with the etrailer.com Hub and Drum AssemblyThe etrailer.com hub and drum assembly, part # AKHD-545-35-K, includes one hub, one of each bearing, parts # L68149 and # L44649, one of each race, parts # L68111 and # L44610, the grease seal, part # 58846, and one set of lug nuts. So you need two of the complete assemblies per axle on your trailer if you're replacing all of them.
view full answer... - 4-Lug Hub With Inner and Outer Bearings L44649We do have a hub with a 4 on 4" bolt pattern with both inner and outer bearings # L44649, which is the Trailer Idler Hub Assembly for 2,000-lb Axles - Pre-Greased # AKIHUB-440-2-2K. This hub does come with the bearings, races, grease seal, and grease cap. The cost can be found on the product page, and I have added a link below to a video review for you to check out as well.
view full answer... - Recommend Disc Brake Kit For A 1996 Float on Brand Boat TrailerWhen installing a disc brake system on your 1996 trailer The Kodiak Disc Brake Kit - 12 inch Hub/Rotor - 6 on 5-1/2 - Dacromet/KodaGuard - 5,200 to 6,000 pounds # K2HR526DKG will not work because you have the 4 bolt pattern and this will only work with 5 bolt systems. You could use The Kodiak Disc Brake Kit - 10 inch Hub/Rotor - 5 on 4-1/2 - Dacromet - 3,500 pounds # K2HR35D which will work on your 4 bolt system. You would also need to figure out your bearing numbers. For # K2HR526DKG...
view full answer...
Do you have a question about this Trailer Bearings Races Seals Cap?
Info for this part was:

Expert Research:
Mike L

Expert Research:
Robert G

Expert Research:
Michael H

Expert Research:
Jeff D

Expert Research:
Jameson C

Expert Research:
John H

Expert Research:
Adam R

Expert Research:
Jeffrey L

Video Edited:
Chris R

Updated by:
Wilson B
At etrailer.com we provide the best information available about the products we sell. We take the quality of our information seriously so that you can get the right part the first time. Let us know if anything is missing or if you have any questions.
Gary V.
10/30/2020
Still going strong! Im truly happy with the quality and durability.