

 Arrives before Christmas
 To see if this custom-fit item will work for you please tell us what vehicle you'll use it with.


The large, digital, LED display and clearly labelled buttons on this proportional controller make it easy to use. Includes 3 levels of boost, a slide-bar manual override, built-in short circuit protection, and automatic leveling.
Features:
Specs:
The controls on the BRAKE-EVN are elegantly simple and user-friendly. Use the clearly-marked push-buttons to change the level of gain or boost. Gain lets you set the maximum amount of power that will be applied to your trailer's brakes. Typically, the gain (also known as output) is only readjusted when you experience changing road conditions or if the weight of your trailer changes.
The Tekonsha BRAKE-EVN also features a large LED display that's easy to see so you can check on your current gain setting with a glance, as well as diagnostic information.
The boost setting controls the aggressiveness of your trailer's braking, meaning how quickly the brakes reach the maximum braking level. You can adjust this when you're towing heavy loads and you need more umph to bring your trailer to a stop. Your tow vehicle doesn't need that much power to brake in time, but your heavy trailer does.
Depending on the level of boost, your trailer brakes can start at either 13 percent or 25 percent of the set braking output. What this means is that, instead of starting at 0, the brakes will start at 25 percent and get to 100 percent sooner. This keeps the trailer from pushing your tow vehicle forward.
If your trailer weighs less than your tow vehicle, no boost is needed. But, if you want your trailer to lead the braking, you can select level B1.
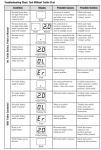
Boost Levels:
| Approximate Gross Trailer Weight | Boost Level | Increase in Initial Power Output |
|---|---|---|
| Less than tow vehicle GVW | B1 | 13% |
| Equal to tow vehicle GVW | B1 or B2 | 13% or 25% |
| Up to 25% more than tow vehicle GVW | B2 or B3* | 25% |
| Up to 40% more than tow vehicle GVW | B3* | 25% |
*Both B2 and B3 offer a 25-percent boost in initial power. But the braking curve for B3 is more aggressive than that of B2. This means that, even though you will start out with the same intensity when using these boost levels, you will get an overall more aggressive braking experience with the higher level. So if you use B3, you will reach maximum braking sooner than if you use B2.
To adjust the boost, use the blue push-buttons on the top of the BRAKE-EVN.
The self-leveling feature of the BRAKE-EVN ensures that the brake controller continues to function even as you drive up steep hills or through the mountains. You can mount it at any vertical angle, and the controller will level itself automatically. But keep in mind that the BRAKE-EVN must be horizontally level and parallel with the direction of travel to work correctly.
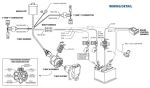
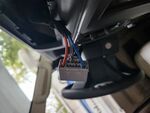
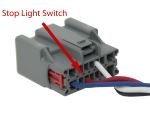
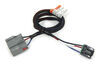
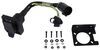
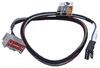
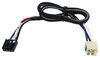
The included wiring harness plugs into the BRAKE-EVN at one end and then into the factory port on your vehicle at the other. No need to cut and splice any wires!
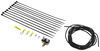
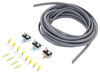
Note: See etrailer.com's exclusive 7- and 4-way brake-control installation kit (ETBC7 - sold separately) if you don't already have a 7-way plug at the back of your vehicle.
The Tekonsha BRAKE-EVN brake controller comes equipped with proportional braking to give you the best towing experience. Proportional braking means that your trailer brakes mimic your tow vehicle's brakes. If you slam on the brakes in your vehicle, your trailer brakes will activate with the same intensity; if you brake lightly, your trailer brakes lightly too. The trailer's braking is in proportion to your vehicle's braking. This saves wear and tear on the tires and the brakes on both your vehicle and trailer.
The BRAKE-EVN uses an internal inertia sensor to detect how your vehicle is braking so it can send the right amount of braking power to your trailer. It measures the inertia of your tow vehicle and activates the trailer's brakes to slow at the same rate. The result is uniform braking across your towing setup. No push-pull action - just smooth, proportional braking every time.
 Alternate Instructions
California residents: click here
Videos are provided as a guide only. Refer to manufacturer installation instructions and specs for complete information.
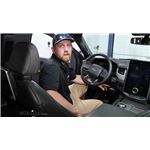
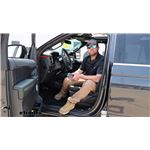
Hey everybody, Ryan here at etrailer. Today on our 2022 Ford Expedition, we're gonna be showing you how to install the Tekonsha BRAKE-EVN trailer brake controller And we're gonna be doing that in conjunction with the Tekonsha adapter plug. Before we get into that, let's just take a couple of minutes, check this out, and make sure it's gonna be right for you. There's a ton of different brake controller options on the market out there, and what one is gonna be best for you is really just gonna depend on a couple things, you know, what are you trying to accomplish and the appearance of it, I feel like, is a big deal, especially in a vehicle like this. So with this one, I like to call these more traditional style brake controllers. You know, been around for a long time.
They mount up to your dash. And this is how you can operate it. You make all your adjustments and everything right here. Surprisingly, this is a actually a pretty good fit for the Expedition. A lot of late model vehicles have a hard time sometimes actually bolting this style up just 'cause there's not a lot of room.
But that's not the case with the Expedition. One of the things I like about this one, it's relatively compact, probably about the size of a deck of cards if I had to compare it to something. And so it doesn't really take up a lot of space and I actually think it kind of matches the color scheme, at least in our truck here. But if you're someone that, you know, really don't want to see or have to deal with a brake controller mounted like this, there's a couple of other options that I like to recommend. One of 'em would be the REDARC Tow-Pro.
Those are really good. We do a ton of 'em. Had a lot of luck with them. The thing with those, the main body of the brake controller will live underneath the dash so you won't see it at all. And the only thing you'll be able to see is a small dial or knob.
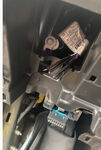
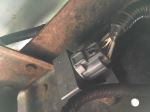
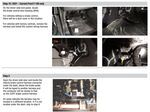
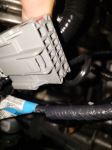
It's about that big around. You could mount it, you know, wherever there's space, probably right here in this area if I had to guess, and that's how you make all your adjustments. So that one really does a good job of blending in and not being too noticeable. If you don't want to see anything on the dash, this would be a good solution. This is the Curt Echo in-line brake controller. And how this would work, your 7-way, you know, this just Ts into it. So plug into the 7-way, the other end would plug into the wiring harness back here, and then you would mount this up. So it's super easy. This'll live underneath the vehicle and you won't see it at all. Now the way you make your adjustments is through a mobile app and so it's really convenient. We do these quite a bit. Curt makes some really good wireless brake controllers and this is one of 'em. And so we've yet to really run into any issues in terms of connectivity or anything along those lines. Back inside. The brake controller is gonna work for trailers that have one up to four axles, so pretty much all your bases covered there. And it's going to work with trailers that have electric brakes only. This is a proportional style brake controller, which is what I recommend pretty much all the time. Just makes for a smoother braking experience. And so what happens, the trailer brakes are gonna match the braking pressure that you apply to your Ford whenever you're stopping. So for example, you know, if you're rolling up to a stop sign or something and you're halfway on the brake, the trailer's gonna match it. On the other hand, if you're going fast and there's an emergency or something, you gotta slam on that brake, the brake controller is going to send that power back and the trailer will match it. So just makes that braking experience a lot more comfortable and predictable. One of the things I personally like about this controller is you get the adjustments that are important and not really a whole lot else, so it really helps simplify things. So up here, you have your gain, which is essentially gonna be almost a power to the brakes. So let's say, you know, if you had an enclosed trailer or something, for example, and it was unloaded, you don't really need it to be super aggressive, right So you could dial that down and once it's loaded up, if you need some extra help in terms of getting the trailer slowed down, you can always ramp that gain back up. So you can really fine tune it there. And then there's boost settings as well. So you have boost one, boost two, boost three, and you can turn that boost off. And so what that's gonna do is start the braking power at a higher level essentially. So you know, let's say if your trailer weighs about the same or less than the Expedition, boost one or two usually would do the trick. If you got something really heavy, maybe a big bumper pull camper or something, two or three might be better. Like I said, it just starts the braking power out at a higher output as soon as you hit the brake, so it gets a little more aggressive, which is needed sometimes. And then you're gonna have the manual override, of course, which is this lever. And when you apply this or slide it over. it's gonna just apply the trailer's brakes. So you would use that in the event of a sway situation. You know, if your trailer kind of starts to catch wind or get away from you a little bit and you're on the highway or whatever, you can always kind of ramp this up slowly, applying the brakes to the trailer, kind of slowing it down and getting it to track straight again. If you're looking for a really simple, easy-to-use, and easy-to-figure-out brake controller, this is definitely one to consider. As far as the installation goes, really not bad on this vehicle. There's a factory connector plug behind the dash, pretty easy to get to. You pop a little panel off, plug the adapter in, plug the brake controller in and mount it up, and that's really all there is to it. It really shouldn't give you too many issues or take up a bunch of your time, but if you'd like to hang around, feel free to. We'll go ahead and get started on it now. To begin our installation, we're gonna be here in the driver's seat in our Expedition. And we need to locate the factory connector plug. That way, we can plug in our adapter harness here. So it should be located right here in this area behind this coin pocket. A lot of times you can kind of just grab that and unsnap it. Might help if you get a trim tool and pry behind there and work it free to get it removed. And inside of there, that's where our connector plug should be located. Here's a better look at that connector plug that we're looking for. There is a little plastic fastener kind of just holding it to the side. I'm gonna come in there and release it. That way, we have some more wire to work with and we can actually see what's going on. You'll see we'll pop that free. And this is a fastener so it's kind of just pushed into a piece of metal. I took a trim tool. You can use a flathead screwdriver, kind of get behind it and just pry it out. Now we're gonna remove this dummy plug here and push down on the center of that to release it. And we're not gonna be reusing this. But we can take our new adapter plug and plug it right in. We're gonna take the other end of our adapter and I'm just gonna feed it in and kind of angle it to the left and down. And I'm just trying to get it to drop down underneath the dash somewhere, and that way, we can kind of reach up there and grab it. Got that plug to drop from underneath our dash, and, you know, there's really no special way or special path to take. There's a lot of stuff going on in there. What I did, I kind of angled this to the left, pushed it in, and, you know, was able to get it to drop down. So that's what we're working with. And with that down there, now we can simply just take our little cover there, pop that back into place. Now you can figure out where you wanna mount up your brake controller. We're gonna put ours right here in this area. Pretty standard. It's clear behind the panel so we don't have to worry about drilling into anything. I like to put a piece of tape on it and get a level, you know, or you can eyeball it. It's up to you, but that's my level line. And then I have my two dots here that I used for my, you know, I took the bracket and held it up where I wanna secure this. So what I like to do is take a couple of the screws, (drill whirs) kind of just barely get 'em started, (drill whirs) pull 'em out, get our tape off, then you have some spots to work with there. We'll grab a bracket and get it installed. Take our bracket and get our screws started. I do like to completely thread these in by hand. Just have a little more control that way. I'm gonna go ahead and get this tightened down. Grab your brake controller now. On each side of it, there's gonna be a spot here. This is where we're gonna put our bolts through to attach to the bracket. They're just plastic inside of there though, so what I like to do is take the screws and get 'em started, you know, and tighten them down. That way, it'll kind of precut the threads in the brake controller and make it a lot easier to get this thing set up when we're holding it up to the bracket. So I did that already on each side. Just kind of a pointer that I find useful. And with that now complete, get our brake controller bolted up. With the brake controller squared away, now what we can do is simply just plug the brake controller plug into our adapter. It's lighting up, so we got power, but it's a good idea to test this to make sure that it's working properly. Just hooked up to a test box which simulates a trailer. Chances are pretty good you're not gonna have one of these, so you can always just use your trailer to do this. But keep in mind, if your trailer has any issues, it might mislead you into thinking it's something you did on the vehicle side. Our display changed to AC, so it knows we're connected to the trailer. And just a real quick test that you can do to make sure power is getting sent back is take your manual override lever, push it off to the side. Our numbers are increasing and we're getting the power to our trailer. Let me verify this works. I went ahead and just used some wire loom and zip tied everything up to help clean up the install look. Really not much to it. Whenever you do zip tie wires or or run anything, make sure you're not around any moving parts like the, you know, steering column, steering shaft, things of that nature. And that'll finish up our look at and our installation of the Tekonsha BRAKE-EVN trailer brake controller on our 2022 Ford Expedition.


Do you have a question about this Trailer Brake Controller?
Info for this part was:
At etrailer.com we provide the best information available about the products we sell. We take the quality of our information seriously so that you can get the right part the first time. Let us know if anything is missing or if you have any questions.


Thank you! Your comment has been submitted successfully. You should be able to view your question/comment here within a few days.
Error submitting comment. Please try again momentarily.