
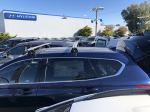
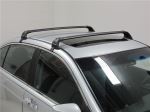
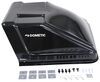
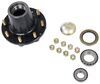
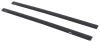
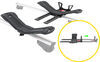
Yakima BaseLine Roof Rack for Naked Roofs - JetStream Crossbars - Aluminum - Black - Qty 2


To see if this custom-fit item will work for you please tell us what vehicle you'll use it with.
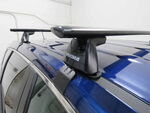
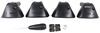
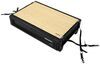
This stylish, aerodynamic Yakima roof rack gives you the space to carry gear on your vehicle. Rubber strips in the top channels push down to load carriers or accessories - no need to trim. Installs on your vehicle's naked roof.
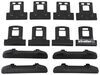
Features:
Specs:
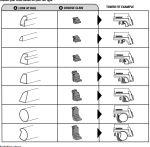
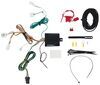
 Alternate Instructions
California residents: click here
Videos are provided as a guide only. Refer to manufacturer installation instructions and specs for complete information.
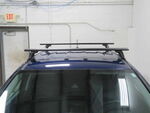
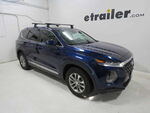
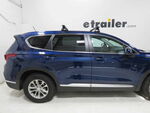
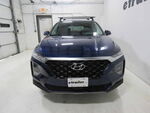
This is Curt with etrailer, and today we're gonna be taking a look at the Yakima BaseLine roof rack with JetStream crossbars. We're gonna see how it fits and how it installs on our 2025 Mazda CX-5. A roof rack is an excellent way to get those extra items to and from your next adventure. While the CX-5 does have a decent amount of cargo space back here, if you've got it fully loaded with passengers plus everything they're bringing with them, you're gonna run out of space back there really, really fast. And that's where a roof rack is gonna shine the most. That and when you have items that are either too big or items that you just don't want riding in the car with you.
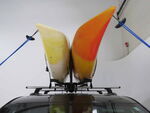
So the type of accessories that we can put up here would be roof boxes and baskets for the extra cargo. You could also put kayak carriers, bike carriers, ski and snowboard carriers, awnings. All of these are things that can go on a roof rack and make your adventure that much more fun. So to start, we're gonna have a weight capacity on these crossbars of 165 pounds. However, you always wanna double-check your owner's manual and see what the vehicle's roof capacity is.
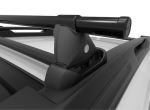
If it's lower than 165 pounds, you're gonna have to stick with that number. But the JetStream crossbar is an arrow style of crossbar. It's got this kind of ovular shape. This is gonna make it a lot more aerodynamic than your traditional round or square bars, and it's gonna make them much quieter and more comfortable as you're riding down the road as well. It's gonna work with your clamp-mounted or your T-track accessories.
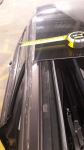
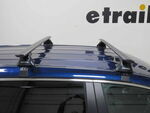
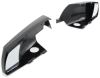
The T-track is easily accessible through the end cap here. All you gotta do is remove your end cap. There's a push-down weather strip up top. And you slide your accessories over and into place. This is also an overhanging roof rack, which means there are parts of the bar that extend out past the tower.
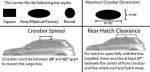
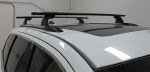
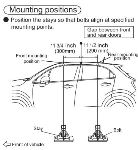
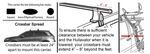
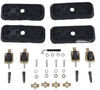
Now, they're not far enough to extend out past the door threshold, so this isn't a hazard as far as hitting your head on it or anything. But what it can allow you to do is it just gives you more bar space. We have 50-inch bars up here, but it allows you to use pretty much the entire bar. And by that, I mean, you have the opportunity to mount something with the clamps on the outside of the tower, and that gives you a better opportunity to carry two rooftop accessories side by side, if they'll fit and if they stay under the weight capacity. So let's take a look at how it fits on the roof here. The first measurement I'm gonna take is gonna be our crossbar spread, and that's gonna be the distance between my crossbars. This is a really important measurement for one main reason. Every rooftop accessory has a minimum and a maximum crossbar spread that'll allow you to use it. That measurement, if I'm going from the center of my front bar to the center of my second bar, is going to be right at about 30 inches. And to me, that's perfect. The minimum-maximum for a lot of crossbar accessories are gonna be between that 25 and 35-inch mark. So 30 being right in the middle, I am not worried about finding accessories that are gonna fit on this roof rack. The other measurement that I'm gonna take is how much height is this adding to the CX-5 So if I go from the middle of the roof to the top of my bar, I'm right at four inches. That's a pretty good amount. Now, at four inches, if you know your vehicle height and the height of your accessory, add that four inches, you'll get your overall heights, you'll know if there's any low-clearance areas if you're gonna be able to make it. So if you pull up to a parking garage, you'll know whether you can enter it safely or not. The other measurement I'm gonna take is how much space do we have between the roof and the bottom of the bar. And in that instance, we're looking at just a hair under three inches in the back, and about 2 3/4 inches on the front. Now, that's important because it'll let you know if your clamp-mounted accessories can go under it, and this is plenty of space for just about any clamp mod accessory I've ever come across. But you could also use it to help determine if you have a model with a sunroof, whether or not it's gonna be able to safely open or close. So we got two different distances on the front and on the back. Now, as far as where up here on the roof you can put these bars, we are gonna have to put them in a very specific location. They will be included in Yakima's instructions. So follow along and I'll show you exactly how to get these installed on the roof of your CX-5. But when it comes to the install, there's a few things that you definitely wanna keep in mind. One, you're gonna get two different fit kits, okay One of these is gonna go on your front crossbar, the other is gonna go on your back crossbar. How do you determine that Well, in your instructions, there is going to be a table, and it's gonna list several different vehicles. What you'll need to do is find the one for the Mazda 5 in the 2025, and it's gonna follow the table across. And it'll tell you which of these fit kits you need to do. BC154 or BC130, it'll tell you which one they go on and where. But the other thing it's gonna give you is measurements. However, they're not too clear about what those measurements mean. They'll be listed as M1, M2, M3 and M4. The M1 measurement is gonna be the distance between the towers on your front crossbar. The M2 measurement is gonna be the distance from the front of your tower to the top edge of your windshield glass. The M3 measurement is gonna be the distance of the towers apart on your second bar. The M4 measurement is going to be from the center of your front bar to the center of the second bar. So it's gonna give you how far apart your towers need to be, and it's gonna tell you how far apart your crossbars need to be. So it is essential that you get your front crossbar installed first, which we've already done. Now, the process to actually install it is exactly the same on the front and the second bar. However, the difference is gonna be the distance apart between the towers and where it's placed up here on the roof. For our second bar, we need to take out the base pads and the clamps from the foot pad BC154. That's what we need for the second bar. So I'm gonna take one of my towers here, turn it over on its back. I'm gonna take my foot pad. And right here on this metal bar right here, you can see the cavity, it's gonna clip right in. Now, it's gonna take a little bit of pressure pushing down on it, but you wanna get that clicked in and secure. If you need help figuring out which way it needs to go, this arrow at the bottom should be pointing toward the outside of the tower, so where your bolts and things are exposed, make sure the arrow is pointed that way. Gonna remove the end cap. I'm gonna lift up on this tab, pull this out. And then at the top here, we've got this metal block, creates kind of a T-catch there. It's gonna go right through this T-slot just like that. We wanna make sure that that arrow is pointing to the outside, or basically all these exposed bolts and everything is pointing to the outside. So I'm just gonna slip that through the track here, and slide it on over. Now, this is gonna be really difficult to pick up on the camera, but there is a scale here. There's numbers and hashes moving along here. They're very, very faint. But the M3 measurement, which is the distance between our towers on the second bar, calls for 36 3/4. So what I'm gonna do is I'm gonna line this up so that the edge here lines right up with 36 3/4, which is going to be right here. So I'm gonna line it right up to that hash. At this point, I'm gonna hold it in place. Right here on the tower, we've got this tab here. If I pull out on that, what that's going to do is expose this bolt right here. There are also three different hashes so that you can kind of angle it. I'm gonna keep it on the middle one. I'm gonna grab the tool that is provided by Yakima, and I'm gonna get this tightened down in place, making sure that the edge of it stays at 36 3/4. And this is a torquing tool. So once I've got it tight enough, according to Yakima specs, you're gonna hear a loud pop. (tool popping) Just like that. Come out of the tool. Now it's locked into place, it's not gonna slide anywhere on me, I'm gonna go ahead and replace my end cap. Next, it's gonna be time to attach our clamp. And the way that we do that is this tab right here, it's like more like a door, I'm gonna open that up, it's gonna expose this bolt here. And at the top of this bolt right here where my finger is, there's a catch that we're gonna get on this loop. So what we wanna make sure of is that our clamp, the rubber portion, the rubber pad of it is facing inward. I'm gonna slip it through this slot here. And I'm gonna bring the catch of this bolt up so that it essentially goes through that open cavity on the clamp and catches in place just like that. Then I'm gonna go ahead and close the door again, and it's gonna lock it in place. It's not gonna shift off of there. Just a heads up, since I put the front bar on already, I've figured this out, but there's quite a bit of a difference between this rail that it's going to sit on, that our rubber pad is going to sit on, and where the edge is. And it only gets bigger as we go back. There is a bolt on here that can make sure that your clamps can extend out as widely as possible. It'll be this bolt right here. But I'm gonna wanna have that reach to make sure that it's gonna fit on here properly. Right now, it's angled a little bit too vertically. I wouldn't be able to set it up there and get the clamp around the edge of the car. So as you can see, as I loosen this bolt, I'm getting more of an angle out this way that's gonna allow me to attach it properly. So I'm gonna go ahead and loosen this out really as much as I can. Just give me all the room that I can. I've got my crossbar ready to go up on the roof, but before I put it up there, I wanna get a general idea of where it needs to go. And this is where that M4 measurement is going to be used. So the M4 measurement is 30 inches. And that's gonna be from the center of my front bar to the center of my rear bar. So I'm just gonna go ahead and come up here and get about to the center of that bar, bring it out to 30 inches. That puts me right around this neighborhood here. So I'm gonna go ahead and grab my crossbar and I'm gonna get it in this general area. We loosened that bolt up so that we can get these clamps as far out as possible, because you're gonna see right now that as I put this over the top, I really wanna make sure that that clears all the way around the vehicle and doesn't end up just kinda sitting on the top of it. So as I maneuver this around a little bit, I'm gonna need to go over and just kinda double-check to make sure that I've got it sitting in the right spot. One of the things that you might notice is that, unlike the rubber pad on the front where it's got a little notch, it sits in the gutter, it's got a notch in the footpad that's gonna kinda come over this, we don't have that on the back pad. The back pad at the measurements provided by Yakima sits half and half on the roof in that little rail space there. I'm pretty confident it's gonna clamp down just fine. If it bugs you and you wanna get it a little bit more in the center, you could always take it off and bring your towers in just a little bit closer. I don't really think it's necessary, so we're gonna move forward from where we're at. So one of the things you may notice is that our clamp here isn't quite long enough to reach, so I need to loosen that up and get a little bit of slack out of it. I'm gonna use the Yakima tool, and through this bolt right here, I'm just gonna loosen that up some, and it's gonna drop my clamp down so that it's gonna be able to reach down and around the lip of my roof here. The other thing is, is through this bolt here, we extended this out a little bit far. So now that I've got it in place where it's gonna go, I'm gonna tighten that down and just get it kinda closer and snugged up to the roof and give it a little bit of a better angle. So there, just until it's just touching it. But now I've got everything in position, my clamps are the right length, they're in the right spot, so I'm gonna go through this bolt again and I'm gonna start tightening it up. Now, as I tighten this clamp up closer to this portion of the doorframe here, I just wanna get it to where it's just snug. I'm not trying to tighten it down too much. If you overtighten one side while leaving the other side loose, it's probably gonna knock the other side out of position. You're just gonna have to loosen everything up, reposition, remeasure, whatever you gotta do, and start from scratch. If I get it to where it's snug, it's not gonna be moving on me anywhere, and I can go do the same on the passenger's side. With both sides snug, I'm gonna start really tightening these down. Now, it's a good idea, for the same reason I just gave, I like to kinda incrementally tighten it down. So I'm gonna tighten down a bit on the driver's side, go do the same on the passenger's side, bounce back and forth, until it'll let me know when it's tight enough. So again, this is a torquing tool. So as soon as I get my clamp tight to where Yakima wants it, I'm gonna get that loud click out of it. And at this point, I can go ahead and close this door back over. Once that's done, I can go ahead and install my tower cover. Now, before I do, something I wanna point out is that, out of the box, Yakima's gonna give you these kind of plastic covers like this. These can be opened up using a flathead screwdriver or something similar. My suggestion would be that you take advantage of Yakima's SKS, or same key system. It'll let you get metal lock cores for each one of your towers, as well as keys to go along with it. And you have the opportunity to get those keys keyed alike to other Yakima accessories. So for instance, if you have a roof box from Yakima that you're gonna use on your roof rack, that it locks, it's got its own set of keys, you can order locks for your roof rack, keyed alike to that roof box, so you just don't have multiple Yakima keys. You have the opportunity to have one key that does all of your Yakima accessories. But in order to put this on, we've got these two hooks here at the bottom, those are gonna clamp onto these spaces here. (lock clacking) And then it's just gonna swing upward and pop into place. (lock popping) So I think it's solid, it's up there. I'm ready to load it up and get out on my next adventure. But if after watching this video, you've still got questions about this roof rack, go ahead and leave those in the comments below. We would love to answer those questions for you and share those answers with other neighbors just like you so they can make the best decision for themselves. Once again, this is Curt with etrailer. Thanks for stopping by.


Do you have a question about this Roof Rack?
Info for this part was:
At etrailer we provide the best information available about the products we sell. We take the quality of our information seriously so that you can get the right part the first time. Let us know if anything is missing or if you have any questions.


Thank you! Your comment has been submitted successfully. You should be able to view your question/comment here within a few days.
Error submitting comment. Please try again momentarily.