
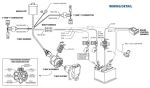
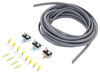
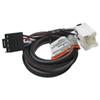
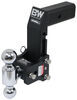
Tekonsha BRAKE-EVN Trailer Brake Controller w/ Custom Harness - 1 to 4 Axles - Proportional


To see if this custom-fit item will work for you please tell us what vehicle you'll use it with.


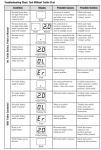
The large, digital, LED display and clearly labelled buttons on this proportional controller make it easy to use. Includes 3 levels of boost, a slide-bar manual override, built-in short circuit protection, and automatic leveling.
Features:
Specs:
The controls on the BRAKE-EVN are elegantly simple and user-friendly. Use the clearly-marked push-buttons to change the level of gain or boost. Gain lets you set the maximum amount of power that will be applied to your trailer's brakes. Typically, the gain (also known as output) is only readjusted when you experience changing road conditions or if the weight of your trailer changes.
The Tekonsha BRAKE-EVN also features a large LED display that's easy to see so you can check on your current gain setting with a glance, as well as diagnostic information.
The boost setting controls the aggressiveness of your trailer's braking, meaning how quickly the brakes reach the maximum braking level. You can adjust this when you're towing heavy loads and you need more umph to bring your trailer to a stop. Your tow vehicle doesn't need that much power to brake in time, but your heavy trailer does.
Depending on the level of boost, your trailer brakes can start at either 13 percent or 25 percent of the set braking output. What this means is that, instead of starting at 0, the brakes will start at 25 percent and get to 100 percent sooner. This keeps the trailer from pushing your tow vehicle forward.
If your trailer weighs less than your tow vehicle, no boost is needed. But, if you want your trailer to lead the braking, you can select level B1.
Boost Levels:
| Approximate Gross Trailer Weight | Boost Level | Increase in Initial Power Output |
|---|---|---|
| Less than tow vehicle GVW | B1 | 13% |
| Equal to tow vehicle GVW | B1 or B2 | 13% or 25% |
| Up to 25% more than tow vehicle GVW | B2 or B3* | 25% |
| Up to 40% more than tow vehicle GVW | B3* | 25% |
*Both B2 and B3 offer a 25-percent boost in initial power. But the braking curve for B3 is more aggressive than that of B2. This means that, even though you will start out with the same intensity when using these boost levels, you will get an overall more aggressive braking experience with the higher level. So if you use B3, you will reach maximum braking sooner than if you use B2.
To adjust the boost, use the blue push-buttons on the top of the BRAKE-EVN.
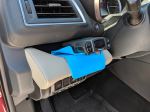
The self-leveling feature of the BRAKE-EVN ensures that the brake controller continues to function even as you drive up steep hills or through the mountains. You can mount it at any vertical angle, and the controller will level itself automatically. But keep in mind that the BRAKE-EVN must be horizontally level and parallel with the direction of travel to work correctly.
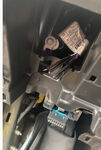
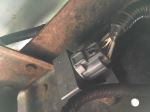
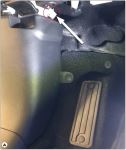
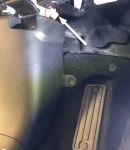
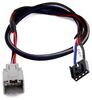
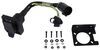
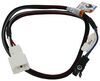
The included wiring harness plugs into the BRAKE-EVN at one end and then into the factory port on your vehicle at the other. No need to cut and splice any wires!
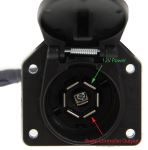
Note: See etrailer.com's exclusive 7- and 4-way brake-control installation kit (ETBC7 - sold separately) if you don't already have a 7-way plug at the back of your vehicle.
The Tekonsha BRAKE-EVN brake controller comes equipped with proportional braking to give you the best towing experience. Proportional braking means that your trailer brakes mimic your tow vehicle's brakes. If you slam on the brakes in your vehicle, your trailer brakes will activate with the same intensity; if you brake lightly, your trailer brakes lightly too. The trailer's braking is in proportion to your vehicle's braking. This saves wear and tear on the tires and the brakes on both your vehicle and trailer.
The BRAKE-EVN uses an internal inertia sensor to detect how your vehicle is braking so it can send the right amount of braking power to your trailer. It measures the inertia of your tow vehicle and activates the trailer's brakes to slow at the same rate. The result is uniform braking across your towing setup. No push-pull action - just smooth, proportional braking every time.
 Alternate Instructions
California residents: click here
Videos are provided as a guide only. Refer to manufacturer installation instructions and specs for complete information.
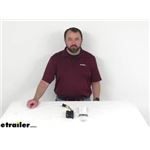
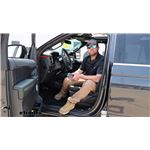
Hi, everybody. Andy here with etrailer.com. And today, we're gonna take a look at this Tekonsha BRAKE-EVN proportional, trailer brake controller for one to four axles. Now, this brake controller activates your trailer brakes in proportion to your vehicle's braking action. It automatically adjust your trailer's braking based on the deceleration of your tow vehicle. And it activates immediately.
There's no pausing like with time delayed brake controllers. This controller will work with trailers up to four axles or eight brake assemblies. And it is designed for use with electric brakes only. Now, it automatically levels. The internal sensor detects deceleration even if the controller is not mounted level.
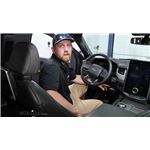
And it can be mounted at angles between -20 degrees and 70 degrees in the vertical plane. The boost setting is going to let you adjust the aggressiveness with which the brakes are activated. You can get full power output faster by pressing the plus button, as you see right here, to increase that activation speed, or achieve smoother braking by pressing the minus button that you see there to supply power gradually. This also has a built-in slide bar manual override. Now, this features an easy to read LED display to keep you informed of your trailer's braking.
The display is gonna show the gain setting when the control is activated. And it can also be used to check for connectivity with your trailer to determine your boost setting and to troubleshoot. It is short circuit protected. And let me pull out my ruler here just to give you an idea of its size. The overall width, we are sitting right at 2 3/4 inches wide.
And then the overall length, it's probably better to measure this way. I'm trying to measure the longest points of this brake controller. We're sitting pretty close to 4 1/4 inches long. Try it up here a little bit. Yeah, about 4 1/4 inches long. And then the thickness or the height, however you'd like to describe it, we are sitting right at an inch thick or an inch tall. Now, this is gonna be a quick and easy installation. The mounting bracket, as you can see here, and the hardware to attach the bracket to your controller and the bracket to your vehicle, that is all included. A plug-in vehicle specific brake controller adapter, which is sold separately, can be used for certain applications to reduce installation time. It is important to note that if a custom brake control wiring adapter is not available for your vehicle, one of the following will be required. And I have that on your screen there for you. A 20 amp circuit breaker for two to four brake applications, or a 30 amp circuit breaker for two to four, I'm sorry, for six to eight brake applications. And you see those item numbers for those circuit breakers on your screen. Also, I would like to mention that if you are in need of a seven-way plug at the back of your vehicle, check out etrailer.com's exclusive seven and four-way brake control installation kit. The item number for that is on the screen as well. Now, this does have a limited lifetime warranty. And that's gonna conclude our look today. I do hope that it was helpful for you. Again, my name is Andy. Thank you for joining me..


Do you have a question about this Trailer Brake Controller?
Info for this part was:
At etrailer we provide the best information available about the products we sell. We take the quality of our information seriously so that you can get the right part the first time. Let us know if anything is missing or if you have any questions.


Thank you! Your comment has been submitted successfully. You should be able to view your question/comment here within a few days.
Error submitting comment. Please try again momentarily.