Expert Review Video:
Trailer Hitch Size:
2 Inch Hitch Opening
Towing Capacity:
1000 Pound Tongue Weight
10000 Pound Towing
Weight Distribution Towing Capacity:
1200 Pound Tongue Weight
12000 Pound Towing
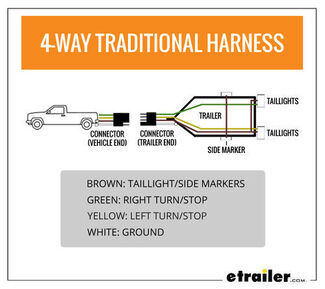
Trailer Wiring:
2019 Ford F-150 Trailer Wiring
With tow package use C56110 for wiring
Features:
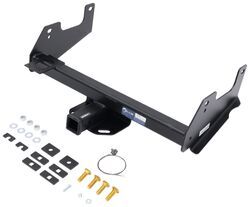
This fully welded trailer hitch receiver bolts onto your vehicle's frame with no welding required. Powder coated steel is sturdy and corrosion resistant.
Installation Notes:
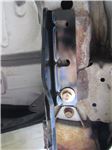
This hitch bolts right on, so you wont have to drill into your vehicle.
You’ll need to lower your spare tire so there’s room to install the hitch.
You can keep your spare tire under the vehicle only if it’s on a 18" or smaller wheel.
An extra set of hands will make installation easier.
More Information >Trailer Hitch Size:
2 Inch Hitch Opening
Towing Capacity:
1000 Pound Tongue Weight
10000 Pound Towing
Weight Distribution Towing Capacity:
1200 Pound Tongue Weight
12000 Pound Towing
Trailer Wiring:
2019 Ford F-150 Trailer Wiring
With tow package use C56110 for wiring
Features:
This fully welded trailer hitch receiver bolts onto your vehicle's frame with no welding required. Powder coated steel is sturdy and corrosion resistant.
Installation Notes:
This hitch bolts right on, so you wont have to drill into your vehicle.
You’ll need to lower your spare tire so there’s room to install the hitch.
An extra set of hands will make installation easier.
More Information >Trailer Hitch Size:
2 Inch Hitch Opening
Towing Capacity:
600 Pound Tongue Weight
6000 Pound Towing
Weight Distribution Towing Capacity:
800 Pound Tongue Weight
8000 Pound Towing
Trailer Wiring:
2019 Ford F-150 Trailer Wiring
With tow package use C56110 for wiring
Features:
Your vehicle might just need a hitch that fits, works, and holds up. This one's built for everyday use, but not oversized jobs. It's perfect for adding a bike rack or cargo carrier for weekend trips, or towing a small camper.
Installation Notes:
This hitch bolts right on, you wont have to drill into your vehicle.
You’ll need to lower your spare tire so there’s room to install the hitch.
An extra set of hands will make installation easier.
More Information >Trailer Hitch Size:
2 Inch Hitch Opening
Towing Capacity:
1000 Pound Tongue Weight
10000 Pound Towing
Weight Distribution Towing Capacity:
1500 Pound Tongue Weight
15000 Pound Towing
Trailer Wiring:
2019 Ford F-150 Trailer Wiring
With tow package use 74682 for wiring
Features:
Tow a trailer and use a hitch-mounted carrier at the same time with this heavy-duty, dual-receiver hitch. Specially designed for the truck camper market, the SuperHitch Hero is pre-drilled for camper tie-downs and works with SuperTruss extensions.
Installation Notes:
No drilling through vehicle frame required for installation.
Hitch is designed to fit Short Bed models
Hitch is designed for vehicles with factory hitch rated to 10,500 lbs; it does not fit vehicles with factory hitches rated to 11,500 lbs
More Information >Trailer Hitch Size:
2 Inch Hitch Opening
Towing Capacity:
900 Pound Tongue Weight
6000 Pound Towing
Weight Distribution Towing Capacity:
1000 Pound Tongue Weight
10000 Pound Towing
Trailer Wiring:
2019 Ford F-150 Trailer Wiring
With tow package use C56110 for wiring
Features:
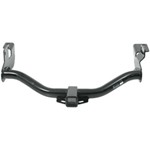
This fully welded trailer hitch receiver bolts onto your vehicle's frame with no welding required. Matte black, powder coated steel is durable and corrosion resistant and creates a rugged look.
Installation Notes:
This hitch bolts right on, so you wont have to drill into your vehicle.
You’ll need to lower your spare tire so there’s room to install the hitch.
You can keep your spare tire under the vehicle only if it’s on a 18" or smaller wheel.
An extra set of hands will make installation easier.
More Information >Trailer Hitch Size:
2 Inch Hitch Opening
Towing Capacity:
900 Pound Tongue Weight
6000 Pound Towing
Weight Distribution Towing Capacity:
1500 Pound Tongue Weight
10000 Pound Towing
Trailer Wiring:
2019 Ford F-150 Trailer Wiring
With tow package use C56110 for wiring
Features:
This fully welded trailer hitch receiver bolts onto your vehicle's frame with no welding required. Textured black powder coat over e-coat shields against rust and corrosion. Mounting bracket for wiring is welded on for a clean look.
Installation Notes:
This hitch bolts right on, so you wont have to drill into your vehicle.
You’ll need to lower your spare tire so there’s room to install the hitch.
You can keep your spare tire under the vehicle only if it’s on a 18" or smaller wheel.
An extra set of hands will make installation easier.
More Information >Trailer Hitch Size:
2 Inch Hitch Opening
Towing Capacity:
900 Pound Tongue Weight
6000 Pound Towing
Weight Distribution Towing Capacity:
800 Pound Tongue Weight
8000 Pound Towing
Trailer Wiring:
Features:
TowSmart's fully welded hitch bolts onto your vehicle. The receiver sits beneath the bumper for easy cargo access. Built from powder-coated steel, it resists rust and corrosion for lasting durability. Perfect for towing and hitch-mounted gear.
Installation Notes:
This hitch bolts right on, so you wont have to drill into your vehicle.
You’ll need to lower your spare tire so there’s room to install the hitch.
You can keep your spare tire under the vehicle only if it’s on a 18" or smaller wheel.
An extra set of hands will make installation easier.
More Information >
 Filters