A 4-Way trailer connector has the basic lighting functions only; running lights, left turn signal and brake lights, right turn signal and brake lights, and ground. A 7-Way has these functions and a 12 volt circuit, a circuit for electric trailer…
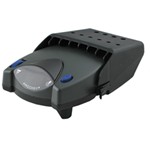
Actually, the P3 now has the upgraded axis accelerometer like the P2. The Tekonsha P3 Trailer Brake Controller #90195, will work with both electric over hydraulic brakes on the trailer as well as electric brakes. It has a menu option on the display…
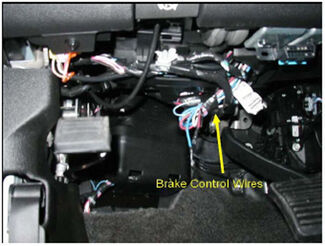
To install a Redarc Tow Pro Liberty in your 2023 Toyota Tacoma Sport you will need the following parts: Redarc Tow-Pro Liberty Brake Controller item #RED24FR Plug-and-Play Wiring Harness for Redarc Tow-Pro Trailer Brake Controllers item #RED99FR…
The difference between the Class II and Class III hitches has to do with their Gross Trailer Weight (GTW), their Tongue Weight (TW), and their Hitch Receiver Size. Class II trailer hitch receivers have a 1-1/4 inch receiver and can be rated up to…
If you just need a 4-pin to 7-pin trailer wiring adapter, then you can use part #C57672. This will plug into the 4-pin trailer connector on your brother's vehicle and give him the 7-pin socket for the trailer. Keep in mind, this will only give…
Not another one! Just kidding Dirk! I was in the Marines I enjoy these conversion questions on the M1101 trailers. I'd be more than happy to list the parts you need, along with quantity, and confirm compatibility. 1 - Timbren Axle-Less Trailer…
For your 2024 Nissan Frontier I recommend the Redarc Tow-Pro Liberty Brake Controller #RED24FR. I like the Liberty because it is simple, reliable, and looks great in any vehicle. The main unit installs behind the dash, so only the control knob will…
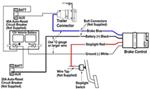
The trailer brakes work on a separate circuit than the lights. You have a couple of options to control the electric brakes on the trailer. One option is to use an air over electric brake control, #HA100400C. This unit connects to the air brakes on…
Hey Brandon, I would strongly recommend sticking with the Tekonsha RF brake controller part #TK94FR. We know this works really well and it sounds like it worked well for you too. The Curt Echo is not reliable enough for me to really ever recommend it…
The best brake controller option to go with is one that activates the brakes proportionally instead of time delayed. A proportional brake controller will activate the trailer brakes at the same time and with the same intensity as the tow vehicle…
Hey Connor, since your 2007 Toyota Tundra comes with a factory 7-way the correct kit to install the Redarc Tow Pro Liberty would be the part #RED82CR which comes with the correct harness that plugs in under the dash of your truck. What are you…
We can get you everything you need for towing with your 2017 Toyota Sienna XLE. By plastic shield, I believe you are referring to the appearance panel underneath the Sienna, and that will have to trimmed a bit in each of the hitches available for the…