
To see if this custom-fit item will work for you please tell us what vehicle you'll use it with.
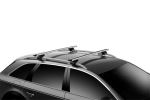
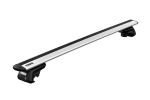
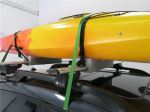
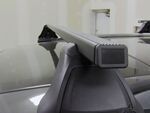
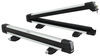
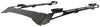
This aerodynamic roof rack lets you carry gear and cargo on your vehicle. Full-length aluminum crossbars provide plenty of space for channel mount and clamp-on accessories. Installs to tracks on your vehicle's roof.
Features:
Specs:
 Alternate Instructions
California residents: click here
Videos are provided as a guide only. Refer to manufacturer installation instructions and specs for complete information.
Hi, everyone, Jesse here with etrailer here. Today we'll be taking a look at and I'll show you how to install the Rhino-Rack Vortex roof rack for tracks on our 2018 Honda Odyssey. Minivans are pretty spacious, but they're almost always full of people. If you've got a big family, all the seats are gonna be full, so it's always nice to add some extra storage space onto the roof of the vehicle. And adding a crossbar system like this will allow you to do that. With this, you can throw on a cargo box or a bike rack or kayak carrier, whatever you need to get that extra storage space.
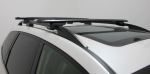
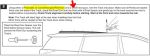
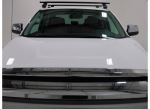
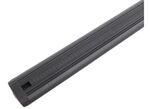
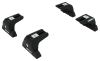
The kit will come with the Vortex crossbars that a lot of people know and love. They have an aerodynamic shape to 'em, and the Vortex strip here, which is gonna cut down on wind noise. The unique part about this kit is it comes with this track system, which actually has to be mounted to the roof of your Odyssey. So it's a little bit of extra work for the installation as opposed to other systems that would maybe clamped around the door. Since this is a minivan and we have a sliding rear door here, we're just not able to do that.
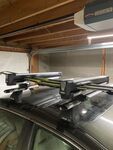
But with that extra difficulty and installation, you get a lot of adjustability. You're not just stuck in a fixed position. You can adjust these crossbars to be anywhere as far as you can see this track. We have two end caps here. They'll come with two separate keys.
This top crossbar end cap, you would really only need to remove this if you had a track-mounted accessory. You'd simply use this plastic key, turn it counter clockwise, pop it out. Then you could figure out where you wanted your track-mounted accessory to be located. Cut the strip and reinstall everything. Pop that cap back in and lock it.
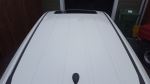
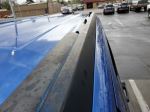
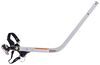
This is pretty secure. I don't think you would really need to worry about the security of this. But just in case you we inchesre worried, we do sell a locking version of this that would have a key similar to the other end cap here. In this end cap, you just use the key. It works just like any other key. Insert it, turn it, and we pull it out. Behind that cover, you'll see two red tabs here. These are what lock the crossbar into the foot here. Just simply pinch these together, and it will pop out. So you could do this if you wanted to just completely remove the bar, maybe you're planning on going through a car wash or something. You could remove the bar and install this plastic pin cap there. Or if you we inchesre looking to adjust where your crossbars are for your spread, you could pop that out. Loosen these two bolts with the included security Allen key, get your adjustments, tighten it down. And then to reinstall it, you just simply pinch these together, drop it down. Ours is a pretty tight fit, so let's give it a tap, and it'll walk into place and we can reinstall our end cap. The crossbars themselves are 49 inches long. As you can see, it matches our roof pretty nicely, and there's not a ton of overhang on our feet. And for a measurement from the roof to the bottom of our crossbar is at about three inches. That's plenty of room to get any of your accessories installed with the clamps underneath. And we don't have a sunroof, but if you do have a sunroof, that should be plenty of room to clear or get it wide open or even pop it up. And as for weight capacity, the roof rack itself and the track system will have weight capacities, but we always recommend to double-check your vehicle's roof capacity ratings and go off the lowest rated number. As for the installation, I wouldn't say it's too terribly difficult, but it does involve using a pneumatic air riveter to get the track system installed. And also a pretty scary step in the process is drilling holes into the roof of your vehicle. So I understand if it's not something that you're comfortable with or maybe you just don't have that special tool, feel free to check out our dealer locator to find somebody local to you that can assist you with the process. If you have installed this yourself and you wanna share some tips or tricks with us, or maybe you just wanna show off what you're using your roof rack for, please feel free to leave a review or a comment. But otherwise, we'll get to the installation process and I'll walk you through it all. So we'll start off by cleaning the work area just with a soapy rag. And then what we'll wanna do is tape off everything. That way while we're working up here, we're not scratching anything. So I'll just run a few strips of painters tape, basically from almost the windshield all the way back. (painter's tape screeching) In the instructions, It'll say that you want your tracks as far spread out as possible, meaning that you wanna mount it as far outside as possible. So you can kind of see there's a little bit of a drop off. So where I'm gonna line everything up will be just before that drop off. That way everything's sitting that level, it's not dropping down, but we're also as far outside as we can get. And I've already set up the driver's side, but this will be essentially the same process, so I kind of mocked it up. What you wanna do is just make sure you're not interfering anything. So you have an antenna or a sunroof, just make sure you're not gonna interfere with them once you get your crossbars on. But we don't have the sunroof. Our roof is pretty clean. So what I did was I measured 19 inches back from the windshield here and that will be my mark for the front. So, I'll just mark off the edge here. Then I'll do the same thing in the back. Just get a mark on that too. Now, I've placed our track on our roof here, and I actually taped down the back just 'cause our roof's curved and this is straight. So once to kind of wobble back and forth, it's not gonna hold it perfectly still, but it's gonna help me out while I mark out where we're gonna be drilling. So what we'll do is I wind up with my mark on the front side and the backside. And then through each hole on the top of our track, I'll just put a mark using a paint marker, and that'll tell me where I need to drill. Before we take the track off, I just like to go over at least once, make sure everything's lining up correctly, and also making sure that I actually made a mark in the tape. But once you've double-checked it, we can take this track off the roof. (painter's tape screeching) We're ready to drill. At this point, I've probably checked over everything like four times. It's kind of nerve-racking drilling a hole in your roof, but we're ready to get to that point. It's a five millimeter drill bit. Then I also have some strong tape just to stop me from going too far. In the instructions, it says to use a drill stopper or something like that, but tape should be fine. Just keep double-checking it, make sure it's not getting pushed back. But we'll just go down the line and get each one of our holes drilled out. (drill whirring) (drill whirring) (drill whirring) (drill whirring) I'll use a vacuum to pick up all this metal swarf that we left behind just to keep it from getting in our skin or scratching the clear coat on the paint. (vacuum cleaner whirring) With all that cleaned up, we'll just peel our tape off. (painter's tape screeching) Now since we exposed bare metal, the instructions will tell you to get some kind of fancy paint and use a Q-tip, but my paint marker's almost the perfect size, so I'll just make sure we get that all around there, covering up all the bare metal. And it really doesn't matter what color you use because we'll be covering all these holes anyways. I've waited for that paint to dry, so now we can install our little beautiful tape pads. What we wanna do is just line up the hole with the hole that we drilled as close as we can. It doesn't really have to be perfect. Then we'll peel off the back. Before we rivet our track into place, we'll need to install our end caps. They just slide into the outside on both sides. Then flip it over and you'll wanna peel off the backing paper on these little pads here. When we drive these rivets into place, the kit does include one spacer to slip over the top. But I'm assuming it just depends on your rivet going, I was finding that with that one spacer, it was still making contact to you and kind of scratching our paint. So I just grabbed the nut that's about the same size and that's gonna keep our rivet going from making contact with our track when I installed the rivets. So we'll start with our first hole, get everything lined up, push your rivet down, and we'll pop our spacers on top. And I'm just gonna work my way down the line, one rivet at a time. It may take some adjusting to get everything line up. And one thing I recommend is push down pretty firm on it, make sure it's sitting flush. And then you'll want to kind of give it a tap just to make sure that it's seated right and then we'll drive that in. (riveter clacking) (riveter clacking) Now we're ready to install our crossbars. I already have the rear set up. It's gonna be essentially the same process. On the front one, there's just one extra step. If you want your crossbars to be more even as our roof's a little bit lower in the front, there's an additional spacer that I'll show you how to install. But we got the back set up so we can get our crossbar spread, which is really up to you, just depending on what you're planning on using your roof rack for. We always go with middle ground of 30 inches, so that's where I'll get ours set up. So we have these blocks here. They have threads in the middle. We need two of those for each side. It just simply slides in from the front. We'll get those slid about to where I need them in order to install our foot here. I'll just get those lined up. We're gonna use the outside holes with our setup. Once you get those lined up, we'll take a bolt, a split washer, and a flat washer, and we'll get that threaded out out. Now, we will take our included Allen wrench, which is a little bit different than the Allen wrenches you probably have at home. There is security style, so they will have holes in it, but they work the same way. And we'll get those tightened up. I just wanna get these tightened up until that split washer is flattened out, and that's what's gonna lock our bolts into place. Once we have those tightened down, we'll use our rubber stopper to fill the extra hole, and then we'll repeat that process on the other side. Now for our legs, we'll put our key in, unlock it, pull this out. That'll give us access to our bolt on the bottom here. And the hardware does come preassembled, so when you're doing the rear, you'll just have to loosen this up. But since we're adding the spacers on, we'll actually take this all the way off 'cause our kit comes with some longer bolts. Get that off, set that aside, and we'll just swap our washers over to the longer bolt, split washer, then flat washer. Then with our spacer, we'll just line up the logo there, go there, insert bolt back through the bottom, and we'll just barely thread this on here. It'll make it easier to get installed on our crossbar. So we have our crossbar upside down, and we'll just slide it in with this part facing the outside. Then right now, we're not gonna tighten down all the way. I'm just gonna tighten it down enough so that when I pick it up, this foot or leg won't move around, but loose enough to where I can move it manually to get our adjustments done. (Allen key clacking) (Allen key clacking) So we brought our crossbar over to the roof and got our locks to engage, now we need to find our overhang measurement. So what I'll do is measure my overhang of both sides, adjust them till those are even, then we'll take it back to the work desk so that we can install a few more components. Before I take these back off, I'm actually going to tighten down our bolts. And since we have enough room between our roof and our crossbars, it's not too difficult to get them tightened. So just to make sure that nothing moves while I'm taking 'em off, I'll tighten both sides down and we'll get to work on. On our bottom side, we'll need to fill this gap here. So our kit comes with these strips with measurements on them. That's just to make it reinstalling a little easier. They simply just push into place. I like to push it into place, kinda eyeball where I need to cut. And with a pair of scissors, I'll make that cut and you can get that jammed into place. We have to cut just a little more. (scissors clacking) (scissors snapping) (scissors clacking) We'll get that into place. And then I'll cut out another piece for our outside just using the scrap that we have. (scissors snapping) Now with the top side, we'll install our Vortex strips essentially the same way. They're just a little bit tougher to get installed, but we'll just go one strip at a time. And then eventually we'll get to the end and we'll have to cut a little bit out of another strip. (scissors clacking) Now we can reinstall our end caps and lock 'em into place. Now we got the crossbar at the car. First, we'll get our locks pulled in and pushed in, and we can get it engaged with our foot here. (locks popping) Now we just need to get our end caps in place and locked, and give everything a good shake test. But otherwise, that's gonna do it for our look at and installation of the Rhino-Rack's Vortex roof rack kit for tracks on our 2018 Honda Odyssey.


Do you have a question about this Roof Rack?
Info for this part was:
At etrailer we provide the best information available about the products we sell. We take the quality of our information seriously so that you can get the right part the first time. Let us know if anything is missing or if you have any questions.


Thank you! Your comment has been submitted successfully. You should be able to view your question/comment here within a few days.
Error submitting comment. Please try again momentarily.