Thank you! Your comment has been submitted successfully. You should be able to view your question/comment here within a few days.
Error submitting comment. Please try again momentarily.
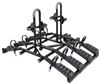
Quickly load up bikes for the whole crew with the ReVert vertical rack. Tilts with the tap of a lever, making loading bikes or accessing your cargo area almost effortless. Automatically raises back up with a simple nudge. No lifting required!
Features:
Specs:
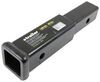
Note: Vertical bike racks put more strain on your hitch than platform or hanging styles. Because of this, the rack isnt compatible with Class III hitches that have a tongue weight rating under 500 lbs. Avoid using extenders or adapters, as they can further reduce your hitchs capacity.
California residents: click here
Videos are provided as a guide only. Refer to manufacturer installation instructions and specs for complete information.
Hi, Jesse with etrailer. Today I'll be helping you assemble your Thule ReVert Bike Rack. Today we're working with the four bike version. We do have a six bike version available also, and they're essentially the same assembly process. If you're looking for a more in-depth view on the bike rack itself or how it fits on your vehicle, we have pictures and videos here at etrailer. But today we're just focusing on the assembly process, so let's get into it.
This is how your bike rack will arrive. We'll get it unboxed and take a look at what's inside. (packaging clicks and rustles) I have all the parts laid out here. Thule instructions don't really list off names of the parts. They just kinda have pictures, so I'll just go through and describe 'em all so you can ensure that you have everything that you need.
Starting with this small black plastic cap. And then we have what looks like a push lever. We have a hydraulic shock. We have three large tubes. One of them has four square holes in it, the other one has straps.
And this third one looks like it will be the main support. It's heavier duty. Then we have some extra black straps. What looks like will be our main assembly, which we'll install into our receiver tube. And then we have four wheel holder trays.
Now for the hardware we have two longer shoulder bolts with washers and nuts, along with two slightly shorter shoulder bolts with washers and nuts. We have two hex key Allen wrenches, a large shoulder bolt with a locking nut, two smaller bolts with locking nuts, another bolt with Loctite applied, and a small bolt. Then two of the wrenches and we have eight carriage bolts with matching bolts that will go inside of them. Our first step is to install this part into the receiver tube on our vehicle. We're just using this prop receiver, but you'll be using it on your vehicle. (part rattles) So it'll just slide in, all you have to do is pull back this (lever clicks) and that will lock into your pinhole on your receiver. (part rattles) (pin clicks) (part clatters) Then we need to take our key and put it into this lock here and unlock it. This is our anti-rattle device here, so just pull it out, rotate it like this so that we can get the tightening started and we'll just turn it like this until we feel it get pretty snug, and get to a good spot, you can extend it all the way out and tighten it down the rest of the way until you line up with the original resting position of it. And then you can lock it into place. (key clicks) Once you have that tightened down enough, we will come here to the center of this piece here, flip these plastic lids up until they click, (lid clicks) (lid clicks) and we will need to put this pin out. It should just pop up (pin clicks) and slide out. Then we'll put our center post in. Just make sure that your Thule badge is facing out and it'll slide into these slots right there. We'll have to get the hole lined up down here. Once we have our holes lined up here, we'll take our large bolt with the lock nut and slide that through. You may have to take your other hand and (bolt clatters) just kind of wiggle that while you push (bolt clatters) (bolt threads) and we'll get that nut started. Then we'll take our two stamped wrenches that we inchesre included and tighten these down with the larger end. You'll need both of them so you can hold the bolt while you tighten the nut. (wrench clinks) (wrench clinks) (wrench clinks) (wrench clinks) Now we'll take our lever and that plastic cap, and first we'll have to kinda slide the plastic cap over because what we're going to end up doing is installing our lever here, tightening down a couple bolts, and then putting the cluster cap over it. So we just need it kinda hanging there. And we'll grab our bolts with the hex head on them and the locking nuts. We'll get our handle holes lined up here. Once we have those holes lined up, we can slide our bolt through. (bolt clicks) And for now, let's leave it hanging so I can get this nut just started. Lift it back up, slide your second bolt through (handle clatters) and get that one started. We'll take our stamped wrench. We're gonna use the end of it here and our five millimeter hex key and just get those tightened down. (part rattles) (part rattles) (part clatters) I'll just get 'em nice and snug. They don't have to be super tight. And once we have those tightened down, we'll line up these tabs with the slots here and put it like that and take our shorter bolt here and insert it into the hole in the bottom. And we'll get that tightened down with the five millimeter hex. Now we'll take our bar with the straps on it and make sure that these tabs here are facing outwards and line it up with the two holes in the center. We'll take the shorter of the two sets of bolts and washers, (bolt clinks) slide those in. (bolt clinks) Once you have both those slid in, we'll throw a washer on the back side and take these cap nuts, (nut threads) get those threaded on, and we'll take our bigger Allen wrench and our stamped wrench. We're using the smaller side this time. Get those tightened down. (wrench clinks) For the top bar, we'll notice that this side here only has one hole, so that's gonna be the bottom that's gonna align with this nub on the plastic here. (part clinks) So we'll slide that in. You'll see once you have it lined up, it'll drop down a little bit and our holes will line up. Then we can insert our longer bolts with washers. (bolt clinks) (bolt clinks) Once we have our bolts installed, we'll take a washer on the back side and our cap nut. (nut threads) We'll get those tightened down with the same tools we used on those lower bolts. Now we'll take our hydraulic shock and get it lined up in here. (hydraulic shock rattles) We'll just thread that on by hand. When we're threading it on, we're just looking to line up with this hole up here, so I'll just go until it stops and turn it back so it lines up. And we'll take our shoulder bolts and our five millimeter hex wrench and get that tightened down. (hex wrench clicks) We're ready to install our trays, so starting on the outside, you'll see there's a square hole here. That'll line up with the square hole there and a round hole there. We'll take our carriage bolt, which has the square end, slide it through our outside hole. Just get that started for now. (bolt threads) And on our other hole here, we actually have some straps that we're going to install there. So on the back side we have another square hole. Slide your carriage bolt through. Take two straps, the round hole here, slide your bolt through like that and just thread that in. So we'll get all these hand tight for now. They're all gonna set up the same way with straps on the side facing out, and just work your way down the line. One thing worth noting while you're setting these up is these two center trays will actually only get one strap while the one's on the outside here, will get two straps. Once we get all those set up, we'll just go through and tighten each one with our larger Allen wrench. (lever clinks) Everything's built so we can close our case up. You just gotta squeeze the sides (part clicks) and pop that down and then install our pin. It's just gonna go through that same hole that we took it out of. (pin clicks) Clamps down in there. And now everybody's favorite part. (tape rustles) So now we've officially assembled our bike rack, we're ready to grab a group, hit the road, and go for a ride. Anyways, I hope this video helped you with the assembly process of your Thule ReVert Bike Rack. I'm Jesse, enjoy the ride.
solid rack at a good price. I bought this instead of a 4 bike platform rack to minimize the torque on my car. E trailers shipping was fast and free.
This is the Rack to get if you want a verticals bike rack. There are several other racks on the market that have similar functionality. I would say what sets this apart is as follows.
1- packaging. Thule does the best Job packaging their items, I had recently purchased another vertical rack and it was slightly damaged because a large heavy metal rack can bang around if not packed correctly. This Rack had come packed very well and no damage to any items, as you would want it when purchasing a new item that is being shipped to you.
2- assist function both up and down. Other racks have assisted function down or none at all. This rack has assistance both ways and if you have 3 bikes on the rack, one pull on the lever and the rack pull it up for you.
3- ease of assembly. Assembly of this rack was probably one of the easiest things out there. Just watch the assembly video and you should be done with in an hour with absolutely no rush.
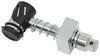
4- hitch stability. The rack comes with an adjustable hitch wedge built in and it makes a huge difference. No need for a hitch stabilizer to be bolted on. The attached hitch pin and adjustable wedge make this very solid and stable when transporting your bikes.
Lastly, honestly think about the cost in comparison to other racks. It may cost just a few hundred more, but the assurance that you have thousands of dollars of bikes on the rack that are safe is well worth it.
This is a fantastic rack. Look up on YouTube for other people comparing other racks like the Velocirack or JB Rack (I bought the JB one and it was a mistake, thin steel and not even close to as stable. Steel bent with assembly and flexed when transporting bikes). When I purchased the Thule revert the comparison to the other vertical rack was night and day. Expensive mistake but at least now you know.
I watched the e trailer video on assembly which made putting it together a breeze. The rack does all the things I was hoping for. It has all the little niceties dialed so raising, lowering, loading, and unloading my heavy eMTBs is no problem. A very well built rack!
We previously owned a Thule XTR 4-bike platform rack and thought it was the fastest to load and unload compared to other 4+ bike racks. This is from seeing other folks loading their bikes on trails. Not until we got Thule Revert, which is by far the easiest and fastest to load and unload. The assist is a game changer, even though it makes it hard to lower an empty rack to access the rear hatch. The angled stem helps avoid hitting rockes and clear uneven terrain on a lower clearance vehicle. The thick rubber bands are super fast to put on and off. The height is just right to simply roll bikes into baskets without lifting. Make sure to get a torque wrench and follow correct torque specifications.
Useful rack, easy to tilt up and down.
I'm using a Hollywood rack valet to hold it when off the vehicle with a motorcycle cover.
Ordered for a friend. So far, they love it!
Do you have a question about this Hitch Bike Rack?
Condition: Like New
Notes: May have damaged packaging or minor cosmetic blemishes.
Info for this part was:
At etrailer.com we provide the best information available about the products we sell. We take the quality of our information seriously so that you can get the right part the first time. Let us know if anything is missing or if you have any questions.


Brooke M.
3/31/2025
We'd love to see a photo of you whole set up if you ever feel like sending one in the next time you're geared up to hit the road :)