Tekonsha Primus IQ Trailer Brake Controller w/ Custom Harness - Up to 3 Axles - Proportional


To see if this custom-fit item will work for you please tell us what vehicle you'll use it with.


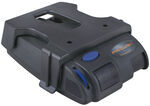
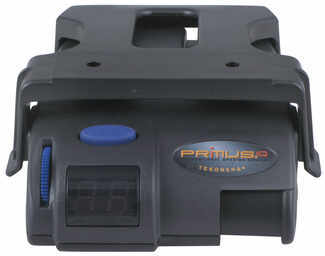
This proportional brake controller has simple controls and a digital display for diagnostic information. Includes 3 boost levels, a slide-bar manual override, built-in battery protection, automatic leveling, and continuous diagnostics.
Features:
Specs:
You can adjust the gain (also known as output) with the thumbwheel on the front of the controller. Gain lets you set the maximum amount of power that will be applied to your trailer's brakes. A heavier trailer will need more power to achieve smooth, safe braking, while a lighter trailer will need less. Typically, the gain is only readjusted when you experience changing road conditions or if the weight of your trailer changes.
The boost setting controls the aggressiveness of your trailer's braking, meaning how quickly the brakes reach the maximum braking level. You can adjust this when you're towing heavy loads and you need more umph to bring your trailer to a stop. Your tow vehicle doesn't need that much power to brake in time, but your heavy trailer does.
Depending on the level of boost, your trailer brakes can start at either 13 percent or 25 percent of the set gain. What this means is that, instead of starting at 0, the brakes will start at 25 percent and get to 100 percent sooner. This keeps the trailer from pushing your tow vehicle forward.
If your trailer weighs less than your tow vehicle, no boost is needed. But, if you want your trailer to lead the braking, you can select level B1.
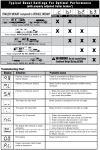
Boost Levels:
| Approximate Gross Trailer Weight | Boost Level | Increase in Initial Power Output |
|---|---|---|
| Less than tow vehicle GVW | B1 | 13% |
| Equal to tow vehicle GVW | B1 or B2 | 13% or 25% |
| Up to 25% more than tow vehicle GVW | B2 or B3* | 25% |
| Up to 40% more than tow vehicle GVW | B3* | 25% |
*Both B2 and B3 offer a 25-percent boost in initial power. But the braking curve for B3 is more aggressive than that of B2. This means that, even though you will start out with the same intensity when using these boost levels, you will get an overall more aggressive braking experience with the higher level. So if you use B3, you will reach maximum braking sooner than if you use B2.
To adjust the boost, use the blue push-button on the top of the Primus IQ.
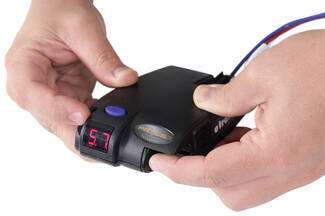
The Tekonsha Primus IQ comes with an easy-to-reach, slide-bar manual override, great for stopping sway or controlling your trailer's momentum in emergencies. To engage the manual override, just push the slide-bar to the left, towards the center of the controller. This will activate the trailer's brakes and brake lights without you having to apply the brakes on your tow vehicle, perfect for limiting trailer movement while you're cruising.
The Primus IQ can mount between -90 degrees and 90 degrees vertically, but the brake controller still needs to be horizontally level and parallel with the direction of travel.
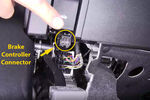
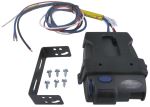
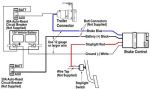
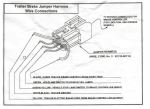
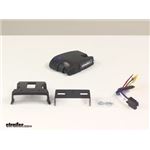
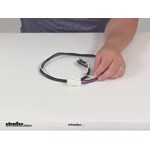
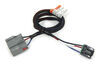
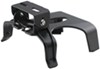
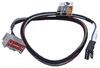
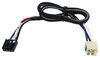
After mounting the Primus IQ unit in your cab using the included bracket, simply plug the included custom harness into your vehicle. The other end of the harness plugs into the brake controller. To remove the IQ for storage when you're not using it, just unplug the unit and slide it out of the bracket. With a replacement wiring harness (sold separately) and replacement bracket (6927 - sold separately), you can even transfer the IQ to another vehicle.
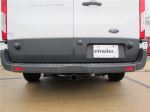
Note: If you don't already have a 7-way plug at the back of your vehicle, take a look at our exclusive 7- and 4-way brake controller installation kit (ETBC7 - sold separately).
The Tekonsha Primus IQ brake controller comes equipped with proportional braking to give you the best towing experience. Proportional braking means that your trailer brakes mimic your tow vehicle's brakes. If you slam on the brakes in your vehicle, your trailer brakes will activate with the same intensity; if you brake lightly, your trailer brakes lightly too. The trailer's braking is in proportion to your vehicle's braking. This saves wear and tear on the tires and the brakes on both your vehicle and trailer.
The Primus IQ uses an internal inertia sensor to detect how your vehicle is braking so it can send the right amount of braking power to your trailer. It measures the inertia of your tow vehicle and activates the trailer's brakes to slow at the same rate. The result is uniform braking across your towing setup. No push-pull action - just smooth, proportional braking every time.
 Alternate Instructions
California residents: click here
Videos are provided as a guide only. Refer to manufacturer installation instructions and specs for complete information.
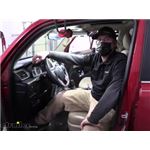
Hi, everybody, Ryan here at etrailer. Today on our 2015 Toyota 4Runner, we're gonna be showing you how to install the Tekonsha Primus IQ brake controller. But before we do that, why don't we check it out and make sure that this is gonna be the right brake controller for you. When it comes to the 4Runner, people do a lot of different things with these SUVs. They're really nice vehicles and very capable. So it definitely makes sense.
And that includes pulling around some bigger trailers, larger utility trailers, campers, things of that nature. And chances are really good when you have a trailer like that, it's gonna have trailer brakes. That way, it can help slow your whole entire rig down as one and not just have to rely on your Toyota's brakes to do all the stopping. With that said, you're gonna need a brake controller to activate the trailer's brakes. And that's where one like the Primus IQ is going to come into play.
When it comes to picking out a brake controller, there's so many available out there. I mean it's crazy how many are available. And so I'm gonna try to break this one down and go over some of the basics and how you would live with it. So this is a good, I'd say intermediate type brake controller. It comes with some of the fancy things, but not over the top by any means.
And so you're gonna get cool features that you would actually use. And I think it's gonna look pretty good too. It's relatively compact. It's a little wide, a little wider than some of them, but not outrageous by any means. Fits decent in the 4Runner.
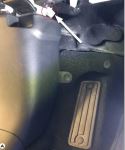
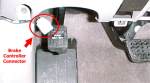
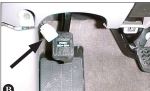
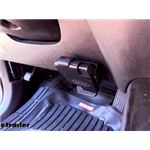
And as far as the looks go, it's really just gonna depend on your liking. Personally, I think anything on the 4Runner, after market wise, just looks right at home, but to each your own. With that said, this is gonna be a proportional type brake controller. What that means is it's going to match a braking pressure that you apply here in your Toyota. So for example, if you're rolling up to a red light, something like that and you're just halfway on the brakes like you normally just regularly be stopping, trailers brakes are gonna do the same thing. On the other end, let's say maybe a deer runs out in front of you or something, you have to really stand on the brakes, make an emergency stop, and you gotta mad it down, trailer brakes are gonna do the same thing. And so what that's gonna do is help provide a smooth braking experience. Okay and that's definitely a good thing, right There's other types of brake controllers that are called time delay and those right out of the box, you have to make some adjustments and play with a little bit, but it's never gonna be as smooth as a proportional type one like this. So definitely an advantage there. As far as what you can do with this thing, so it's gonna have a few different adjustments. One of them is gonna be called boost. And so there's a button up top here and you push that button and you got boost one, boost two, boost three. All right, and so generally a rule of thumb is boost one you would use for a trailer and a load that is lighter than your vehicle. Boost two would be about the same weight and boost three would be if your trailer and load weighs more than your vehicle. And what that's gonna do is change the performance, I guess you could say, the brake controller. So it's gonna change how aggressive and how strong the brakes come on. So it's pretty cool. You can roughly get in the ballpark here. Okay, I know my trailer and stuff weighs about the same, boost two. It'll least get you going down the road and be pretty close. So real quick on the fly adjustments. And that'll even work too. Let's say if your trailer's unloaded and you put it on B1, boost one. And then you go you load it up with some rack or something, and it's super heavy, You just crank it up a couple notches and you're good to go. You can also adjust the gain here which is what this dial as little wheels for. And what that is gonna do is change essentially the power level going back to the brakes too. So I'll hit our manual override here. I turned it all the way down so you can see there's essentially hardly any power going out to our brakes. You can really crank that thing up all the way and that'll send maximum power. So let's say, if the brakes are coming on too strong. It feels like the trailer's wanting to skid or lock up on you. You can always dial it down some. On the same note too, if you feel like the Toyota's doing most of the work braking, you can crank it up a little bit. So you can really play with it and fine tune it to your particular liking. What I was hitting here, to show you that is the manual override. So what happens is whenever you push this, it's going to apply just to your trailers brakes. I actually like it. It's a pretty big slide. Some of them are a little on the small side. Not that you really use it all that often, but it's nice to have a big thumbprint there that you can grab and operate it. But you'd use that in a situation primarily, let say if your trailer started to get away from you a little bit, maybe started getting a little dicey, start swaying behind you. You could apply that, hit that and slow that trailer back down and get things back under control. For those of you that really don't like the look of this and you don't want something permanently on the dashboard like this, there is a better solution and that is what's called the REDARC. And those are really cool. Essentially the main body, the brake controller, this box portion will be mounted up underneath the dash where you're never gonna see it. And the way you would control it is by a small knob. Okay, it's pretty small. And I've actually done several on Toyotas, but what you can do is have these knockout panels here from the factory. You can pop these out and then there's a new one that you can put in. It has a little hole in it and you can mount that knob to it. And so it looks really clean. To the untrained eye, it'll look like a factory option. And so that's always an option for you guys that really aren't looking to have something like this mounted up to your dashboard. But other than that, at the end of the day, good all around brake controller. It seems like a lot of people have had good luck with them and like them. So one you really can't go wrong with. It'll cover all your bases. As far as the installation goes, really not bad. When you use the adapter plug, essentially you're gonna plug it in, you ground it out, plug it into the back of the brake controller and just mount up your bracket. So really straightforward, really you shouldn't run into too many issues at all with it. Speaking of that, though, if you're interested in seeing how that's done, feel free to hang around. We'll go ahead and put it on together now. To begin our installation, we're gonna be here on the driver's side of our 4Runner and we need to locate a factory connector plug, which should be right underneath the dash here towards the side in this area. So the connector plug, if we look, we're gonna have a wire right here. This one is loose and this is a connector plug we're gonna be working with. Sometimes it might be taped up a little bit right here but it's gonna be in this general area. The wire's only a few inches long. So whether it's taped up top, taped down here, you can look right here in this area and that's the plug that we are looking for. So now that we have our plug, we can take our adapter harness. And this is really simple. One end is just gonna plug right into the factory connector there. And then that leaves us with, on our adapter harness. There's actually a single white wire that has a pre-attached ring terminal. That's gonna need to get grounded to a metal part of our vehicle to supply an additional ground. So I'm gonna take a quick look underneath our dash and see what would be the most appropriate spot to ground this out. So I looked under our dash and one of the easiest and best spots is right here on the kick panel. It's gonna be really tricky to see. So I'm gonna explain this and then go ahead and do it. And then you guys can take a close look at it. So there's a threaded hole right here on the side of the metal and there's no hardware in it. So I'm gonna take a bolt. This is a M6 by 1.0. That's the thread pitch of the bolt. And you can use one this long or maybe even a little bit shorter, but I'm gonna put that through the ring terminal and then tighten it down into the hole. And that's going to provide us with the ground that we need. If you don't have this bolt, or you don't feel like going to the hardware store, you can always use a self tapping screw and find a piece of metal to secure this too. That'll work as well. I do wanna give you a trick here though. So in our case, the head of the bolt is a 10 millimeter so trying to do this and with keeping this from falling out can be tricky. So if you have a magnet, a magnetized socket, great. A lot of people probably could have that though. So one thing you can do is take a piece of paper towel and put that in with the bolt and that's gonna keep it really tight and prevent that from falling out. So I'm gonna go ahead, get this done. I'll show you how it turned out. So I went ahead and got our ground wire secured and this is what it looks like. Piece of the paper towel got stuck to it. Not really a huge deal. It's not interfering with our ground or isn't gonna mess with it at all. So as long as you have that metal to metal contact, you'll be in pretty good shape. With our wire now ran, we can take our brake controller and prep it. So there's two holes on each side of it that we're gonna use to secure to a bracket eventually. The issue is those holes aren't threaded right out of the box, if that makes sense. So it's much easier to do that now as opposed to when you're trying to like hold it up with the bracket and do all that. So I did three of them. We'll go ahead and walk through this one. So just gonna take one of the screws, take your quarter inch socket or nut driver or whatever you're using, and simply just run that screw all the way in and cut those threads, then just back it out. And that'll make it a lot easier to secure here in a moment. But with all those done, we can then plug this in. So that just clips into place. And then we can come up to our dashboard and get our bracket secured. So you have a couple of choices here. You can use this metal bracket or there's this plastic one too that sits like that. You can use either one, whatever best suits your needs and gets it in the correct position. In our case, I think what I'm gonna use this metal one, just eyeballing it here to see how I wanna do this. So I'm gonna mount it like this. We have some marks on our dash already. Take our screws and secure this bracket. Now, whenever you're securing this, make sure to position it in a way that the brake controller suggests doing and be careful what you're screwing into in the dash. Obviously, you just don't wanna come in blind and just start screwing things into your dash. You don't wanna head an airbag or something of importance, but this area we're pretty good shape. So then at this point, we can take our brake controller, line it on up with the bracket, and get the screws started. I like to get all of them hand tight. That way, it'll just stay in place and then we can position it exactly how we want it. And once we have it how we want it, then we can come back and completely snug them down. So once the brake controller is completely tightened down, I just took our wiring, zip tied it up in a bundle, stuffed it in there behind our kick panel. And then I took a little bit of wire loom here. Just put it over the wires where you could see it. That way, it just cleans up the look of it. Wire loom doesn't come with it. But if you need some, you can always grab little bit here at etrailer. With everything hooked up, good idea to test our brake controller. So I'll have them just hooked up to a test box, which is simulating a trailer. As you can see, we have C illuminated on the display letting us know we're connected. Quick way to check, I'm just gonna hit my manual override and you can see that power level increase and being sent back to our tester. And that'll finish up our look at and our installation of the Tekonsha Primus IQ brake controller on our 2015 Toyota 4Runner..

Easy to install and very affordable.
Quick install works Great
Worked great!
easy to install
Just what the doctor ordered. Thanks
The package arrived on time (actually a day early!). It came with the correct Harness. It was easy to install and is working properly!
Great for the price
Ordered as replacement for one that quit after 18 years. New plugged into existing wiring and even fits in existing mounting bracket. So far so good.

was easy to install and works great
Easy to hook up , works flawlessly
Simple hook-up when using the model specific harness.
Easier to install than expected. Works flawlessly
Very easy installation.
Easy to install and works great no issu es


Do you have a question about this Trailer Brake Controller?
Info for this part was:
At etrailer we provide the best information available about the products we sell. We take the quality of our information seriously so that you can get the right part the first time. Let us know if anything is missing or if you have any questions.


Thank you! Your comment has been submitted successfully. You should be able to view your question/comment here within a few days.
Error submitting comment. Please try again momentarily.