

 Arrives before Christmas
 To see if this custom-fit item will work for you please tell us what vehicle you'll use it with.


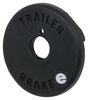
This is one of our favorite brake controllers, with flawless braking and a tiny dash knob that looks like it came straight from the factory. Its unique off-roading mode helps you handle rough conditions, so get out there and get towing.
Features:
Specs:
The off-road mode is a unique feature of the Redarc Tow-Pro Elite. In this mode, the brake controller will apply your trailer's brakes with a preset amount of power, independent of what your tow vehicle is doing. This is ideal for off-roading or challenging conditions. Set the power low if you're towing through sand or mud so that the trailer doesn't stop with too much force and act as an anchor. If navigating a steep descent, set the power to a higher level to ensure that the trailer doesn't push against the tow vehicle.
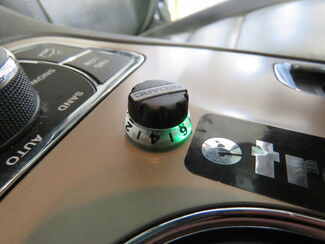
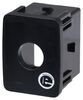
To activate the off-road mode, rotate the knob counterclockwise and apply your vehicle's brakes. Push down on the knob twice (2 times within 1 second) and release the brakes. The knob will turn green to let you know that the mode has been activated.
Use the knob to set the braking output -- the maximum amount of power that will be applied to your trailer's brakes. To get more power output, rotate the knob clockwise toward 10. To decrease the power output, rotate it counterclockwise toward 0.
When you apply the tow vehicle's brakes, the knob will change from blue to red to signal that the trailer brakes are being activated. The higher the braking power output, the deeper the red that you will see.
To engage manual override, simply press the control knob. This will activate the trailer's brakes and brake lights independent of your tow vehicle, great for stopping sway or controlling your trailer's momentum in an emergency.
When you are calibrating the brake controller for the first time, the LED lights will signal your progress.
You'll start by braking 20 times or so to let the unit learn its orientation and the direction of travel. You don't need to have a trailer connected for it to calibrate; the only difference is that the knob won't illuminate at all. If your trailer is connected, the LED light will flash green/blue as it calibrates. When the display turns solid blue, initial calibration is complete.
Once done, the unit will remain calibrated. If recalibration is required, it will happen automatically and without LED indication.
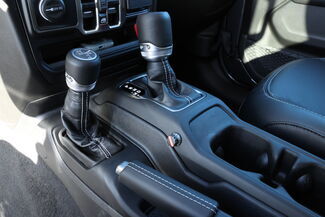
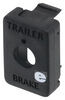
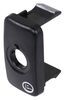
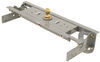
The Tow-Pro Elite has almost no mounting restrictions. It comes in 2 pieces: the main unit and the control knob. The main unit can be mounted out of sight and out of the way. You don't have to worry about dinging your knee on a bulky brake controller or interfering with your vehicle's airbags.
The control knob can be installed in any convenient spot that's easy for you to see and access. This can be a blank switch panel, an open spot on your center console, or wherever there's space on your dashboard. A universal mounting panel is included to ensure a clean, from-the-factory look. Custom-fit panels are available for certain vehicles as well. Before you do any drilling, be sure there's enough clearance behind the dash for the entire knob to install!
Once you've decided where you want to put the control knob, you'll need to find a good place to install the main unit. Your only restriction is the 3' cable connecting the main unit and the control knob. Securely mount the box using screws, double-sided tape, or zip-ties (not included). A mounting kit (RE67FR - sold separately) is also available for the Tow-Pro Elite. Do not attach the module to wiring or cables that can shift as you drive!
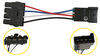
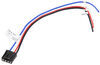
Then plug the custom-fit harness right into your vehicle and the brake controller and you're done!
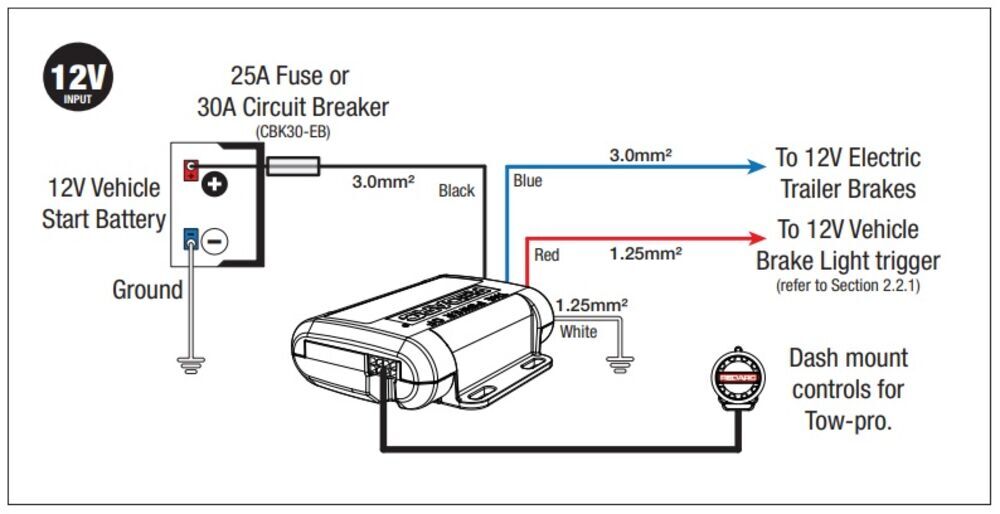
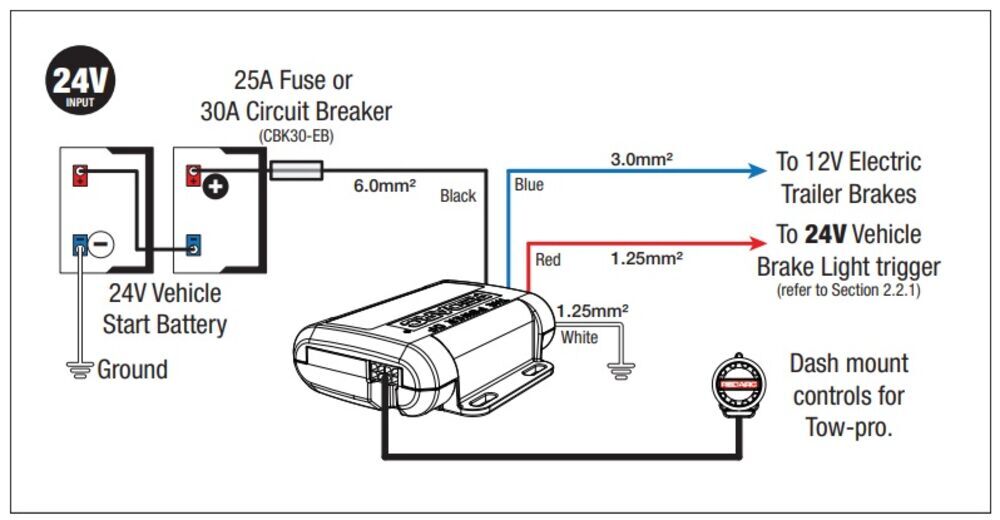
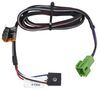
If you don't already have a 7-way plug at the back of your vehicle, take a look at our exclusive 7- and 4-way brake-control installation kit (ETBC7 - sold separately). A 30-amp circuit breaker kit (331-CBK30-EB - sold separately) may also be required for installation.
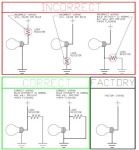
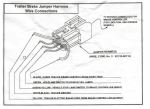
For assistance in properly wiring the Tow-Pro Elite, please refer to the diagrams below:
Proportional braking means that your trailer brakes mimic your tow vehicle's brakes. If you slam on the brakes in your vehicle, your trailer brakes will activate with the same intensity; if you brake lightly, your trailer brakes lightly too. The trailer's braking is in proportion to your vehicle's braking. This saves wear and tear on the tires and the brakes on both your vehicle and trailer.
The Tow-Pro Elite uses an internal 3-axis accelerometer to sense how your vehicle is braking so it can send the right amount of braking power to your trailer. It measures the inertia of your tow vehicle and activates the trailer's brakes to slow at the same rate. The result is uniform braking across your towing setup. No push-pull action - just smooth, proportional braking every time.

California residents: click here
Videos are provided as a guide only. Refer to manufacturer installation instructions and specs for complete information.
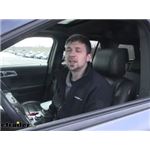
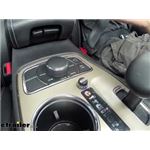
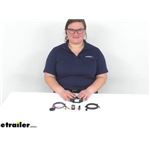
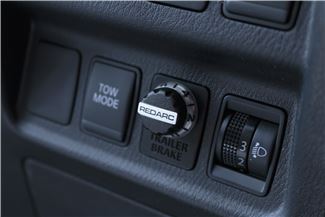
Hey guys, how's it going Conner here today at etrailer.com we're gonna be taking a look at the REDARC Tow Pro Elite Trailer Brake Controller here for our 2013 Ford Explorer. The REDARC Tow Pro Elite Trailer Brake Controller is gonna be an excellent option here for our Ford Explorer. Number one benefits we have of the REDARC Tow Pro Elite is we don't have to have some sort of bulky brake controller mounted during the knee of our dash, like we would for the standard brake controller like we see here. Now, if we we're to mount this here it's obviously gonna cut some leg room away, whereas the Tow Pro Elite it's gonna be composed of two components, we have the control knob which is a very small cylinder knob here which is the only part that's gonna be installed on the outside of our dash here. The other part is a control module, that's gonna be installed behind our dash out of sight. So our Tow Pro Elite Brake Controller is gonna be an excellent option, not only in regards to mounting but also in regards to functionality.
Now, this brake controller is actually gonna be unique because it has two modes. It has a proportional braking mode which is gonna sense the inertia of the tow vehicle and it's gonna apply a proportional braking force back to our trailer. So in addition to the proportional mode our REDARC Tow Pro Elite brake controller also has a unique user controlled mode, and what this user control mode is gonna be used for is if we're taking our trailer off-road or we're gonna be going down any steep slopes, things of that nature, basically, what's gonna be happening, if we're towing a trailer and we're going up a steep incline or down a steep slope the trailer is gonna wanna push the tow vehicle, that's where the user control mode comes in, cause we can activate the brakes, so we don't have that push-pull feeling from our trailer. So as you can see here we have our control knob mounted on our dash here, it's gonna be free from our knee, we're not gonna have to worry about any leg stance restrictions and it's also gonna be easy to reach while we're driving. And right now we have a green LED illuminated which is gonna indicate that we're in the user control mode, however, it's very simple to switch over the proportional mode which is gonna be indicated by blue light.
In order to do this, you want to make sure the brake controller is gonna be turned all the way counterclockwise, lining up with the zero on the control knob, we wanna depress the brake controller, we wanna press our manual override two times, let go of the brake pedal, and there we can see we have a blue led which let's let us know we're in the proportional braking mode. So what's in each of our braking modes, we're gonna be able to rotate our knob here clockwise in order to increase the brake output, we have the highest setting which is 10 and that's gonna give us 12 volts. We also have the lowest setting which is zero which would give us zero volts, and can choose a happy medium in between for our particular trailers, what's great about this brake controller is that there's memory features, so we'll be able to store the settings for a couple of different trailers. Now, if we also press this button here that's gonna activate our manual override which we're gonna see with the purple LED. So please note our REDARC Tow Pro Elite Brake Controller is gonna require that we have a fully functioning seven-way trailer connector on our vehicle.
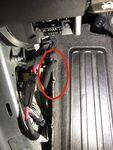
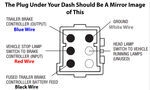
If you don't have one, you can definitely pick one up here at etrailer.com. So now that we've gone over some of the benefits and features, let's go ahead and jump right into the installation process to show you how it's done. So the first step of our installation today we wanna come inside the vehicle under the driver dash here, and what we need to do is we need to locate the factory tow package port for our brake controller, In order to do this, we're gonna have to remove a cover which is underneath the steering column here, cause our factory brake controller port is gonna be located above this panel, right by where our emergency brake pedal is. So in order to remove this panel, we're gonna have two, seven millimeter screws as well as a push fastener which we're gonna need a trim panel tool to pry out. Once we have all the fasteners free, we shouldn't be able to pry the panel down and then out, just like so, and again, just to show you the location of our fasteners, we have one secured here, one secured here, and then here is the push rivet which was a little harder to see.
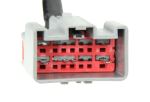
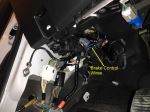
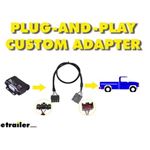
Bop this panel that we just removed and directly beside the emergency brake pedal we're gonna see this gray square connector here which is gonna be our factory brake control port. So the reason we needed to go ahead and locate our factory brake controller port first is because the next step is gonna be to mount our control box here, and we do have a fixed amount of wire, that's gonna be in between the control box and our factory brake controller port. Therefore we need to find a suitable location, that's gonna allow us to reach with the required wiring that we have. So based on the location of our factory brake controller port, it's gonna be best if we mount our control module somewhere around this area here, preferably behind this panel, so what we're gonna do is, we're gonna take a trim panel removal tool or a flathead screwdriver and we're gonna pry off this cover here to see if we do indeed have room behind here. So there's gonna be clips along the outside of it that we need to pry out, I'll show you those once we get it off but it shouldn't take a whole lot of force, so you can see here just a little push fasteners I just pull straight out, and then we can take a look here inside this sort of cavity, and it looks like we have plenty of room to mount our control module preferably to this metal plate here. So we do need to find a way to secure it to that plate, It doesn't look like we're gonna be able to get any self-tapping screws in there just due to the amount of clearance that we have but there are some other ways we can use which we'll show you here in a bit. But before we do that, go ahead and make our wiring connections now, so we don't have to fight with those when the control box is mounted in there. So for the next step of our installation here we need to figure out the wiring that goes from our control module here to the factory tow port on the vehicle. Now we're actually gonna have a few different options for this, here is the harness that comes with our tow pro brake controller, we see the large rectangular connector here is gonna plug into the control module like so and then we have a few blunt cut wires on the end here, so this is where you get into a little bit of a situation where you do have a choice. The first choice we have here is a wiring harness from Tekonsha here, as you can see on this end we have the plug which is gonna match the factory tow package port on our Explorer, we also have a set of blunt cut wires, which we could splice into the wires that come with the harness from our Tow Pro Elite using the supplied butt connectors, this would be very easy cause we're just gonna match color to color, and it's a super simple installation. However, if you don't wanna have to worry about doing any splicing or using any of these butt connectors we do have a plug and play option. In order to do this you're gonna need this other Tekonsha brake controller harness here, which is again, gonna have the same tow package port that's on our Explorer, we're also gonna have a Tekonsha brake controller specific plug on this side in order to adapt that to our tow pro brake controller here we're gonna need this additional adapter harness which is gonna make for a complete plug and play installation. Once we have this adapter on there that's gonna plug directly in to our control module like so. So it really doesn't matter which option you choose, they're both gonna provide the same end result, however, the hard wire option over here is gonna be a little bit more cost-effective so that's what we're gonna be using, however, we definitely have the plug and play option if you feel more comfortable with that. So since we're gonna the hard wire route we're gonna go ahead and make our connections here, the good news is all of our jacket is already stripped for us, We just need to pull the remaining bit off. Also keep in mind we're gonna have two different size butt connectors, we have the yellow ones which are for a 10 to 12 gauge wire, we have these blue ones which I believe are for our 14 to 16 gauge wire. The smaller gauge wires are gonna be our red, which is for the stoplight, the white, which is for the ground, and then the two larger gauge wires are gonna be the blue, which is for the break output then black which is for our battery. We're gonna go ahead and connect those now. So now we're gonna take our vehicles specific wiring harness and attach it to our tow pro harness by just matching the colors up. Then when we're done, we're gonna go ahead and use some electrical tape, just to seal up all our butt connectors, granted it is inside the vehicle, so we shouldn't have too much of an issue with corrosion, but better safe than sorry. So the next step of our installation is to monitor control knob to control our brake controller. Now this is gonna vary a little bit depending on where you prefer to have the knob located, However, it needs to be easily accessible while we're driving the vehicle, It looks like an area right here below a couple of the factory buttons is gonna be ideal for our setup. However, we do need to look behind this panel to make sure there's not gonna be any obstructions because we do have a bit of a body on our switch here which we need to account for the depth of it going back into the dash. So we're gonna go ahead and drill some holes here to mount our control knob, in order to make this a little bit easier on yourself we can go ahead and just remove this panel right here, if we look on the inside here we can see some plastic push fasteners similar to the ones that we removed down here. So we're just gonna be using a trim panel tool again, we're gonna try to pry some of these fasteners away, just like so, there we go, we actually got to have a couple more connections, we need to disconnect here on the back before we pull it straight out from the vehicle and there's gonna be a tab on the bottom of each of these connectors that we need to depress, then we can pull the harness out just like that. So now that we have our little trim panel off the vehicle here, I've went ahead and marked a spot here, which you see with the yellow dot that we're gonna have clearance for our housing to fit through, so I went ahead and test it on the vehicle and just make sure there wasn't gonna be any obstructions behind this trim panel here. So now what I'm gonna go ahead and do is I'm gonna go ahead and make a couple of holes here, now the instructions are gonna be a little confusing because they're all in metric and most people aren't gonna have metric drill bits on hand, so for this first pilot hole, we're gonna be using a 1/8 inch drill bit, we're just gonna drill this out just like so. So now that we have our first hole drilled we do need to drill another hole, we're gonna start smaller, we're gonna start with a 1/8 inch drill bit then we're gonna work our way up to a 3/8 inch drill bit, however, the spacing between these two holes is critical, so what we can do is to make this a little easier on ourself, we can go ahead and use this plastic trim ring that comes with the switch, we can go ahead and line that top hole up with the hole we just drilled, now we're gonna need a drill another hole adjacent to this in the center of this ring here. I'm gonna do my best to try to roughly mark out the center of this new hole here. I'm gonna come back here with our eighth inch drill bit just make sure it's dead center, as close as we can get as possible, drill that out. Now that we have our pilot hole drilled, we're gonna come back with our 3/8 inch drill bit and enlarge that second bottom hole here. Just like so. So once we have our two holes in place we can go ahead and begin to assemble our switch, we're gonna start with our outer trim ring here, it's gonna press into place, then we're gonna take our switch housing from the back, keep in mind we do need to align that smaller top hole into our trim ring there, just like so and we can go ahead and thread our nut here, you can see there, the neck in needs to go down into the switch housing that's just gonna thread on like so. Now the next step here we're just gonna take our 12 millimeter wrench, we're just gonna finish tightening up this nut here to secure the switch housing. Now the next step we can go ahead and install our switch head here, but before we do this, we need to rotate this knob all the way to the left or counterclockwise and we're gonna do is we're gonna try to align the zero with the top marker there on our switch. Then we can just press it on the place like so. So now that we have our controller mounted what we want to do is, we wanna take our data link cable here, just go ahead and plug it in now, so we don't have to fight with that later and we can feed our cable up through here, you can go ahead and make our connections again, making sure we have clearance, just like so, now we can go ahead and just press the panel back into place. Keep in mind we do have a lip here on the right side of the panel that we have to sort of feed over the lip here on our dash. And there we have it. So now our next step here is to go ahead and mount our control module, as we noted earlier, there's gonna be a nice metal flat surface here which we can mount it to in this pocket here, however, we're not gonna be able to get any screwed into this just because the angle of this panel here. So what we're gonna do is, we're gonna first make sure we have the correct orientation, we're gonna be using this larger connector facing downward cause our factory tow port is gonna be below that, and then the top one is gonna go to our control knob. So we're gonna be using sort of a unique attachment method here, we're gonna be using some double-sided adhesive tape which you see here, keep in mind this does not come with the kit. So we're gonna attach this to the back of the module here, just press it into place, we're gonna remove the backing like so, now we can go ahead and just loosely mount this into position, keep in mind, we have two openings here in our metal, I'm actually gonna be running a zip tie through those and securing it to the two holes on the control module, so we wanna try to line those up as best we can. Just get a quick eye before I press it down, and then as stated we're gonna take a zip tie here run it through these two holes to secure the control module to our backing here. So upon further inspection after messing with the adhesive more it's actually holding a lot better than I thought it would, so we're not gonna need any additional attachment methods such as the self-tapping screws or the zip ties but feel free to use more if you wish. So now the final step here is we're gonna go ahead and connect our wiring harness from the module here to the factory brake controller port as well as the cable here from our adjustment knob to the control module. So we hear that click into place and we'll leave the slack out here so we have more room to work, so this other one was gonna be a bit difficult if you'd like to go ahead and connect these beforehand, but we should have enough room to make our connections still, there we go. Now we can go ahead and route this into the harness down to our factory brake control port. As you can see here we have the other end of our brake controller harness, we're gonna have to plug into the factory tow package port which we pointed out earlier. So now we're just gonna take the remaining excess wiring we have and just tuck it in this opening we have here behind our panel. So now that we have our wiring tucked in place we can go ahead and reinstall our trim panels here. So now that we have everything wrapped up, we need to go ahead and turn our brake controller on and we need it to allow it to go through the calibration settings which is gonna entail just driving around doing some slow speeds start and stops. So during the calibration settings, we're gonna see in alternating blue/green light flashing, then once the calibration is complete we're gonna get a solid blue light, so we're gonna go ahead and turn the brake controller on now and drive around to calibrate it. So now that we have everything hooked up we're gonna go ahead and test our brake controller here using a test box which we have here at etrailer, however, if you have your actual trailer nearby that'll work as well. So we're just gonna go ahead and hit the manual override button on our brake controller here, as you can see, we have voltage back to the seven way, so we know everything's working correctly. So now that we've tested everything to ensure it's working we've showed you how to go over the controls. That's gonna do it today for the installation of our REDARC Tow Pro Elite Trailer Brake Controller here for our 2013 Ford Explorer..


Do you have a question about this Trailer Brake Controller?
Info for this part was:
At etrailer.com we provide the best information available about the products we sell. We take the quality of our information seriously so that you can get the right part the first time. Let us know if anything is missing or if you have any questions.


Thank you! Your comment has been submitted successfully. You should be able to view your question/comment here within a few days.
Error submitting comment. Please try again momentarily.