

 Arrives before Christmas
 To see if this custom-fit item will work for you please tell us what vehicle you'll use it with.


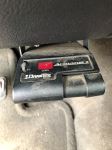
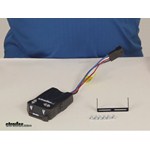
This stout brake controller has easy-to-reach button controls up front and a simple slide-lever manual override. The digital display is large and easy to read. And the included splice-in harness and mounting bracket make for simple installation.
Features:
Specs:
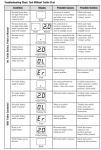
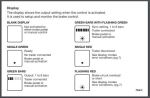
Power output is the maximum amount of power that will be applied to your trailer's brakes. How much braking output you need is determined by the weight of your trailer; a heavier trailer will need more power to bring it to a stop. You want to go as high as you can without the trailer brakes locking up. It adjusts on a scale of 0 to 10.
Once you have the power output set, you can fine-tune your braking by adjusting the sync control. This controls the aggressiveness of your trailer's braking, meaning how quickly the brakes reach the maximum braking level. If your vehicle takes too long to come to a stop, increase the setting. If it stops too abruptly, decrease the setting. The sync setting is shown as a number followed by the letter "o" to differentiate it from the output reading. The least aggressive sync setting is 0o and the most aggressive is 9o.
The Activator IV displays the power settings as you adjust them. While braking, the unit will display the power output setting. To see or adjust the sync setting, step on your brake pedal and press either the plus or minus button to increase or decrease the setting.
The display will also show trouble codes to alert you to any potential problems, such as short circuits or overloads, or if there is an internal problem with the controller.
Installation
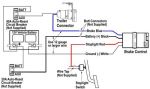
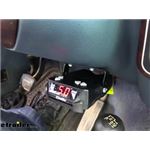
Because inertia plays no role in the functioning of this controller, you do not have to mount the unit at any particular angle. Your mounting options are limitless, so long as you can still easily access the controller and manual override. And because the included wiring harness plugs into the back of the controller, you can easily remove the Activator when you're done towing so you won't bang your knee.
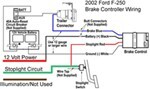
Note: If you don't already have a 7-way plug at the back of your vehicle, take a look at our exclusive 7- and 4-way brake control installation kit (ETBC7 - sold separately).
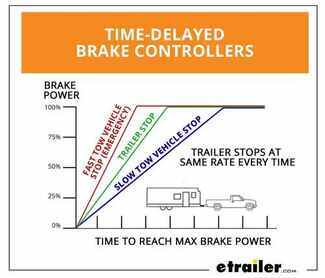
Time-delayed braking means that when you apply the brakes in your vehicle, the controller activates the trailer brakes at a pre-set intensity and rate. Both the amount of braking power (gain) and rate of application (load) can be adjusted to suit your preference, the road conditions, the type of trailer, and the weight of your load. To determine which levels are best for your application, test your towing setup and choose what feels right.

California residents: click here
Videos are provided as a guide only. Refer to manufacturer installation instructions and specs for complete information.
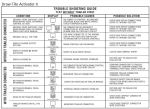
Today on our 2013 Dodge Durango, we're going to look at, then show you how to install the Draw Tite Activator IV. This is a time-delayed trailer brake controller for one up to four axles. Part number on it is 5504. We're also using the Tekonsha Plug-In Wiring Adapter, part number 3045-P. Here's the Activator IV all installed on our dash. As you can see, we've got a couple of easy to get to buttons here on the top, an easy to read LED display, and this time controlled brake controller has full adjust-ability to really allow you to customize this for your trailer. To start with something that's common, it's going to be gain on all brake controllers.
Right now we've got it set at max power of ten. By hitting the down button, we're going to turn this down. This is going to reduce the maximum amount of braking force that can be sent to the rear. So if you're hauling a light weight trailer, or if the roads are a little bit slippery, so you don't want a maximum braking power going to to the back, we can turn that down. Then no matter if we activate it with our foot brake or with our lever brake, it's only going to go to the maximum that we have set. The sync, what this does, you can see we've got multiple adjustments.
This is going to allow us to go from basically zero to nine. So we're going to have ten different settings that we can dial this up to, raise our gain up, so we can get a good demonstration of it. Let's just take the gain to max. Now I have to turn on the car, and it's going to beep. You'll have to bear with me; I'll try to speak up.
So now when we apply our brakes with the sync in the low setting like it is . You see how that slowly progresses up to whatever our maximum output number is. Currently it's ten. If we had this set to five, it's going to slowly progress up to five, and then it's going to stop. Turn that back up. Now if we turn our sync setting up, let's say we go all the way up to high power, it's going to go up very quickly and very aggressively, to provide full power back to the rear.
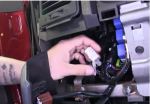
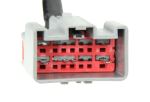
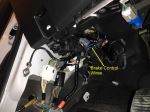
See how that really builds up a lot quicker than it did, and then we'll have full adjustment kind of anywhere in between there incrementally to fine tune it to the occasion. This is going to allow you to override that sync setting. So maybe you've got it set real low, so it's going to gradually apply the brakes kind of like this. Well if you need to, in an emergency situation, you reach down here and grab a handful, and get those brakes applied to whatever you've got your maximum setting to. Another great thing about the time delayed system is of course, we can mount this in any location we want. If you don't want controls or this lever, you can mount it up underneath the dash. It really doesn't matter other than getting to your buttons and stuff. That way you can kind of fine tune it and adjust it for each trailer. Whether upside down, sideways, backwards, it's limitless as far as the mounting options that you'll have. Now our installation's going to begin by removing this. It's kind of like a decorative, or a cosmetic cover that's underneath the dash here. There's a couple of push pin fasteners that we'll take out. That should just come down out of the way for us, and that allows us access right up under the dash. Set that aside. If we want to, we can certainly reinstall this. If not, we don't have to. Now here's our parking brake lever. It comes up to a little white panel here. Right above that, we're going to see our gray connector. That's what we'll plug into our pigtail. To release it, there's a little catch here on the bottom. We'll pull down on that, and then just give it a push rearward and get it slid off. Once we've got that tab released, we'll just kind of push it forward slightly, and there you see it's going to come right off there and be accessible. You see that little tab is going to be located right there. You just want to pull down on that tab, and then that will allow you to slide it forward and out. Now we can take the end of the pigtail. It will only slide in one way. Slide that in; you want to hear it click, and then we'll push and pull just to make sure that it's nice and secure. Now our pigtail handle, let's get our bracket in place. I'm going to use this mounting location right here. I really like it. It's convenient. It's out of the way. It's easy to get to. You can choose to come out on this lip here. You can wrap up really limitless options as far as mounting is your concern. I'd stay away from this left side of the dash, because when you get out, your knee kind of comes over this way. You might have some interference. If you want to drill holes in your dash here, perfect. I prefer not to, that's why I stick it underneath here. It's also going to give us a nice clean look. Once installed, all of our wiring can be tucked up and hidden out of the way. Now we're just using two of the self-tapping screws that we're provided to mount our bracket, and we'll use two more of them to secure the actual controller to our bracket. All right, that's really nice and secure. Now let's grab our controller. We're just going to plug that into the pigtail we installed, give it a couple push-pulls, make sure everything's nice and secure, and now let's bring our controller up. We'll have a set of holes here at the bottom or at the top. I don't think the tops of the holes are going to work for me, because I've got to tuck it under the dash, so I'm going to use the bottom set. Let's get that one started, and now I'll get the other side started. Now we want our buttons here where we can reach them. So depending on the size of your finger, if you got a little more of the pudgy sausage fingers, those will be about right for me. If you have a little bit skinnier fingers, maybe you can tuck it up a little bit more. Now just for grins, this is up out of the way pretty nicely back here, but it's making contact with the steering shaft, so let's move that around a little bit. Up here just a little higher on the steering shaft, it doesn't rotate or move when you turn the vehicle, so it gives us a really nice mounting location. We'll take a zip tie and go up and around that, also bring that around our wiring and secure it. I'm going to pull out a little slack, because we don't want any tension here in between the controller and our zip tie. Now we'll go in and trim any excess off that we might have had. There we go. Everything's nice and tight. Then if our pigtails still kind of over . If it's in the way, there's a nice little cubby hole right over here. Tuck that in. It's nice and deep. It can really hold that, so we won't have to mess with it. It gives it a really nice, clean look. With everything working properly, that's going to complete today's installation of the Draw Tite Activator IV, part number 5504, also using the Tekonsha Plug-In Wiring Adapter, part number 3045-P on our 2013 Dodge Durango. .

As good or better than OEM!
Worked perfect, just as advertised.
Worked great!
Received my order sooner than expected.
as described
EXCELLENT PRODUCT
Excellent product!!
Factory plug, good value.
Fast service,good price, got the right part
5 stars5 stars
excellent customer serviceworks great
Arrived as ordered on time and installed no problem.
It plugged in and worked as advertised,Thank you so much,
Fantastic brake controller. Even better website.
shipping was free took 3 days and ever thing came in working order
Great controller, we install it on almost every system we do.
Good overall product. Meets needs and is inexpensive.
seller was super fast and product works very well good investment
this controller is great. etrailer delivery, packaging, pricing were ALL great...
Received my brake controler in perfect condition, I installed it the next day and works fine.
Love it.... Installed in my 2011 chevy in about 5 min and it works great. Recommend to anyone
recieved the product on time. bery happy with their service i will be using them in the future.
It worked very well with my truck and the electric brake
Needed an extra harness for another car. Works perfect!
Had to add wire it get it throught the firewall. this means pulling conectors throught the boot on the firewall.


Do you have a question about this Trailer Brake Controller?
Info for this part was:
At etrailer.com we provide the best information available about the products we sell. We take the quality of our information seriously so that you can get the right part the first time. Let us know if anything is missing or if you have any questions.


Thank you! Your comment has been submitted successfully. You should be able to view your question/comment here within a few days.
Error submitting comment. Please try again momentarily.