
To see if this custom-fit item will work for you please tell us what vehicle you'll use it with.
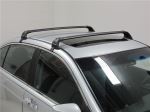
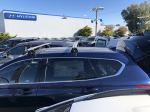
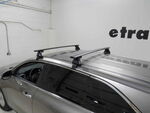
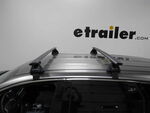
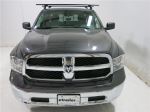
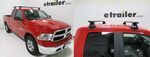
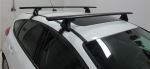
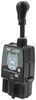
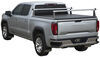
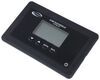
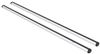
This heavy-duty, versatile Yakima roof rack comes with strong, aluminum crossbars. It works with channel-mount and clamp-on accessories, plus each bar has tie-down points on the endcaps. Installs on your vehicle's naked roof.
Features:
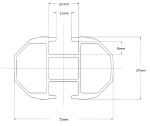
Specs:
 Alternate Instructions
California residents: click here
Videos are provided as a guide only. Refer to manufacturer installation instructions and specs for complete information.
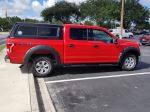
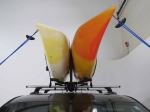
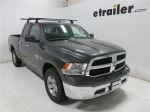
Hi, Matt with etrailer. If you have a 2025 Ram 1500, and you're looking for something that is extra sturdy, extra strong to carry whatever items you have, then the Yakima HD roof rack is gonna be a great option for you. So let's check it out. What I really like about a roof rack is a few things. So this is gonna be perfect if you have any accessories like a bike rack, ski carrier, or even if you have a canoe, this is gonna be a great location for it, since it's gonna be above your cab, saving you a lot of room. And then you can leave your bed open for other items, anything for work, or if you have a bunch of camping supplies, you can put it back there.
And I like this better than any hitch mountain accessory or trailer, because it's not gonna be extending the footprint of your vehicle because the truck's already a little bit big anyways. So saving any room you can is gonna help you a lot in the long run. And really the biggest thing that's gonna separate this rack from other X is gonna be the crossbars themself. Now we're gonna be talking about the crossbar, the tower, and the thick kit. So let's kind of focus on that crossbar right now.
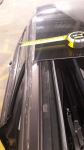
So you'll notice with this HD design, this is extra thick, so this gonna be extra strong too. Now something to think about is some accessories might not be able to wrap around that very well. So what you could do is use the T channel that is built on top of it, and mount your accessories like that instead. What I also like about this is we're gonna have this anchor point at the very end of it. So if you do have anything that requires straps like a canoe or kayak, you can use this point to tie it off to.
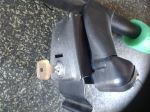
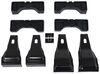
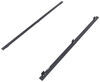
Underneath it, we're gonna have another T channel. And this one's gonna be a little bit different, might be a little bit hard to see. But this is what's being used, the mount your tower to your crossbar. And with that tower, it is gonna have this end cap that comes right off. You notice we have this little plastic core right here.
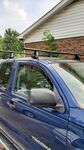
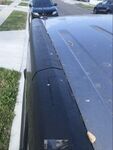
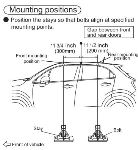
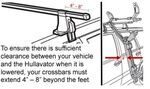
You can actually get that replaced with a metal lock core. You can find that on your website and you can get that key-to-like with your other Yakima accessories. That's gonna cover up all these points here. There's gonna be a lot of bolts, some little doors, there's a lot going up here. So it's nice that we can cover this up. And really what all these mechanisms are doing is helping us get a good fit today. A lot of times this is used to really make sure you have a good fit on top of your roof. If you have a roof that tapers in, we really don't have a roof that changes too much. So we don't have to think about that a lot. But underneath you'll notice we have this hook and base that kind of grab onto your roof. Now the way this is working is if I open up my door, you'll notice that hook is grabbing onto your gutter right here and that's how you're getting that good fit. And above that at this kind of rubber base here, that's made outta rubber, we're gonna scratch anything up. This is how it's sitting on top of your roof. Now as far as how that is looking compared to other options around, that's looking pretty okay. I mean it's better than some other options I've seen around, but it's personally not my favorite fit. If I was gonna compare it to another probably better fit, I'd say the Thule roof rack is great. 'Cause that fit is almost seamless on top of your roof. Now let's move over to how this is gonna sit on top of our roof. The first measurement I want to get is gonna the overall height it adds. So going from your roof to the top of your crossbar, that's gonna be about five inches. That's not too bad, but what I'd recommend doing is taking the total height of a vehicle, your crossbar, and if you have anything on top of that, include that too, so you know if you can make it underneath something like a garage or not. Next up we're talk about the space underneath. That's gonna be a little bit over three inches, so that's good amount of space for you for most cases. Now, like I said, a lot of clamp on accessories are probably not gonna be able to wrap around there, so I wouldn't be too concerned with it. But if you do get one to wrap around there and if it is a little bit bulky, just kinda keep in mind it might be a little bit harder to really use. And if you have a sunroof on your roof, if that spans up, it might make contact with it. So just keep an eye out for it. And for how far it's gonna stick out on the side for your overhang, this is pretty minimal. That's gonna be as close as you can probably get and a lot of people like that 'cause you're gonna be less likely of hitting your head on this. Now it is a downside in some cases, because if you are using a clamp on accessory, you're not gonna have really any room to put it on like that. But like I said earlier, most mount on accessories won't be able to wrap around this unless you have an adapter. 'Cause definitely keeping in mind but something you would want as close as possible to the edge would be anything like a bike rack or a ski carrier. And as for the weight capacity, now like I said, these bars are pretty sturdy, but it's important to think about the whole rack itself. 'Cause we have the fit kit and the towers themselves, so your crossbars are probably gonna have the highest weight capacity, and honestly what your limiting factor most likely will be is gonna be your roof. So what I'd recommend doing is just finding that in your owner's manual. Then going from the lowest rated component. In my opinion, I think this is a solid choice, especially if you like the look of something a little bit more rugged on top of your roof. You like those tie off points that we have too. If you have a lot of kayaks or canoes, you just want something that's gonna last you a long time. Now if I was gonna compare it to anything else, I still think the Thule roof rack is another great option. I think it just gives us a little bit more of a sleek design and I really like how those fit kits really sit on top of a roof. But either way, we can't go wrong. As for the installation, either one of 'em won't be too bad. Now this one be a little bit more involved. There's a lot more settings you have to deal with. So if you are a little bit curious to see how we handle it, just stay tuned and we'll walk you through the process. If you don't have that HD adapter in here yet, this is how you're gonna do it. You're just gonna grab this plastic piece. This right here has this ridged side on the bottom. I find the best way to put this in here is kind of add an angle. Putting in one side first and applying the pressure to the other side til it kind of clicks into place. Then you're gonna grab your block and this is gonna have a threaded hole on it. Make sure you just stick that and line it up with your bolt. If you have any issues doing that, just flip this around. You're gonna find that you have this opening right here. If that opening is blocked, it's just 'cause it's blocked by this little tab. So just pull that out. Now you have access to it. Grab your Allen key, try to line it up, and then just tighten it on slightly. Just like that. Now that your towers are prepped, because you're gonna do that on each one, you're gonna move over to the crossbar, and we're gonna flip this over. And now we have the underside facing up. You're gonna find we have a little bolt in there. With that bolt, I'm just gonna grab our Allen key and remove it. And sometimes this can be a little bit tricky getting out. So what we find the best way to take it out is just by flipping it over and catching it in your hand. And you can remove your end cap. Sliding that off and we can put a towers on. Now the way you're put your tower on is just by lining up that metal block with that channel. Now I can actually mount both the towers from the same side. I just need to make sure they're facing opposite directions. So I need to make sure this is facing like this for the side furthest away from me. I'm just gonna push it on all the way across. And for the second one, I'm just gonna make sure it faces the opposite direction. I'm gonna take off that end cap. You can just squeeze on it and it'll come right off. And it's just gonna face this way when you put it on. Now if yours is already on and it's too tight, just loosen that same bolt we used earlier to install that HD bar adapter. And then it'll go on. And from here, just make sure you put your end caps back into place, and we can move over to the next step. (loud thumping) We are gonna put these towers in their exact spot how they're gonna sit on your roof. Now we need to reference our instructions to find those exact numbers. That's gonna be under your M1 and your M3 measurement. Your M1 is gonna refer to the measurement on your front crossbar, and your M3 is gonna refer to the one on your rear crossbar. They might be different. Sometimes they're the same though. And a easy way to really measure this out is if I look down here at the crossbar, we're gonna notice there's some little numbers here. Sometimes they can be a little hard to see, but once you spot 'em, then you can just line up the vary front of our tower, to the spot where it needs to sit. And then just do that on the other side. Next up, we're gonna have to adjust some settings. But before we do that we're gonna have an arrow on our crossbar. And it's gonna make it easiest for you if you make sure this arrow right here is facing away from you. It might be kind of hard to see, but just make sure it's pointing away from you. Once you've done that, we can ask you to come over here to the tower. And the first setting we're gonna adjust is gonna be our P1 or P2. Depending on if you're on the front or rear crossbar. We're gonna have that bolt in here, that same one we used to connect to that block earlier. You're gonna notice we have three different lines. There's gonna be an A, a B and a C. The C is gonna be closest to you and you're just gonna reference your instructions to find which one this needs to sit on. And once you've done that, then we're gonna tighten this into place. After when this is tightened, you're gonna notice at some point you're gonna hear some clicking coming from your Allen key. That's gonna be that built-in torque device letting you know it's tight enough. (tool clicking) Just like that. Next up, I'm gonna reach over here, and I'll grab one of our bases. And what I wanna do with this is there's gonna be an arrow on that tube. I wanna make sure that is facing away on the inside of your crossbar. There's also gonna be this little indention here. Just make sure that is facing away. Once we've done that, we're gonna line this up with this metal bar. You are gonna find we have an opening, that's gonna match up that same shape. You are gonna push down on it, (light clicking) until clicks into place. And from here we can adjust our T1 and our T2 measurements. And that's just gonna be the T1 on your front crossbar and the T2 on your rear crossbar. The way we're gonna adjust that is by coming over here to the secondary bolt. That's gonna be right here. That's gonna be very similar to the P1. We're gonna have a one, a two and three. The three is gonna be closest to you, so just reference your instructions to find which setting you need this to be on. And then you can adjust it. The easiest way to adjust it is just by loosening that bolt up, grabbing the fit kit, and just pivoting it to where you needed to sit. And then retighten that down. And I wanna repeat that whole process on the other side. And now we can actually start putting this on our roof. Now what we're gonna do is make sure that arrow we had on the bottom of that crossbar is still facing forward. And when we put it up here, we're just gonna take our time. You could grab a friend to help you out with this, but you can do it either way. I'm just gonna roughly place it up here. It doesn't need to be perfect and change it up later on. And either way you go, it's gonna be the same process either with your front or rear. And to make sure your crossbar is sitting in the right spot, we're going to use our M2 and a M4 measurements. You can find those in your instructions. Now for your M2, that's gonna be referring to your front crossbar. The way you're gonna get that is measuring from the very top of your windshield all the way up to the very front of this base. Once you've done that, then just do it on the other side to make sure it's even and square it off. Now when we're going over to the rear crossbar, it's gonna be a little bit different. Instead we're gonna be going from the front of your front crossbar, to the front of your rear crossbar to get that M4 measurement. Once you reference that measurement and get that even on both sides, you can move over to the next step. Once you have this up here, you might find you have an odd fit. And what I mean by that is the way our base is sitting on our roof. What we're looking for is something to be more centered on this black strip here. So what we're gonna have to do with this is just bring a tower in a little bit. Now this happens every once in a while when you get kits, sometimes it just doesn't match up to your roof exactly. And that's where we're kind of fine tune it now. So what I like to do is grab some of that painter's tape and just lay it right next to where my base is sitting. So once I put this back up here, I don't have to remeasure anything. I just got done fixing how everything is sitting on here. And now we're gonna install these clamps. So what you're gonna do is come over here and open up our access door just like that. You are gonna find we have this little bolt in here, it kind of has this kind of a point that sticks out. You are gonna stick that underneath. And that point that sticks out there is gonna grab right into that opening. This side here. Not the bigger one, but the smaller one at the bottom. And we're just gonna double check with how the bottom's sitting here. And what my goal is, is to lower that down. So when gonna start up here with that swing bolt, bring it down some. Right now it's making contact with it. So I'm actually gonna go over to the dry bolt, loosen that a little bit, just like that. And now it'll completely clear. Now lower that a little bit more. Try and get this as straight as possible. Once that's done, we'll come back over to the drive bolt, right here, tighten that just a little bit, and come over to your swing bolt and tighten that just a little bit too. You don't wanna tighten that all the way down, because we need to tighten the other side down, because if you tighten one side too much, this is gonna pull and give you an uneven fit. So you're just gonna keep doing that back and forth. And you're eventually gonna reach a point, you're gonna have a lot of resistance. (light clicking) You start hearing this click, and we will tighten up the bottom one too. (light clicking) There we go. And we'll close up that a access door. Close up this tab two. And from here we're gonna give the good shake test, make sure everything feels solid. It's not gonna go anywhere. And then I'm gonna put my end cap on. And if you got the lock core for it too, you can lock it up. And from here we're really just gonna loading up with whatever gear we have and taking it out for a ride to see how it does. But that's just a look at the installation and some of the features of the Yakima roof rack on our 2025 Ram 1500. I'm Matt, thanks for watching.
Ratings & Reviews


Info for this part was:
At etrailer we provide the best information available about the products we sell. We take the quality of our information seriously so that you can get the right part the first time.


Thank you! Your comment has been submitted successfully. You should be able to view your question/comment here within a few days.
Error submitting comment. Please try again momentarily.