

 Arrives before Christmas
 To see if this custom-fit item will work for you please tell us what vehicle you'll use it with.


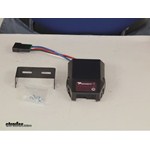
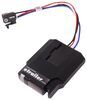
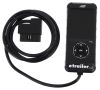
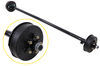
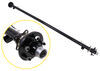
This proportional brake controller is designed to keep towing simple. Includes an LED braking indicator, a slide-bar manual override, and a knob to adjust braking power. Mounts easily within a 90-degree vertical range.
Features:
Specs:
Once the brake controller is installed, you can use the knob on the right side of the unit to adjust the gain (also known as output). Gain lets you set the maximum amount of power that will be applied to your trailer's brakes. You want to set it as high as you can without locking up the brakes. Typically, this setting is only readjusted when you experience changing road conditions or if you switch over from a heavy, loaded trailer to a much lighter, empty trailer, or vice versa.
You can fine-tune the gain by adjusting the sensitivity of the internal sensor using the knob on the left side. This controls the aggressiveness of your trailer's braking, meaning how quickly the brakes reach the maximum braking level. You can adjust this when you're towing heavy loads and you need more umph to bring your trailer to a stop. Your tow vehicle doesn't need that much power to brake in time, but your heavy trailer does. A high sensitivity level will get the braking power to your trailer brakes faster and with more intensity so that it doesn't push your tow vehicle forward.
LED Indicator
Keeping with its simple design, the Voyager will not overwhelm you with information. An LED indicator on the top of the unit lights up green to show that your trailer is securely connected to your tow vehicle. The LED indicator will change to red when the brakes on your trailer are activated.
During installation and setup, this light is also used to ensure that the Voyager will be able to function correctly. Proper leveling of the internal sensor is crucial to the operation of this brake controller. When the sensor is level, the LED will change to a shade of orange.
The Voyager is designed to be mounted in your cab at a vertical angle that is between -20 degrees and 70 degrees. The brake controller needs to be horizontally level and parallel to the direction of travel in order to function properly.
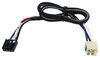
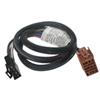
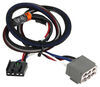
To connect the Voyager, just plug the included harness into your vehicle. The other end plugs into the controller - no hardwiring required.
Once the controller is mounted and connected, you must level the internal sensor. First, set the overall power to the maximum using the knob on the side of the controller. Then, while pressing the tow vehicle's brake pedal, adjust the level knob on the other side of the brake controller (this is the same knob that is used to fine-tune the power output) until the LED monitor is a shade of orange.
Note: If you don't already have a 7-way plug at the back of your vehicle, take a look at our exclusive 7- and 4-way brake controller installation kit (ETBC7 - sold separately).
The Tekonsha Voyager brake controller comes equipped with proportional braking to give you the best towing experience. Proportional braking means that your trailer brakes mimic your tow vehicle's brakes. If you slam on the brakes in your vehicle, your trailer brakes will activate with the same intensity; if you brake lightly, your trailer brakes lightly too. The trailer's braking is in proportion to your vehicle's braking. This saves wear and tear on the tires and the brakes on both your vehicle and trailer.
The Voyager uses a pendulum system to sense how your vehicle is braking so it can send the right amount of braking power to your trailer. It measures the inertia of your tow vehicle and activates the trailer's brakes to slow at the same rate. The result is uniform braking across your towing setup. No push-pull action - just smooth, proportional braking every time.
 Alternate Instructions
California residents: click here
Videos are provided as a guide only. Refer to manufacturer installation instructions and specs for complete information.
Today on our 2010 GMC Yukon, we're going to be showing you how to install the Tekonsha Voyager. This is a proportional break controller that works great for 1 up to 4 axles. Part number is 39510. We're also going to be using the Trailer Mate universal wiring harness. This offers a 12 inch long pigtail part number is TM75127. The Voyager is a proportional break controller.
Proportional break controllers are very nice in that we don't have to wait for them to activate and they're not going to slowly rev up to maximum power, like we get with the time delay kind of setups. A proportional break controller uses a sensor inside of the controller itself that has it feels are towing vehicle slowing down, it's going to send the right amount of breaking power back to our trailers. It's going to give us instant breaking power to our trailer, which is going to be in proportion to what our vehicle is doing. You can see right here our green light comes on. The nice thing about that is it constantly monitors that connection. If it ever separates, that light is going to go off and indicate that for us.
You can see the Voyager has a manual override lever. This is going to allow us to manually operate the breaks on our trailer, up to whatever gain that we've got set. Wherever we've got that set to, when we apply our manual override, it will go right up to that level. It's going to reduce the rise of overpowering our breaks and locking them up. The nice thing about the gain being fully adjustable here, is that we can really dial it in for trailer, driver, or road conditions. Our level setting is going to be here on the side.
To get this set, what we're going to do is apply our breaks, and you'll see as we rotate this, our LED is going to change from a green into more of a yellow, then into that really dark red. The dark red will indicate that we're sending back an aggressive break signal to our trailer, to get our breaks operating quickly, and getting to that maximum level of breaking sooner. The lower we have that set, we go more into that orange, to where it's more right in the middle. That is going to be just like a normal setting. Then we can even adjust that to where is goes into more of a green.
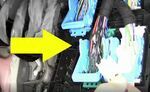
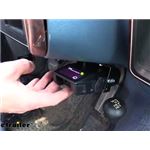
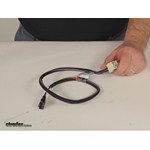
That's going to give us more of a delayed setting, maybe empty trailers and things, we don't want to wear out those breaks. That allows us to fine tune it. Get it right where we want for operation on our trailer, no matter what the weight is. Before we install our break controller, let's pop this cover off out here. We're going to check for that controller wire. You've got 2 clips on the outside, 2 clips on the inside of what we'll take off to get it removed, we'll set this aside. We just want to verify, you'll see here, this is our 12 volt power wire, that sends power to the back of the truck. That one is okay if it's connected. It's the one here on the larger stud 00:02:52 we don't want connected right now. If it's not connected, you're going to find it stored down here bedside the fuse panel. See here it's already going to have the terminal on it. That's going to slide right down over there. While we do our installation, let's keep this separated so we don't have to worry about any power going to our 12 volt wire. To begin our installation we're going to find our factory harness. It's going to be 4 wires underneath the dash here. In our case here, we want to come right up, just kind of to the left of our break peddle, and there's going to be a small tab right here. If we look just on the backside of that tab, there's a wire loom that runs right here. Then we're going to see a couple of wires that just kind of come down here and end. One is red with a black stripe and a few others. What we want to do is separate the tape that's holding that bundle of wire up, without cutting into the actual wire loom. See that's going to allow us to pull our wires down. We're going to have the 4 that we need to make our connection to our trailer mate pigtail. The piece of tape that holds it up into place is important, so don't destroy it. You want to look on here, and it's going to tell us exactly what we need to connect to. It tells us our red and black, that's our 12 volt power. Our white is going to be our ground. It shows us that the light blue with the white stripe, that's going to be our break signal, it's marked as CHMSL. Then our dark blue, this is going to be our auxiliary, it's marked AUX, that's our break signal going back to our 7 pole connector. Want to do is give these all a fresh end, in case there has been any corrosion, or anything like that. We're going to get these stripped back. Now one thing that you want to keep in mind with the red and black one is that if somebody has already hooked up the break controller lead that's underneath the hood, this is going to have power, so if you then touched it to something under the dash you could short that out. In our case, we've made sure our break controller lead is not connected. We'll show you where that's located when we hook it up. We know our wire is not going to have any power to it at this point. We need to use a few butt connectors. These aren't going to be provided. I recommend having 2 in the 10-12 gauge size and 2 in the 14-16 gauge size. All crimped on there. Now we'll bring in our Trailer Mate pigtail here. You can see they are pretty stripped here a little bit. I'm going to take just a little bit more off, not much. All right, now our output from our Trailer Mate harness, that needs to go to our auxiliary. Our output to our breaks on our trailer. Our red wire, this is our stop, that needs to go to the CHMSL, or to the stop light signal, the light blue with the white stripe. Our white wire, that's going to go to our ground signal. The last one is going to be our black wire that's marked power, that's going to go to the red and black 12 volt power. Now a little bit of electrical tape, we can get that wrapped up so it will look a little bit nicer. That tapped up, set it aside and figure out exactly where we're going to mount our break controller. Here's our mounting bracket. If you can see, we're going to have 2 hole locations. 2 on the top, that's for a fixed flat mount. The ones on the bottom, those are going to allow us a little bit of rotation. That could be helpful in mounting. Here on the Yukon it's not really that big of a deal. You got options on where you could mount this. I usually like to stay on the right side of the dashboard so when you get in and out you don't bump it with your leg. Right down here there's a screw that holds on a little tab here. Lot of times I like to go right into that. Then we can use another one of the self tapping screws provided to hold it in place. What I'm going to do is just use a Phillips screw driver to back that out. Slide our bracket right up behind it. Looks like our holes line up fine. We're going to get that back secured. Check behind our other hole location here to make sure we don't have any wires or anything. We'll use one of our self tapping screws. Brackets in place. See on the back of break controller here, we're also going to have a pigtail. Plug right into our Trailer Mate pigtail. Then it wouldn't be a bad idea to go ahead and tape this up so you don't see these wires sticking up from under the dash, give you a nicer look. Now we'll place our break controller up on our bracket. Choose which of the options that we want. We just want to be sure that we keep our break controller inline with the direction of travel. We want to keep this inline this way. We can go to negative 20 degrees, or we can go up to positive 70 degrees, so we've got 90 degrees of available mounting rotation there. All right, nice. Got a good solid mount there. We just want to take our access wire, there's a heating duct right here that we can zip tie around. Or we can bring it over here and do a wire loom, whatever you want. Just keep it up and out of the way so we won't have to worry about it interfering with our gas pedal or our break. All right, now let's head under the hood. Now with our break controller installed, let's go ahead and pop this arm up just a little bit. It's going to give us room to get in there. We'll have to get our own nut. It's going to slide down on there. All we have to do is tighten it down. That will provide the power we need to our break controller. It's just a matter of kind of bending that down a little bit. Kind of keep those tucked in. Over here, not too worried about the wire. It's going to stay down and out of the way. Your 12 volt wire, if you've just connected that, that stays stored right here stored under the master cylinder. It's going to be wrapped up with a little bit of tape too. You can bring that up. Probably a good idea to put a couple of zip ties on that. Now located just behind our 2 studs here, again our 12 volt power and our break controller power. There should be 2 fuses. For our power going to the rear of the vehicle it's going to be a 40 amp jcase fuse. For the one going to break controller, it's going to be a 30 amp jcase fuse. If these aren't present, these studs aren't going to be hot, so they're not going to give you the power. If these don't exist on your vehicle, you need to be sure to put those in so these will be powered. Let's push that lever back down. Slide our cover back on till it clicks. We'll go inside, check and make sure everything is working. Now to make sure that we're sending out breaking power, we can hook up our trailer tester. As we operate the manual override bar, we should be able to see both our break voltage and current coming through. With everything working the way it should, that's going to complete our installation of the Tekonsha Voyage controller, part number 39510. Also using the Trailer Mate universal wiring harness, part number TM75127.


Do you have a question about this Trailer Brake Controller?
Info for this part was:
At etrailer.com we provide the best information available about the products we sell. We take the quality of our information seriously so that you can get the right part the first time. Let us know if anything is missing or if you have any questions.


Thank you! Your comment has been submitted successfully. You should be able to view your question/comment here within a few days.
Error submitting comment. Please try again momentarily.