

 Arrives before Christmas
 To see if this custom-fit item will work for you please tell us what vehicle you'll use it with.


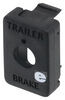
This is one of our favorite brake controllers, with flawless braking and a tiny dash knob that looks like it came straight from the factory. Its unique off-roading mode helps you handle rough conditions, so get out there and get towing.
Features:
Specs:
The off-road mode is a unique feature of the Redarc Tow-Pro Elite. In this mode, the brake controller will apply your trailer's brakes with a preset amount of power, independent of what your tow vehicle is doing. This is ideal for off-roading or challenging conditions. Set the power low if you're towing through sand or mud so that the trailer doesn't stop with too much force and act as an anchor. If navigating a steep descent, set the power to a higher level to ensure that the trailer doesn't push against the tow vehicle.
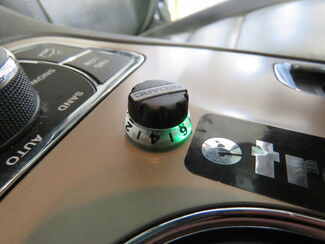
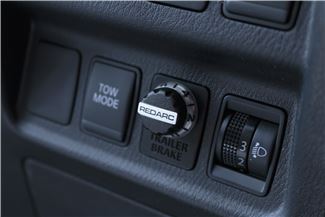
To activate the off-road mode, rotate the knob counterclockwise and apply your vehicle's brakes. Push down on the knob twice (2 times within 1 second) and release the brakes. The knob will turn green to let you know that the mode has been activated.
Use the knob to set the braking output -- the maximum amount of power that will be applied to your trailer's brakes. To get more power output, rotate the knob clockwise toward 10. To decrease the power output, rotate it counterclockwise toward 0.
When you apply the tow vehicle's brakes, the knob will change from blue to red to signal that the trailer brakes are being activated. The higher the braking power output, the deeper the red that you will see.
To engage manual override, simply press the control knob. This will activate the trailer's brakes and brake lights independent of your tow vehicle, great for stopping sway or controlling your trailer's momentum in an emergency.
When you are calibrating the brake controller for the first time, the LED lights will signal your progress.
You'll start by braking 20 times or so to let the unit learn its orientation and the direction of travel. You don't need to have a trailer connected for it to calibrate; the only difference is that the knob won't illuminate at all. If your trailer is connected, the LED light will flash green/blue as it calibrates. When the display turns solid blue, initial calibration is complete.
Once done, the unit will remain calibrated. If recalibration is required, it will happen automatically and without LED indication.
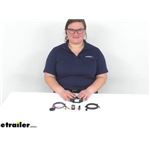
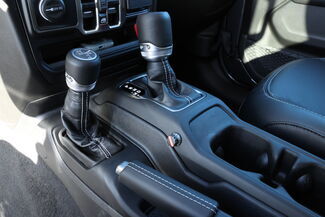
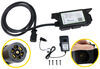
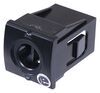
The Tow-Pro Elite has almost no mounting restrictions. It comes in 2 pieces: the main unit and the control knob. The main unit can be mounted out of sight and out of the way. You don't have to worry about dinging your knee on a bulky brake controller or interfering with your vehicle's airbags.
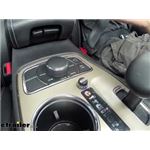
The control knob can be installed in any convenient spot that's easy for you to see and access. This can be a blank switch panel, an open spot on your center console, or wherever there's space on your dashboard. A universal mounting panel is included to ensure a clean, from-the-factory look. Custom-fit panels are available for certain vehicles as well. Before you do any drilling, be sure there's enough clearance behind the dash for the entire knob to install!
Once you've decided where you want to put the control knob, you'll need to find a good place to install the main unit. Your only restriction is the 3' cable connecting the main unit and the control knob. Securely mount the box using screws, double-sided tape, or zip-ties (not included). A mounting kit (RE67FR - sold separately) is also available for the Tow-Pro Elite. Do not attach the module to wiring or cables that can shift as you drive!
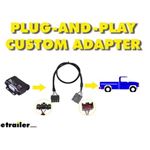
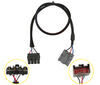
Then plug the custom-fit harness right into your vehicle and the brake controller and you're done!
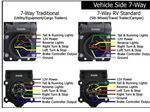
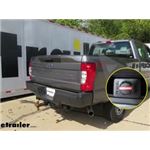
If you don't already have a 7-way plug at the back of your vehicle, take a look at our exclusive 7- and 4-way brake-control installation kit (ETBC7 - sold separately). A 30-amp circuit breaker kit (331-CBK30-EB - sold separately) may also be required for installation.
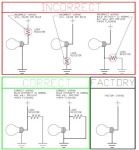
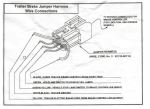
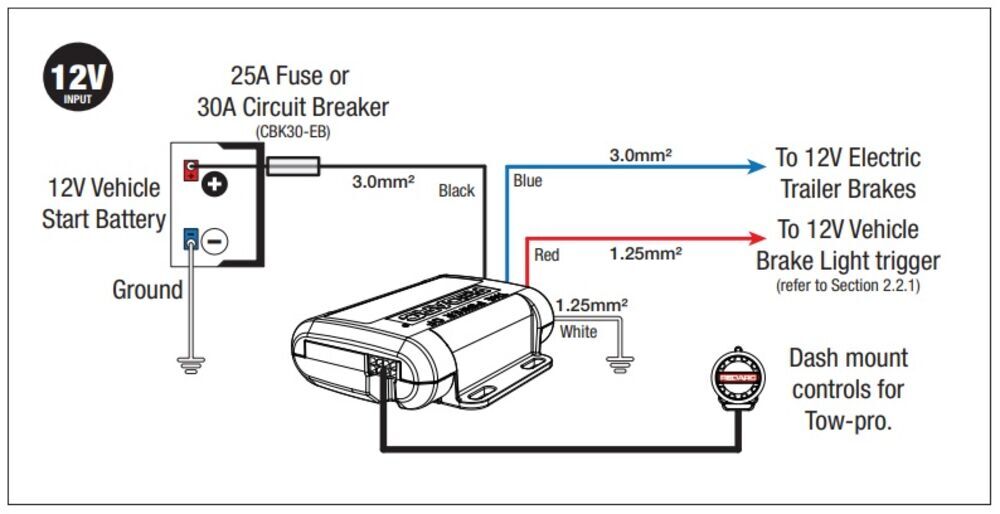
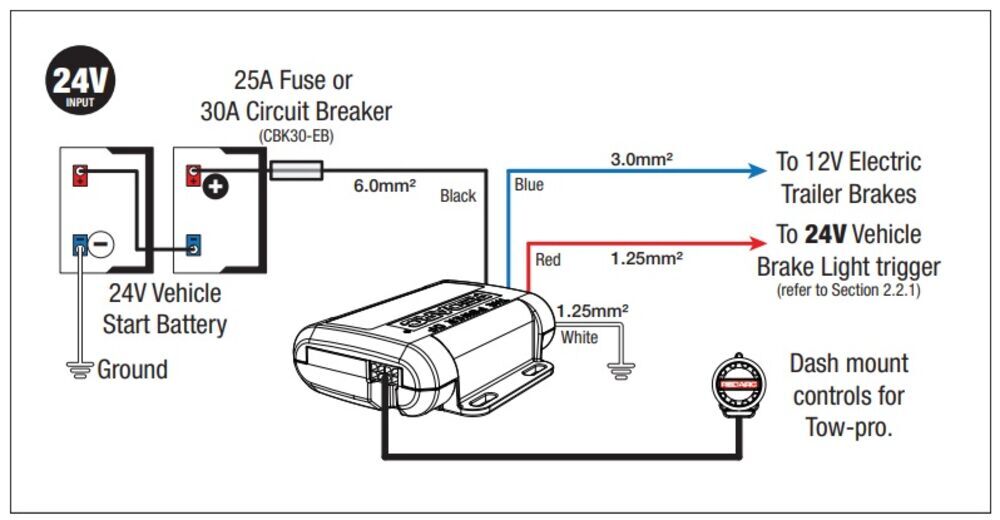
For assistance in properly wiring the Tow-Pro Elite, please refer to the diagrams below:
Proportional braking means that your trailer brakes mimic your tow vehicle's brakes. If you slam on the brakes in your vehicle, your trailer brakes will activate with the same intensity; if you brake lightly, your trailer brakes lightly too. The trailer's braking is in proportion to your vehicle's braking. This saves wear and tear on the tires and the brakes on both your vehicle and trailer.
The Tow-Pro Elite uses an internal 3-axis accelerometer to sense how your vehicle is braking so it can send the right amount of braking power to your trailer. It measures the inertia of your tow vehicle and activates the trailer's brakes to slow at the same rate. The result is uniform braking across your towing setup. No push-pull action - just smooth, proportional braking every time.

California residents: click here
Videos are provided as a guide only. Refer to manufacturer installation instructions and specs for complete information.
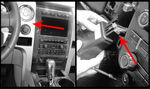
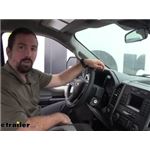
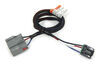
Ola neighbors, It's Brad here at etrailer, and today we're taking a look at the vehicle specific wiring harness piggyback for the Redarc Tow-Pro Elite, on a 2022 Ford F-250. Having vehicles specific harness is going to allow you to plug in directly to your factory tow plug on your vehicle. And this does come with the kit and you can splice this in, but I'm a big fan of the plug and play aspect of having a vehicle specific harness, and that way you know it's gonna be hooked up correctly and you're not having to go back and troubleshoot. As opposed to our included harness, the vehicle specific one actually has a very nice OEM plug and a nice sheathing that goes around it, and that's gonna protect these wires from any chafing that might make contact in the dash. Now, I'm gonna show you how that harness makes this installation nice and easy. The first part of the installation is really planning it out how you want it to look and how it's going to sit on your dash, so, here we have the trailer brake kinda spacer here, and that's gonna be nice, it gives it a good look on the knob.
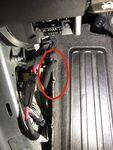
Now, so, if we use this, we can find a bunch of different spots, this cubby is actually I think a great spot because you do have the factory tow wiring right behind this, and it's plugged into a plastic part of that cubby just for safekeeping, so, I think this will probably be our option. It's a little more evasive than running it on some other spots on the plastic, but it's kind of at a good spot to adjust and also do your manual override. So, I think we're gonna go with this spot, and the next step is gonna be just getting this open, so let's kinda dive into that. Before I do install it in our cubby, again, you can run this wherever you want on your plastics assuming there's nothing back there and you have clearance, so you will have to drill a hole wherever you put it. So, just remember that when doing the install, so, also something important to note, you know, if you chose to put it down here or on any of the plastics, you need to know what's behind it.
So, part of the planning kinda happens, you know it's gonna go here, you can pull this plastic off, that's great, but if you're gonna wanna put it in the cubby or any other spot, make sure you pull that panel off and know that there's clearance for it. There's also the module that it has to attach to, so finding space for it is another thing you need to plan out. So our customer requested that we install it in this cubby hole, so we're gonna go ahead with that. And in order to do this, this panel is gonna be sandwiched in between underneath our steering wheel, there's some plastic here, and then you also have your center console where you have your radiator display, so this will have to come off. And so to begin that, there's this bottom shroud here and there is a seven millimeter bolt here, we're just gonna remove that.
This bottom shroud comes off, there are some plastic clips, and so just kinda be careful with it. I've kind of worked my self from outside in, so this side's kind of pried out, I can go on my passenger side, start popping that and it should pop out. I pulled it from this back side here and you can see it kinda pops, and then there's one more clip here it seems, we let it go, and now you can set this plastics aside for later assembly. So the garnish here that we're pulling out it actually kind of hooks into the center console where the radio is, and so we're gonna need to pry this forward in order to kinda take it out. We'll be starting to do that by pulling this little dust cover out, and you're gonna see there's two seven millimeters bolts there and we're gonna go ahead and remove those as well, and you can put those with the other hardware that we removed already.
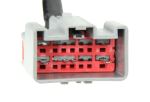
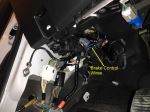
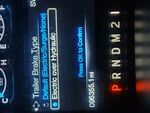
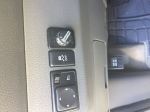
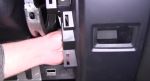
I'm gonna try to remove this center storage little cubby up top, and as I pry it open with my plastic trim tool removal, I'm going to see these white clips and I should be able to just push those in and pry this up, and there we go. Now, simply I just pushed up, push down on these clips, and that allows me to pop this up. You can set your top tray kind of aside, and you're gonna see there are two more seven millimeters that we're gonna need to remove. So with those two screws out, we can now kind of just pry up and very carefully press forward, there we go. So now with that gap, we're able to get this panel out a little bit easier. So going back with my plastic removal tool, try to get in here and just start prying, and don't go too hard on one section because if you start prying, it can cause stress marks in the plastic, so take your time and work your way around the entire bezel here. As I kinda pull this forward and move this to the side, I can get those out of those channels and that's really gonna help me move this out. Now you do have your selector for your four-wheel drive, so you're not gonna wanna pull this too hard because it's attached to the plug. You're just gonna work your way down here and then pry up, and there we go. Like I said, there's our plug here for our four-wheel drive and we're gonna remove this by just pushing that tab down, that slides out. Now keep this here if you need to tape it or whatever that way it doesn't fall back in the dash, and it's gonna be a good reminder when you put it back together to plug that back in. So now, we have access to our cubby, it's no longer sandwiched between the plastic, so, with our removal tool we're gonna just pry that and that comes out. And here is the existing plug for your tow package, as you can see, it's not actually plugged into anything except for this plastic holder, so we'll go ahead, push our tab in, and remove this. So now that we have everything opened up, we're really gonna want to plan our attack as far as mounting everything up. And so this box does need to be mounted to something that's gonna be stable, so you don't wanna put it on any wire looms or anything like that, and that way it's not moving around. So luckily, as looking at the top above the radio here, you're gonna see these two studs, and just kinda mocking it up here, those studs fit pretty well into the holes. So I'll then going to enlarge those with a drill bit, slide that on, and then we'll wrap some zip ties on the bottom, and I might even throw some hook and loop or double-sided tape on the back just for added security, I don't want that rattling loose. Now, you can see here, this will plug directly into our factory tow harness here, and then this is gonna route up into the box. So we'll kind of dry fit it here just to kinda get an idea of how we need to route it. And then also continuing on, you're gonna see this adapter as well, which this is gonna go into the box, and then the other plug is going to go into our control switch. So, we know that this has to fit into our cubby, so we're able to route this wire out as long as we can reach to the module. So now that we have it hooked up, let's, I'm gonna drill the holes out on this, mount it up, and try to get these wires tucked in really nice. I'm simply gonna enlarge the holes on this actual module and that way it can slip over these, the existing studs. Now I recommend before actually mounting the bracket to have your plugs in place, so you have your top one here and then also the smaller black connector, and that way you're not trying to connect it while it's down there. So once you slide that over the studs and kinda zip tie that in place, then you can start routing your wires towards the controller itself, and I can see this little notch here, so I actually zip tied it there and ran it over the HVAC duct here. You see I wrapped it over and it's actually kinda, this is very pliable, so you can kind of move that to get your hand in there to gain some access to make it pretty easy, and then from there, you just route it to the cubby hole. So right now I have my existing harness, our piggyback adapter, as well as the plug that's going to go to the turn knob. Also important is when you're mounting your bracket is to check the clearances to make sure that this is still gonna close down. You don't want to mount that down and then realize that this isn't going to go into place. So, come there, it looks like it's going to sit flush so we're looking good. So now we're going to take our piggyback harness, attach it to the factory tow package plug, and I'm gonna simply just place this back here for now. I'm going to go back later and zip tie this so it's a little more secure just for my own personal wellbeing there. Now, you do have this plug that's gonna go to our connecting on our turn knob here, so we are gonna have to drill a hole in the cubby pocket, and I think if I put a half inch drill bit into where the plug holder was, I think that I'll be able to run that through with no problems, so, we can go ahead and get a hole here, and then we can kina see how it looks. So with the half inch hole drilled, I did waller it out just a little bit and walked the bit a little back and forth, but you can see that plug goes through very nicely. So, now that we have that through, we can kind of get an idea of how this is gonna look, grab our switch and plug this in. So, now with that kind of installed, we can see what it looks like. Now, from the factory, this actually sits in the cubby as like a little grip holder, I'm gonna put that in place 'cause I think that's gonna hold this pretty well. And then we're also gonna add a little hook and loop on this to make sure that that controller doesn't move, 'cause as you're adjusting or doing a manual override, you're gonna notice that when you push it, it actually might move, so little hook and loop should hold that in with conjunction of the rubber piece. So just makes sure this little tail goes through, pull that, and that's gonna sit really nice right in the middle there. And I really like that, and this kind of creates a lip that way when I pushed down, it's actually not moving the plug. So, go ahead and put some hook and loop, or double-sided tape, if you want to make a bracket, that's up to you, but I do think this will hold it in place just fine. So at this point, I have it all plugged in and I wanna make sure that it has power, so I'm gonna give it a quick push, you can see it start to illuminate, and so we are hooked up there. As far as calibration goes on the actual trailer brake itself, we're gonna do that a little but at a later step, but now that I know that this is working and everything's powered up, we can then get our interior put back together, make sure you get your four-wheel drive connector put back in place, and you should be good to go. So we have everything installed, and we have our truck out of the bay, and now we need to calibrate the actual brake controller. So, we have a tester box actually hooked up to our seven pole, you may need to hook up to your trailer for this. So you can see the light ring around the actual controller, it's flashing green and then blue. So what we're doing during the calibration is every time we stop, the module itself is gonna kinda start to learn how it's gonna move with the vehicle, and it's gonna get this set up. So we're gonna be keep, we're gonna keep hitting our brakes until we this to be a solid color. So I'm gonna get up to about 15 miles per hour here, and then I'll hit the brakes. I'm now gonna continue this process, so find a nice open road where there's no traffic that you can perform your calibration test. Now you can see, it is lit up with a solid blue, so we know that we're calibrated. And that was a look at the vehicle specific harness piggyback wiring for the Redarc Tow-Pro Elite on a 2022 Ford F-250..

Do you have a question about this Trailer Brake Controller?
Info for this part was:
At etrailer.com we provide the best information available about the products we sell. We take the quality of our information seriously so that you can get the right part the first time. Let us know if anything is missing or if you have any questions.


Thank you! Your comment has been submitted successfully. You should be able to view your question/comment here within a few days.
Error submitting comment. Please try again momentarily.