
To see if this custom-fit item will work for you please tell us what vehicle you'll use it with.
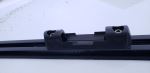
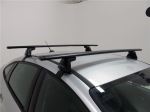
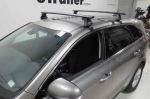
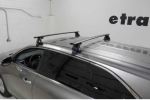
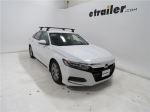
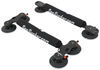
These crossbars combine the strength of steel with an aerodynamic shape to create a heavy-duty yet quiet roof rack for your vehicle. Full-length bars maximize cargo carrying capacity and work with most clamp-on accessories.
Features:
Yakima CoreBars - 60" Long - Qty 2:Videos are provided as a guide only. Refer to manufacturer installation instructions and specs for complete information.
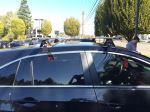
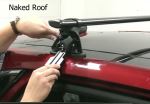
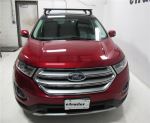
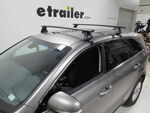
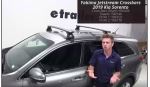
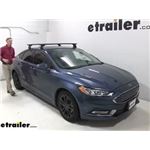
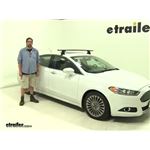
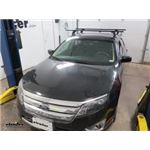
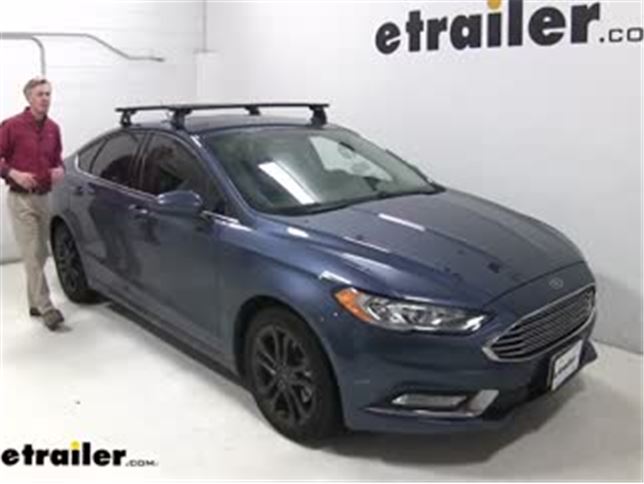
Today, with 2018 Ford Fusion, we're gonna be doing a test fit on the Yakima JetStream Crossbar Roof Rack System. I've already got it in place so you can get a good look. With this system, it's gonna allow you to carry bike racks, cargo carriers, kayak carriers, and more. Now this roof rack is specifically designed to fit the naked roof of your Fusion. The JetStream Crossbars are 50 inches long. You can see how they can span across the entire roof.
This is gonna allow us to carry not one but multiple accessories on our roof. Maybe you'd like to get three bike racks up here or even two kayaks. You'll notice how they have that aerodynamic shape. These are gonna be a lot quieter than your traditional round or square bars.Now they're gonna work with your standard clamp-on accessories, as well as your T-slot accessories. You always wanna remove that end cap.
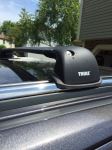
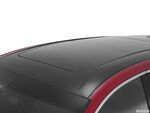
Then, rather than having to trim or remove that rubber strip, that T-bolt just slides right over the top to your desired location giving you that nice clean look. The crossbars are held in place by four baseline towers. You can see here how they feature some padding. That way, they don't harm or scratch our Fusion's roof. Underneath our cover here, you can see it protects our hardware from the elements and it's gonna help the torque fit.Now, right here, you can see our base clip.
This is what attaches the baseline tower to the roof of your Fusion. It, too, is rubber coated. That way, it doesn't harm or scratch that finish. When you've got everything installed, the cover goes back on and you can even upgrade to a lock. That way, no one can remove it from your roof.
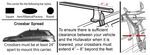
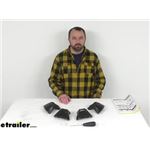
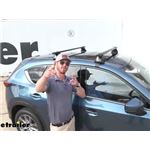
I've opened my door just to give you a shot of that base clip. Again, it is rubber coated all the way to the inside. You can see how it connects. It is specifically designed to fit your Fusion's roof. You can see when we close up our door, that seal just goes around our clip and we don't have to worry about anything getting inside.Now this roof rack system has a weight capacity of 165 pounds. You do rather wanna check with their fusions owner's manual to see if the roof can support that much weight. Now I'll give you some clearance measurements. This will give you an idea how much you've added to the roof of your Fusion. It also may help you when using those clamp-on accessories. From the top of the roof to the other side of the bar is about three and a quarter of an inch. From the top of the roof to the top of the bar is about four and three-eighths of an inch. Now that we've got all the features, I'll go ahead and show you how to get it set up.I've already got my front crossbar in place on the Fusion. Per instructions, you wanna measure up nine inches from the corner of the windshield on each side to the beginning portion of the pad here. That gives you your placement. The rear crossbar installs very similar. Let's go ahead and do it together. Now on the table, I've got one of my baseline towers already installed. We just need to repeat the same process on the side here. We'll start off by grabbing our baseline tower, and we need to remove the cover. Now the way you do this, as you squeeze in on both sides, on the top here, and then it shouldn't just come right apart just like that. We can set that aside. Then we need to open up the little gray door here.By doing so, it's going to allow us to access this bolt here. Now we need to do some assembly here on top. We'll take our plastic adapter. We'll push it in place here. Let me listen for the click that you heard there, and we'll take the metal knot. We're gonna place that right over the top of bolt. You may have to adjust that bolt a little bit. We'll hold it in place. Then we can turn it over, and begin to tighten up the screw through here. Now we don't wanna tighten it down all the way just yet. What we're looking for is for that metal piece to be flushed with the plastic adapter that we put in.Now we can put our pad on the bottom. We need to be sure that the notch portion of it is facing this direction, so away from the tower. One thing about the pad is they are numbered. They're different from the front and the rear crossbar. Since we're working with the rear crossbar, we're gonna be looking for the number three. We can line it up and push it in place. Once we got it on, we're ready to slide it on to our crossbar. Now it's easier if you turn over your crossbar. That way, you can easily see what you're doing when you're sliding in place. If you haven't removed the end cap already, go ahead and do that. Then we need to slide it into the channel here.We're looking for the metal bracket and the plastic bracket to slide into the channel. With it installed, we'll then need to set it to the correct measurement. I don't know if you can see this, but there's a scale printed on the bottom of our crossbar here. Per instructions, we'll need to set it to 39 and three quarters. Now again, this is gonna be for the rear crossbar. The front crossbar has a different measurement. You can find that located in your instructions. We'll take our tool. We'll then need to set the pitch and the toe. That's gonna be here and here. Now you'll notice that they're not labeled, but the first one here is A, second one B, and third one is C. That's for our pitch. For our toe, it's one, two, and three.How you figure that out is you wanna start from the front portion of your crossbar, which is gonna be the rounded portion of your crossroads. That's what's going to face forward. When you know that, that's how you know to start A, B, and C, and one, two, and three. This is all found in your instruction. If it's confusing, be sure and check that out. For my setting, the pitch needs to be set to C so we're going to move it to C. You can see how it kind of changes the angle of our baseline tower, so the bolt is over the line here, which is C, and we'll tighten that up. We're gonna be listening for two clicks on our tool. That's how we know it's properly torqued down.As for our toe, that just needs to be the number two, which is in the center. Again, we can tighten it down. We can replace our end cap, and hen we're ready to set it in place on our Fusion. When you set it in place, again, you wanna be sure that that rounded portion of the bar is facing forward. That's gonna be our front and we're going to gently rest it down in the general area. Per our instructions, we need to be 32 inches from the front of our front crossbar to the front of our rear crossbar. That gives us our placement. We'll go ahead and grab a tape measure and make sure we've got that right. We'll do this for both sides.Now it's time to install our clips. All of our clips are the same, front and back, so we don't need to worry about placing in the right spot. We'll lift up the gray door here and then we need to install the clip up through the bottom, and it needs to hook in place. Our hook here is actually upside down. If that happens, no big deal, just turn it over until that is on the bottom just like that. We'll take that clip, slide it in underneath until it hooks in place just like that. Go and do that for both sides. Now we need to adjust our hook towards making contact with the inside of the doorframe.You can see here how its kind of sticking out. We need to be up against our doorframe like so. So we come up to our bolt here with our included tool and turn that clockwise, and you'll see how it starts to draw in. We don't need to overdo this. We just need to make sure that it's sitting correctly so we can help along until it actually gets there. From there, we can then start tightening it up here. We wanna try to take out as much of that slack as we can on each side. That way, when we start tightening it down, everything is gonna be tightened down evenly.I've already gone ahead and done that side so I'm gonna go ahead and do a few more turns here, and then I will alternate sides and make sure that it gets done correctly. When we have just about got it nice and tight, we'll listen for that audible click in our tool and that's how we know it's properly torqued down. From there, we can close up our two gray doors, got this one here in the front, and then we've got this one here. Last thing to do is to put on our cover, but we can go ahead and close the door. It just clips on just as easy as it came off, push it in place, listen for the click and you're good to go. Once everything's assembled and installed correctly, you're ready to load up your favorite roof mount accessory and hit the road. But that's gonna complete our look, the Yakima JetStream Crossbar Roof Rack System on our 2018 Ford Fusion.
Average Customer Rating: 4.8 out of 5 stars (177 Customer Reviews)
These crossbars combine the strength of steel with an aerodynamic shape to create a heavy-duty yet quiet roof rack for your vehicle. Full-length bars maximize cargo carrying capacity and work with most clamp-on accessories.Excellent solution for my 2023 Chevy Silverado. In the past, I have had rails installed on the roof of my pickup trucks, but I find the BaseLine towers to be a better solution, since they don't permanently change the truck. Plus, they are much more solid than SkyLine system on the rails.
Follow the instructions, and you can't go wrong on the self installation
Really easy to install & work as specified. So happy with the customer support/service at etrailer.
Your notice of schemes was a lot better than the yakima site provided. They did not suggest the scheme you did.
But when the products arrived, the instructions were by yakima. Generally worked as instructed except the tower to tower transverse mounting dimensions needed to be tweaked for a perfect fit.

Love my Yakima roof rack!! It exceeds my expectations.great product. Also thank etrailer for the tec support! great staff always there to help thanks again!!
The design of the connection seems a little sketchy to me. Hopefully I'm wrong and the design engineers have it figured out. etrailer's selection process, delivery ann installation help both online and on the phone was excellent
Ackage came 2 days early the install was somewhat easy (did it by myself)
Did not get to mount anything to it but seems really sturdy. One thing I can say is mark out your mounting points with provided stickers then put up and make adjustments to the roof rack.
We purchased the Yakima Skyline Towers roof rack with the Jet Stream crossbars. Took about 2 hours to install on the naked roof of our Flex. I drilled through the roof strip for the mounting bolts and they fit tighter than the factory rails. Very happy with our choice.
Item was as described and shipping was fast. Overall very satisfied with trailer. Will definitely order my stuff from them
I ordered the wrong set up for my car, but the excellent customer service specialist set me up and expedited my roof rack that fit perfectly. I highly recommend calling and speaking with the knowledgeable staff about your needs. I'm super happy with the experience overall!
Was skeptical at first because I needed the posts as well for my 2011 Honda Element. The Honda crossbars were not adequately weight rated and is why I opted for Yakima. Couldn't be happier with my choice as this assembly has served me well throughout the year.
Solid build quality and easy installation on my '21 Mazda CX-5.
So far so good. Purchased these towers to use on a 2022 GMC Canyon with HD bars that I already had, primarily to carry my canoe. Yakima's fitting instructions worked perfectly and the whole system seems really solid.
Perfect. Perfect. Easy to install and high quality. Confident in this product. Excellent instructions. Used with towers of course! Towers and crossbars have demonstrated to be strong and durable with several trips with kayaks.
Well packaged and on time
Perfect fit for our car, much better than any OEM rack I've ever seen.
Yakima towers and crossbars were solid and easy to install with the very well written instructions. We used them on 2 cross country trips with any loosening. They were easy to remove. We plan to use them again as the need arises.
I have not bought car roof racks for decades--back when there were those very useful rain gutters. So I was shocked with the high prices. But what you get today is much more carefully engineered with a complicated construction. This Yakima version even comes with a manual 3.5 mm hex driver which turns out to be a torque wrench too. You use it 16 times, torquing to its limit, in installing the two cross rails on the four towers. Years ago you installed the towers where you wanted them on the rain gutters and adjusted the cross rails by sight. No more. You must go on line to Yakima. You must get the precisely engineered dimensions for your exact vehicle. You even adjust the towers for the roof slope and any toe-in of the roof line. Pay attention to the precise instructions. The result is very solid. I wish that I had more space between the cross rails. There is room for another 6 or 8 inches given where the door openings on my 2019 Toyota Highlander are spaced. But then the rear base clips would be different and that logistics would add yet more to the price. I am confident that I can secure a 4 X 8 sheet of plywood on the cross rails. And I will find my vehicle in the mall parking lot easier with those good looking rails. While I am happy with the end product, I wish the vendors had given more explanation of the fixed dimensions of today's installations. That would have helped make my on-line shopping less frustrating. Part of the problem is that Yakima and Thule do not provide cross rails for my LE Highlander's existing tower bases. And I could not get 60 inch cross rails on any of the versions that fit my LE's bases.
The roof rack has been awesome! It has been really handy to be able to attach our bike rack attachment, kayak bars or traveling cargo carrier. My only complaint is that the end caps fell off somewhere along one of our many adventures and looks a bit disheveled. Other than the appearance it has been very versatile and we love it!
I want to thank the staff at eTrailer for their outstanding support. After my roof rack order got off to a shaky start the customer service staff stepped in and made it right; 100% RIGHT. I cannot thank them, and eTrailer, enough. Regarding the roof rack itself, I have now installed it and can vouch that the installation was a breeze. All parts fit and the instructions were correct. For the record, this is not my first purchase from eTrailer (I've bought hitch items from them before) and it won't be my last. They have ALWAYS given great service, their web site works, their products and descriptions are good, etc., etc. Thank you!
Roof rack parts were ordered correctly and shipped quickly.
Very happy with the Yakima roof top rack kit for my 2017 Ford Edge with glass roof. The instructions were a little confusing at first, but after reading through them a couple of times while working with the product they became much clearer. The Yakima fit site was helpful as well. After the initial cross bar mounting measurements and set up, attaching and detaching the racks from the roof is a very simple process.
Great product fast shipping
Great! Easy to install!
I did a lot of research before purchasing my roof rack. I came across this website and liked the prices, and after much thought, decided to get the Yakima CoreBar crossbars. I received my roof rack within a couple days of ordering! It's extremely sturdy and doesn't make hardly any wind noise. I love it and it looks great on my car, couldn't be happier with my purchase!!


Do you have a question about this Roof Rack?
Info for this part was:
At etrailer.com we provide the best information available about the products we sell. We take the quality of our information seriously so that you can get the right part the first time. Let us know if anything is missing or if you have any questions.


Thank you! Your comment has been submitted successfully. You should be able to view your question/comment here within a few days.
Error submitting comment. Please try again momentarily.