
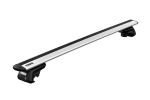
Thule WingBar Evo Roof Rack for Flush Rails - Aluminum - Black - Qty 2


To see if this custom-fit item will work for you please tell us what vehicle you'll use it with.
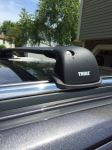
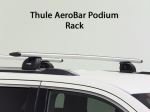
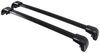
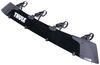
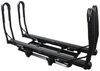
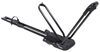
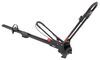
This Thule roof rack lets you carry cargo and gear on your vehicle. Aerodynamic crossbars with split rubber strips in top channels work with channel-mount and clamp-on accessories. Installs to flush rails on your vehicle's roof.
Features:
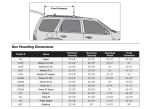
Specs:
 Alternate Instructions
California residents: click here
Videos are provided as a guide only. Refer to manufacturer installation instructions and specs for complete information.
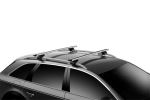
Hi, Matt with etrailer. If you have a 2023 BMW X5 and you're looking for a roof rack that's gonna be really easy to work with and that's gonna give you more of a clean finish to the top of your roof, then the Thule roof rack will be a great option for you. So let's check it out. Now it's important that you know what type of roof you have because the X5 will come with a lot of different variations of roofs. And the one we have today will be a flush rail. And the way you can tell is if I come over here, I can actually wrap my hand around the rail.
Now that's gonna be a flush rail. Now if there's no rail to grab, that's gonna be a naked option. And if you can actually get your hand or fingers underneath the rail, that's gonna be a raise rail option. I also recommend just plugging your vehicle's information into our fit guide to find the right one for you. What I really like about roof racks though is that they're gonna keep all those additional accessories in one location or more so in one footprint of your vehicle rather than expanding past behind you extending that footprint so you're gonna take up more space in a parking spot.
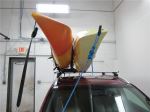
And what's also great about a roof rack is they're gonna allow you to carry those longer items. So anything like skis, kayaks, or anything that just won't fit in your car. And this one is be comprised of three parts today. So we're gonna have our crossbars up top, we're gonna have towers beneath them, and then the fit kit. So let's take a closer look at the crossbar.
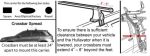
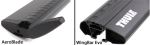
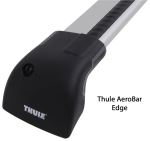
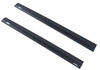
So these are gonna be the Thule 53" wing bars and there's a few things that really pop out to me. Now typically we're gonna have a built-in weather strip to this, and that's going to help protect your TCH channel. Your T channels gonna be great if you have any T channel accessories or if you have maybe a clamp-on accessory that isn't working very well. If you just wanna get the most out of your real estate up here, that's gonna be great for your T channel accessories. That weather strip's also gonna keep out any debris or water from getting in here and help reduce wind noise.
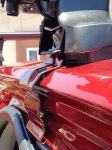
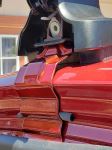
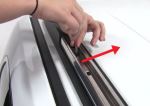
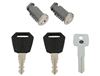
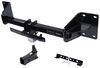
Now we don't have ours in right now 'cause we've had this down in the shop for a long time, but yours will come with one. And we're gonna have this end cap at the very end of it, which I really like. So that's what kind of makes this one a really easy to work with roof rack. If I slide that around, you can actually mount your T channel accessories from this spot right here instead of having to take off your end cap completely, which is a really unique feature to this kit. And moving down to the tower, you'll notice right here we have this plastic core, you can actually get that traded out for a metal locking core for more security. And if I take this end cap off, you'll notice you have all the hardware here. And I really like this design because it's a pretty smart design, because what's happening is, this clamp, you only have to tighten down one bolt to secure not your towers to your crossbars, but also your tower to your fit kit. Makes it really easy to use. And speaking of that fit kit, the way that's gonna work is, you're gonna have this metal clamp on either side. That's gonna grab onto the gutters of your rails. And this is a pretty seamless fit we're getting right here. So you can see how flush it is, even on top of the rail itself where you have that rubber pad, that rubber pad's gonna help prevent any scratching from occurring. But overall, I think this is an excellent fit we're getting. But now we get a few measurements to see how this is gonna live up here. So the first measurement I'm gonna get is gonna be the overall height it adds, which is gonna be 5", which is actually pretty high. So what I'd recommend doing is just taking the total height of the vehicle, the cross bars, and then anything on top of that just so you know what areas you can make it under. The spot to really think about would be a garage. And then if we look over here, I have my sunroof up, and this is gonna give you an idea of how much space we still have underneath and that's gonna be 2". So even with your sunroof up, will most likely not gonna make contact with it. Now if you have some really bulky clamps, they might come pretty close or they might make contact. I just recommend checking that first. If they are gonna make contact, then I'd recommend keeping your sunroof down because you're still gonna have 4" of space underneath there. So that's tons of space. And really placing your crossbars is gonna be another big factor to this. So right now, since this isn't a fixed mounting kit, we have it placed here instead of directly over this opening. The reason I recommend that is because if you're driving down the road and you want open up your sunroof, if that crossbar is directly above you, it's gonna create a lot of wind noise and it's not gonna be a very enjoyable ride. So that's one of the benefits of having this not be a fixed mounting system, because you can really place it wherever you need it to sit. And this will have a little bit of overhang to it too. I'll get that exact distance. That is going to be about a little bit under 4". So that's pretty good. Now of the usable space, that's gonna be a little bit less, you might be able to get a smaller ski carrier on here, but as far as anything a little bit larger, more bulky, that's not gonna be a whole lot of room to work with. The reason why overhangs is pretty nice is because if you have anything like ski carriers or a kayak carrier, you're gonna want that as close to the edge as possible. It's just a little bit easier to take on and off. Now that's another reason why to have a T channel on your crossbars. It's gonna be a big benefit 'cause it's gonna maximize the amount of real estate you can use this with. Now this is also gonna have a pretty decent weight capacity, and honestly what's probably gonna be a limiting factor is gonna be a roof. So what I'd recommend doing is just finding that out and then going from the lowest rated capacity. Now in my opinion, I think this is a pretty great option, especially if you are looking for a cleaner look overall, 'cause I really do like the look of the towers and crossbars we have today. And especially if you are looking for just an easy-to-use crossbar or a roof rack, because we have easy access to that T channel too. Now we also do have the Yakima roof rack, which is also a solid choice. And what's nice about that is, you can actually get that keyed alike with any of the other Yakima accessories. But at the end of the day, I think this is just gonna do a little bit of a better job of grabbing onto your roof. And if you don't have all those other Yakima accessories, I think this is gonna be the better option overall. Now if you are curious to see what this installation looks like, just take tuned, we'll walk you through the process. To start off the installation, we like to lay everything out. So closest to me, we're gonna have our crossbar, we're gonna have the towers along with their end caps, and then we're gonna have our fit kit. It's gonna be comprised of three parts. They're gonna be labeled A, B, and C. And then we're gonna have these other parts that go along with it. I'll talk a little bit more about how they install. And you're gonna have this include an Allen key with a torque wrench. And we will have, or I do recommend bringing a tape measure just to make sure you get everything even. Where I'm gonna start with is gonna be the crossbar. So we're just gonna flip this over. This is gonna be this tab. We're gonna press in on that tab and pull this end cap off. I find it best if you kind of wiggle it some. It comes off a little bit easier that way. And then you're gonna grab one of your towers. You're gonna have this metal block and these two plastic tabs on here. We want that to slide into that channel. So I'm just gonna flip this around, making sure this bolt is facing on the outside of your crossbar. (plastic clicks) And then we're just gonna slide it in. And at this point, just make sure you put your end caps back into place, and repeat this on the other side. Now slide this into place. You're gonna have this hole that's in the center and these two tabs that are gonna slide into the tower. Should look something like this. And from here I'm gonna grab B, and that's gonna be that rubber pad. And the way you wanna line this up is with the tabs on your tower. They'll just slide into place. You might have to push that a little bit. And you can kind of feel 'em grab on. And this is what it should look like from the side, making sure you have this kind of flush fit. We wanna make sure that our thicker side is facing forward and the thinner side is facing behind this of the crossbar. And we're just gonna roughly lift it up and place it down. Now this doesn't have to be perfect when you first place it here, 'cause we're gonna adjust it later on. This is gonna be the fit that we're looking for. So you want that base to be roughly wrapping around rails like this. And now we can get a few measurements just make sure it's even on both ends. So I recommend going from some place that's gonna be the same on both sides, kind of this like this door hinge here. I'm gonna measure from there to the very end of our tower. And then I'm just gonna double check it's the same with both ends. If I need to adjust it, all I simply have to do is either push it or pull it either way. We're gonna check our overhang. So the way I'm gonna do that is to measure from the end of the tower to the end of the crossbar. And then I'm just gonna adjust it either by pulling on it or pushing on it. And you just wanna make sure you have the same overhang on either end. And from here we're gonna start cinching it down. And to do that we're gonna grab our C clamp and this nut. And the way this is gonna go on is, you're gonna have this tab right here. You're gonna have this opening on clamp C that will wrap around it, and it's gonna have this hole in the center that lines up with that bolt. And then I'm gonna grab this nut, slide it on until grabs onto that bolt in there and then start hand tightening it. Now this might take a second, but really the fit you're trying to get is to have this clamp wrap around this point right here. Once that is about hand tightened, before we tighten this all the way, I'm actually going to the other side and repeat this process, and then slowly tighten this all the way down until it is completely secured. You don't wanna tighten down one side completely before the other because it could give you an uneven fit. And the way you're gonna be able to tell this is all the way tightened down is, eventually you're gonna reach a point where you get a lot of resistance, (rack clicks) you start hearing that click. That's that torque device letting you know this is all the way tightened down. And from here we can start putting on our end cap. You're just gonna push it into place. You should hear a click. And you're gonna have this point that you can secure down with a flat head, unless you put the locking cores in there. And really the last step is really just sliding this tab back into place so you don't get that wind noise. But that'll pretty much do it for our look at the installation and some of the features of the Thule roof rack on top of our 2023 BMW X5. I'm Matt, thanks for watching.


Do you have a question about this Roof Rack?
Info for this part was:
At etrailer we provide the best information available about the products we sell. We take the quality of our information seriously so that you can get the right part the first time. Let us know if anything is missing or if you have any questions.


Thank you! Your comment has been submitted successfully. You should be able to view your question/comment here within a few days.
Error submitting comment. Please try again momentarily.