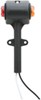
Tekonsha Primus IQ Trailer Brake Controller w/ Custom Harness - Up to 3 Axles - Proportional


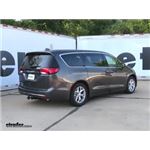
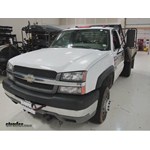
To see if this custom-fit item will work for you please tell us what vehicle you'll use it with.


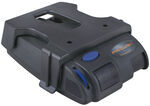
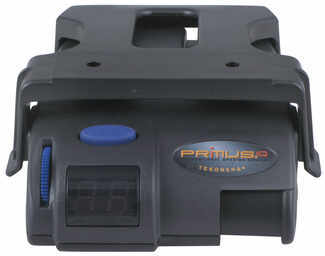
This proportional brake controller has simple controls and a digital display for diagnostic information. Includes 3 boost levels, a slide-bar manual override, built-in battery protection, automatic leveling, and continuous diagnostics.
Features:
Specs:
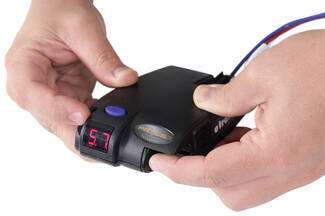
You can adjust the gain (also known as output) with the thumbwheel on the front of the controller. Gain lets you set the maximum amount of power that will be applied to your trailer's brakes. A heavier trailer will need more power to achieve smooth, safe braking, while a lighter trailer will need less. Typically, the gain is only readjusted when you experience changing road conditions or if the weight of your trailer changes.
The boost setting controls the aggressiveness of your trailer's braking, meaning how quickly the brakes reach the maximum braking level. You can adjust this when you're towing heavy loads and you need more umph to bring your trailer to a stop. Your tow vehicle doesn't need that much power to brake in time, but your heavy trailer does.
Depending on the level of boost, your trailer brakes can start at either 13 percent or 25 percent of the set gain. What this means is that, instead of starting at 0, the brakes will start at 25 percent and get to 100 percent sooner. This keeps the trailer from pushing your tow vehicle forward.
If your trailer weighs less than your tow vehicle, no boost is needed. But, if you want your trailer to lead the braking, you can select level B1.
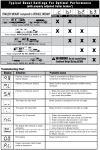
Boost Levels:
| Approximate Gross Trailer Weight | Boost Level | Increase in Initial Power Output |
|---|---|---|
| Less than tow vehicle GVW | B1 | 13% |
| Equal to tow vehicle GVW | B1 or B2 | 13% or 25% |
| Up to 25% more than tow vehicle GVW | B2 or B3* | 25% |
| Up to 40% more than tow vehicle GVW | B3* | 25% |
*Both B2 and B3 offer a 25-percent boost in initial power. But the braking curve for B3 is more aggressive than that of B2. This means that, even though you will start out with the same intensity when using these boost levels, you will get an overall more aggressive braking experience with the higher level. So if you use B3, you will reach maximum braking sooner than if you use B2.
To adjust the boost, use the blue push-button on the top of the Primus IQ.
The Tekonsha Primus IQ comes with an easy-to-reach, slide-bar manual override, great for stopping sway or controlling your trailer's momentum in emergencies. To engage the manual override, just push the slide-bar to the left, towards the center of the controller. This will activate the trailer's brakes and brake lights without you having to apply the brakes on your tow vehicle, perfect for limiting trailer movement while you're cruising.
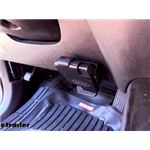
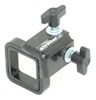
The Primus IQ can mount between -90 degrees and 90 degrees vertically, but the brake controller still needs to be horizontally level and parallel with the direction of travel.
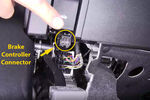
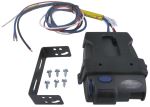
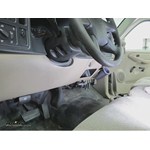
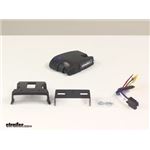
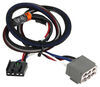
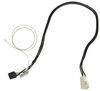
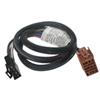
After mounting the Primus IQ unit in your cab using the included bracket, simply plug the included custom harness into your vehicle. The other end of the harness plugs into the brake controller. To remove the IQ for storage when you're not using it, just unplug the unit and slide it out of the bracket. With a replacement wiring harness (sold separately) and replacement bracket (6927 - sold separately), you can even transfer the IQ to another vehicle.
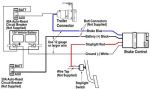
Note: If you don't already have a 7-way plug at the back of your vehicle, take a look at our exclusive 7- and 4-way brake controller installation kit (ETBC7 - sold separately).
The Tekonsha Primus IQ brake controller comes equipped with proportional braking to give you the best towing experience. Proportional braking means that your trailer brakes mimic your tow vehicle's brakes. If you slam on the brakes in your vehicle, your trailer brakes will activate with the same intensity; if you brake lightly, your trailer brakes lightly too. The trailer's braking is in proportion to your vehicle's braking. This saves wear and tear on the tires and the brakes on both your vehicle and trailer.
The Primus IQ uses an internal inertia sensor to detect how your vehicle is braking so it can send the right amount of braking power to your trailer. It measures the inertia of your tow vehicle and activates the trailer's brakes to slow at the same rate. The result is uniform braking across your towing setup. No push-pull action - just smooth, proportional braking every time.
 Alternate Instructions
California residents: click here
Videos are provided as a guide only. Refer to manufacturer installation instructions and specs for complete information.
Hi there hollers there. Today we're going to be taking a look at Tekonsha's Primus IQ proportional trailer brake controller.This brake controller is going to be your entry level into a proportional brake controller and even though this is entry into proportional, I would recommend it over most of your time delay modules, just to how much smoother your breaking experience is going to be with a proportional controller, because proportional means that it uses an internal inertia sensor to detect the movement of the vehicle.So as we hit the brakes and go to a stop, that inertia sensor is going to detect that loss of motion and it's then going to use that information to apply a signal to the trailer brakes at the back, which will apply them. But it uses this information to help match the application of the brakes, to what you're doing here in the vehicle. So that way, when you hit the brakes, you're going to get a softer brake application at the trailer if you hit the brake softly in the vehicle. And then if you need an aggressive stop, like an emergency stop and you hit the brakes hard here in the vehicle, it's then going to detect that quick stop and it's going to put out a hard, aggressive brake to your trailer.With your time delays, you're just going to have whatever you have your setting to on your adjustment. And then a few seconds after applying the pedal, it will then apply to that exact amount that you've got it set to.
And that can be useful if you do a lot of off roading because you just want your brakes to apply. But for most people that are just going to be driving out on the roads, hauling going from campsite to campsite, proportional is going to be significantly smoother and a much more enjoyable experience.For example, when using a time delay brake controller with our boat here, if we come into an emergency situation or we're getting off the highway and we need to hit the brakes to come to a stop, with that time delay, we've got them set aggressive so that way we can get the application we need so this boat's not pushing us up that off-ramp. But when we're just breaking around town, going through stoplights and just here in the city, every time we hit the brakes, that brake controller applies with that same pressure and it's too much. We feel the trailer wanting to stop us before we get to the stop that we wanted to come to at the stoplight. So then we have to adjust our time delay brake controller down and up to meet those various situations so it feels properly when driving.
With our proportional controller in here, once we set the adjustment for the application, at that point, when we go into those different situations, the controller's going to take over and do all of those adjustments for us. So it just feels smooth the entire time.Our initial adjustment we're making is just for the particular size of the trailer that we're currently hauling. And with our boat here, we are getting pretty close to the weight of our Sorento. So we are going to be using the boost two setting with it to give us a little bit more aggressive braking to match this.Now we're just talking about the boost setting on our brake controller and it has three different boost options, as well as being able to turn the boost completely off. The boost is just going to give it a more aggressive strategy when using that inertia sensor information to be more aggressive.
And that's important when you've got extremely heavy things, you need that more aggressive braking. So when we got our John boat here hooked up, we're likely going to have it in the boost one, or maybe even the boost offsetting depending on how it feels, because this is significantly lighter than what our vehicle is.And for you people at home hauling a camper that is likely heavier than your vehicle, you'll want to use that boost three setting to get that more aggressive braking so this isn't pushing you when you're coming to a stop off the highway. Now, regardless if you're in the boost one, two, three or you have the boost turned off, your power adjustment is going to play a factor into how hard that applies. I'm going to hit the manual slider all the way over so you can see our maximum output. And as we adjust this, it does dial back what our maximum is going to be.
So if we have it on that boost three setting, it's going to apply more aggressively, but it's not going to apply harder than where we've got our power output set to here. So that way you can set that maximum and that can be really useful when you've got a medium or smaller trailer. Maybe you don't ever want this inertia sensor to put it at that maximum output. You can dial that back with the setting.Now, if you're using those boost settings, like when we we're backing our boat up here, it does make it more aggressive. And when you're backing up that inertia sensor might be applying a little bit too early, because when you're backing up, you're doing things slow and you're doing a lot of turning and a lot of tapping on the brake to get that position you need to, so you can get it into that spot. And that might be applying your brake controller's brakes here on your trailer, causing it to stop. And then all of a sudden you're backing into your trailer. Well, there's a reverse mode setting that we can temporarily apply for when backing up. So that way our boost isn't being too sensitive and applying those things.To put it into that reverse mode and temporarily cancel out the boost, you'll just want to hold onto your brake pedal. Just press down on that and then press down on the boost button and after a few seconds, you'll see, it will have a flashing R indicating that you're in the reverse mode. And now you don't have to worry about those brakes applying when you're backing up. And like most of your traditional brake controllers, there is a manual slide on it so you can manually apply the brakes on your trailer, if you need to.This can be useful for testing purposes. If you're just wanting to test the output, test the proper operation of your brakes, you can manually apply it with this. And it's also useful if your trailer starts to sway behind you, because that swaying motion when it starts going on, can potentially cause issues with stability and driving the vehicle. To straighten that out, we can hit our manual slide a little bit and that's going to apply the brakes in our trailer. So instead of being able to sway, our vehicle now wants to leave the trailer because the trailer is applying the brakes. That's going to pull them taut, and it's going to bring that trailer straight in line behind your vehicle once again.When your trailer is disconnected, you will see an NC located here on the screen. We just disconnected it right now and it does this so that, you know, hey, if you are driving, you have just been disconnected. You're no longer applying a brake signal to your trailer. It lost that input. And if you don't have anything connected, you're in your vehicle right now. You can be sure that you're not connected. You hit your slider here, it'll say NC. This can also be useful if you plug in your trailer and it doesn't seem like it's functioning, you should not see NC when your trailer's plugged up. That means that it's not currently detecting that there is a trailer plugged in and then you can correct any faults you've got with the wiring on your trailer, test it back out and ensure that you don't see the NC when you're hooked up.The two digit display will display your power output. And it also constantly monitors for any faults. And you can get fault codes on here. So you can use the troubleshooting in your instructions to help determine where the fault is and what's causing it.You'll have two different mounting options that come included with your brake controller. You've got the snap in mounting option, which is my preferred option because it's a little bit more low profile. It keeps itself closer to the dash and it only requires the two screws and you can easily click the module in and out with this bracket. It simply slides in the bottom there. And then it clicks up into place.And with our other bracket here, it does have adjustments. So if you can't achieve the appropriate angle with this bracket, you may need to use this one, but this can be mounted in a positive 90 degree to negative 90 degree orientation. So currently we're at zero that all the way straight up would be positive and all the way straight down would be negative 90 degrees. So you get a lot of options on how you're going to mount it. As long as you mount it level this direction, it can be again, tilted up or down, front to back. This other option here, you can see it has a slot on it. So you can mount it up using two screws here, wherever you want to position it. And with the slotted hole here, it will bolt to the side and then you actually get a tilt. So you can change that adjustment if you need it. In most cases, though, I feel like this is the best bracket for most vehicles.Now, when it comes to the installation of your brake controller, that's going to vary quite a bit, depending upon your vehicle. If you've got a truck, in most cases, they are already pre-wired underneath the dash and you can get a custom fit wire adapter here at etrailer.com, that will go from our Tekonsha brake controller and plug directly into the factory connector and then you're good to go. You'll want to use our fit guide to determine if there is a factory connector available for your particular vehicle.Now, something like our Kia here, your smaller SUVs or regular cars, those ones are likely not going to have a factory option. We have kits available though. Kit ETBC7 is going to provide you with your seven way connector as well as the wiring to get it hooked up for your brake controller.In addition to ETBC7, if you don't have a fully functioning four way connector, you'll need that as well because ETBC7 provides you with the wiring and seven way that you need for your brake controller, but does not provide you with the wiring for your lighting functions. But we have custom fit wiring options here at etrailer.com that have plug and play connectors for most vehicles. So you can simply just plug those in line and get a functioning four pole at the back, which provides you with all of your lighting signals. That'll just plug into ETBC7 here and then you can finish installing the rest of the kit to turn that four pole into a fully functioning seven way that can work with your brake controller.Now, if you've got multiple trailers you want to haul, then instead of going with the entry level proportional that the Primus IQ provides, I would recommend to Tekonsha's Prodigy P3. This will allow you to set trailer profiles. So if you've got a small trailer and a medium and a large sized trailer, or maybe two different large ones, maybe one's electric over hydraulic, you can make those adjustments and save those profiles. So that way you can just choose that profile when you hook up and it's already got your settings saved and you're ready to go.If you have limited space under your dash for a brake controller, there are brake controllers that can actually mount at the back and plug directly into the seven way connector like Curt's Echo. That's definitely one of the best options for that limited space there in the front. I'm a pretty tall guy and it really bothers me when I'm driving and my knee keeps hitting on my brake controller. So that's one of my favorite ones out there since I can get that out of the way and put it at the back of the vehicle.And that completes our look at Tekonsha's Primus IQ proportional brake controller.

Easy to install and very affordable.
Quick install works Great
Worked great!
easy to install
Just what the doctor ordered. Thanks
The package arrived on time (actually a day early!). It came with the correct Harness. It was easy to install and is working properly!
Great for the price

was easy to install and works great
Easy to hook up , works flawlessly
Simple hook-up when using the model specific harness.
Easier to install than expected. Works flawlessly
Very easy installation.
Easy to install and works great no issu es
Haven't tried it yet but it was very easy to install plug and play if you have tow package already
fast shipping, it installs easily. It's too early to comment on how good it works.
I went to all my local trailer places, auto parts stores and no one had a clue as to what I needed or how to install a brake controller. U-haul wanted $600 dollars to install a controller.
I visited e-trailer, bought $92, worth of parts, and watched an installation video, and a couple of hours later I was ready to tow.


Do you have a question about this Trailer Brake Controller?
Info for this part was:
At etrailer we provide the best information available about the products we sell. We take the quality of our information seriously so that you can get the right part the first time. Let us know if anything is missing or if you have any questions.


Thank you! Your comment has been submitted successfully. You should be able to view your question/comment here within a few days.
Error submitting comment. Please try again momentarily.