
To see if this custom-fit item will work for you please tell us what vehicle you'll use it with.


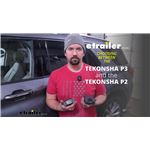
The Tekonsha P3 is a brake controller beloved for its reliability and useability. You're able to save your settings and multiple profiles. It's easy to install, and with the custom harness, it's plug-and-play.
Features:
Specs:
Braking output is the maximum amount of power that will be applied to your trailer's brakes. How much braking output you need is determined by the weight of your trailer; a heavier trailer will need more power to bring it to a stop. You want to go as high as you can without the trailer brakes locking up.
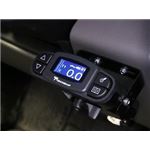
Use the arrow buttons on the front of the module to set the output.
The boost setting controls the aggressiveness of your trailer's braking, meaning how quickly the brakes reach the maximum braking level. If your vehicle takes too long to come to a stop, increase the setting. If it stops too abruptly, decrease the setting.
Depending on the level of boost, your trailer brakes can start at either 13 percent or 25 percent of the set braking output. So instead of starting at 0, the brakes will start at 25 percent and get to 100 percent sooner. This keeps the trailer from pushing your tow vehicle forward.
Boost Levels:
| Approximate Gross Trailer Weight | Boost Level | Increase in Initial Power Output |
|---|---|---|
| Less than tow vehicle GVW | B1 | 13% |
| Equal to tow vehicle GVW | B1 or B2 | 13% or 25% |
| Up to 25% more than tow vehicle GVW | B2 or B3* | 25% |
| Up to 40% more than tow vehicle GVW | B3* | 25% |
*Both B2 and B3 offer a 25-percent boost in initial power. But the braking curve for B3 is more aggressive than that of B2. This means that, even though you will start out with the same intensity when using these boost levels, you will get an overall more aggressive braking experience with the higher level. So if you use B3, you will reach maximum braking sooner than if you use B2.
To engage the manual override, twist the rotary-style lever from right to left. This will activate the trailer's brakes and brake lights independently of your vehicle, great for stopping sway or controlling your trailer's momentum in an emergency.
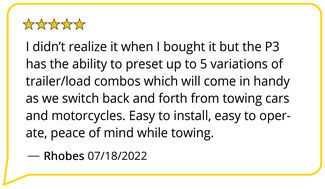
The P3 is able to store your settings in multiple profiles so that you can have them ready to go for different trailers and drivers. Even the display is super customizable: you can change the screen color, brightness, and language to make it easy to use.
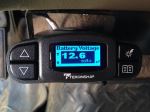
The P3 makes it easy to troubleshoot problems as they come up, with comprehensible and detailed diagnostics displayed on the screen.
Diagnostic troubleshooting messages include:
Diagnostic warning signs include:
The Prodigy P3 offers advanced safety features to prevent damage to various components of your towing setup.
-Integrated reverse battery protection shields the brake controller and your trailer's breakaway system from shorts.
-When the P3 is not in use, it draws only 3.6 milliamps, minimizing drain on your vehicle's battery.
-Any time your vehicle and trailer are at a standstill with the brakes applied for more than 5 seconds, the hold feature will kick on and reduce power to just 25 percent. This will keep your trailer in place without your brakes overheating.
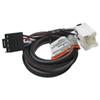
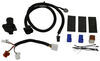
Installing the P3 is incredibly simple. You'll mount the bracket to your dashboard then mount the unit to the bracket. Plug the custom harness into your vehicle and into the unit. Done!
Keep in mind that the P3 must be horizontally level and parallel with the direction of travel to work correctly.
With a replacement wiring harness (sold separately) and replacement bracket (TK5906 - sold separately), you can even transfer the Prodigy P3 to another vehicle.
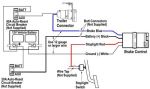
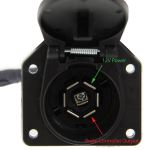
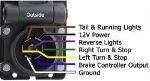
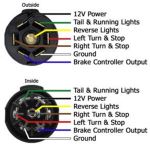
Note: If you don't already have a 7-way plug at the back of your vehicle, take a look at our exclusive 7- and 4-way brake controller installation kit (ETBC7 - sold separately).
Proportional braking means that your trailer brakes mimic your tow vehicle's brakes. If you slam on the brakes, your trailer brakes will activate with the same intensity; if you brake lightly, your trailer brakes lightly too. The trailer's braking is in proportion to your vehicle and trailer.
The Prodigy P3 uses an internal inertia sensor to detect how your vehicle is braking so it can send the right amount of braking power to your trailer. It measures the inertia of your tow vehicle and activates the trailer's brakes to slow at the same rate. The result is uniform braking across your towing setup. No push-pull action - just smooth, proportional braking every time.
 Alternate Instructions
California residents: click here
Videos are provided as a guide only. Refer to manufacturer installation instructions and specs for complete information.
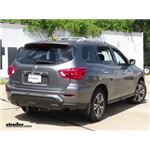
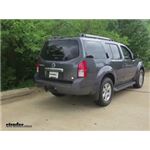
Speaker 1: Here on this 2018 Nissan Pathfinder, we're gonna be having a look at and showing you how to install the Tekonsha Prodigy P3 brake controller. Part number 90195, in conjunction with the Tekonsha plug in wiring adaptor for electric brake controllers for Nissan vehicles. Part number 3050-P.Here's what our brake controller looks like installed. Now, the reason you're gonna want the Tekonsha Prodigy P3 brake controller is that if you own a trailer and it has electric trailer brakes, you need to have a way to utilize them. This will allow you to do that.Now one thing that really sets this brake controller apart from other on the market, is that this is a proportional brake controller. A proportional brake controller is going to give you the smoothest and the safest application of your trailer brakes.
You're really not going to feel your trailer back there as you're applying the brakes in your vehicle and you're coming to a stop. You're not going to feel it push you going down the road. The reason for this is because proportional brake controllers will gradually apply the brakes to the preset level that you have on the brake controller and if you're going to an aggressive stop where you're really jamming on your brakes, it'll apply the brakes to the same level to match.If you're just normal stop and go traffic, it'll give you just a little bit of trailer brakes so, you don't have to worry about the trailer jerking your vehicle back as it applies the brakes, which is something that you can see happen with other brake controllers out there, specifically time delayed brake controllers.This brake controller does have a very easy to use display. It's also very easy to read. There's one that really sets it apart from others, because most other brake controllers out there, they only have a couple numbers on this.
This gives you a full layout of what's going on. You have what your brakes are being applied to right now. You have your preset for whatever trailer you have preprogrammed.You do have multiple preset options, so if you tow different trailers that are different sizes, different length, you can set up each trailer individually in your controller so, you don't have to worry about changing settings every time you hook up to your trailer.We'll show you how the individual trailer settings work now. You see right here, where it say T1, mean we're on trailer one. If we press and hold this button on the top right, we have a new screen that pops up.
You can select trailer one, trailer two, trailer three, four, five. So you have five different trailer setups with this brake controller.Now this button on the top right is also our boost control button. What's great about this is, sometimes we find ourselves towing a heavier trailer, and our vehicle's brakes may need a little more assistance, and we need the trailer brakes to come on a little faster, and with a little more intensity. We can simply press the boost button, and you see it goes up to boost level one, and the little indicator here on the top shows a bigger trailer now. Each way that we go up to boost level two, you'll notice that the trailer gets bigger, and our brakes are coming on faster, and with more intensity.
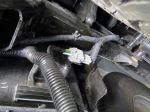
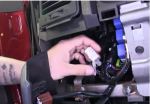
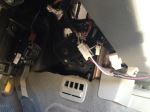
We have another setting of boost level three. This will make them come on the fastest and with the most intensity out of all three settings.If you're towing a small utility trailer, you really don't need to have boost on, but if you're towing a larger, heavier trailer such as a fifth wheel or a gooseneck trailer, you may find it beneficial to use it as you're driving.The buttons over here to the left, these are our gain control buttons. This will control how much power is going to your trailer brakes. You can go all the way down to zero, which is basically no power at all, or all the way up to 14, which is max power. This will give you the most power to your trailer brakes possible, and it'll be the most aggressive. You may find that this is a little too much for your application. It's a good place to start right in the middle, around seven.Finally, at the bottom, we have our manual override. What this is going to do is apply our trailer brakes without us applying the brakes in our vehicle. We slide this over, you'll notice the numbers start to go up. We slide it all the way over, it'll go up to where we have our gain adjustment set at.Now, the manual override, this is a great thing to use in a situation where you find your trailer trying to get jack knifed behind you. You need to slow your trailer down and not your vehicle, so you only want the trailer brakes applied, not yours. You can just slide this over to bring the trailer back in line behind you, and you'll find yourself in a much safer situation.Now, when directly comparing this to another brake controller out there that is proportional, such as the Redarc TowPro Elite Brake Controller which, we have on our website, this one has a much more user customizable interface. Because of that, it is a much larger unit, and it has to be mounted underneath your dash somewhere.The Redarc can be mounted anywhere inside your vehicle, you just have to drill a couple holes, and you'll have a very small button that will be your interface.One other great feature about this brake controller that other proportional brake controllers don't offer, is that it does have the ability to run electric over hydraulic trailer brakes, which is becoming a very popular upgrade on fifth wheel, goosenecks, or other large trailers because it does offer the best stopping power.In order to get in that mode, you simply press your menu button on the bottom right. We'll scroll down to brake type. Press the menu button again. Then you can select electric or hydraulic. Once selected, just simply hit okay, and hit confirm, and you're back there.Another cool thing about this is you can also change the display to whatever color you like. You can have pink, magenta, orange, light green, green, cyan, light blue, whatever meets your preference, or whatever matches the interior dash lights of your vehicle. That's one nice thing about this, other brake controllers you can't do that.It also comes with a nice carrying case here. This is useful if you need to store the brake controller if you're not gonna be towing a trailer for awhile and you want to free up your dash space, or if you own multiple vehicles that you tow your trailer with and you only have one brake controller. It's a nice way to transport it between them.Now that we've gone over some features, we'll show you how to get it installed.To begin our install of the brake controller, we first need to locate the factory brake controller port underneath the dash on our driver side. Above our parking brake assembly, we'll find a connector that is wrapped in foam tape up here. This is our factory brake controller plug. We're gonna bring that down so it's easier for us to access.There's a tab here we need to press on to remove the dummy plug that protects the connector. Gonna use a screwdriver to help us. And we'll pull to separate the connector.Now, we'll take our adaptor harness for our brake controller, and we'll plug that in to the factory harness.We'll now take our brake controller and plug it in to the other end of our adaptor harness.As you can see, after we plugged our brake controller in it powers on and is working. So now we need to find a place to mount it inside of our vehicle. Typically, you'll mount this on the right side of your steering wheel, on the lower portion of your dash. Due to space constraints in this vehicle, this is about the only spot where we can actually mount it. So, this is where we are going to mount it and we'll secure our bracket to the dash using the provided hardware.We'll get one screw started and then we'll get the other screw in place. Now we'll screw our brake controller into our mounting bracket. All right, got one started, now we'll get the other one started. Okay, you have a screw on the other side tight, our brake controller is now secure to our dash and is in a convenient spot for us to use while we're driving.We went ahead and zip tied up the excess wiring underneath the dash so it doesn't interfere with our feet as we're driving and stays away from any moving parts such as the steering column.That completes our look at and showing you how to install the Tekonsha Prodigy P3 trailer brake controller, part number 90195. In conjunction with the Tekonsha plug in wiring adaptor for electric brake controllers for Nissan vehicles, part number 3050-P on this 2018 Nissan Pathfinder.


Do you have a question about this Trailer Brake Controller?
Info for this part was:
At etrailer.com we provide the best information available about the products we sell. We take the quality of our information seriously so that you can get the right part the first time. Let us know if anything is missing or if you have any questions.


Thank you! Your comment has been submitted successfully. You should be able to view your question/comment here within a few days.
Error submitting comment. Please try again momentarily.