
To see if this custom-fit item will work for you please tell us what vehicle you'll use it with.


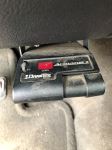
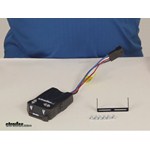
This stout brake controller has easy-to-reach button controls up front and a simple slide-lever manual override. The digital display is large and easy to read. And the included splice-in harness and mounting bracket make for simple installation.
Features:
Specs:
Power output is the maximum amount of power that will be applied to your trailer's brakes. How much braking output you need is determined by the weight of your trailer; a heavier trailer will need more power to bring it to a stop. You want to go as high as you can without the trailer brakes locking up. It adjusts on a scale of 0 to 10.
Once you have the power output set, you can fine-tune your braking by adjusting the sync control. This controls the aggressiveness of your trailer's braking, meaning how quickly the brakes reach the maximum braking level. If your vehicle takes too long to come to a stop, increase the setting. If it stops too abruptly, decrease the setting. The sync setting is shown as a number followed by the letter "o" to differentiate it from the output reading. The least aggressive sync setting is 0o and the most aggressive is 9o.
The Activator IV displays the power settings as you adjust them. While braking, the unit will display the power output setting. To see or adjust the sync setting, step on your brake pedal and press either the plus or minus button to increase or decrease the setting.
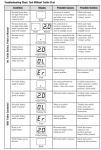
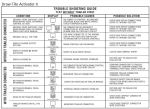
The display will also show trouble codes to alert you to any potential problems, such as short circuits or overloads, or if there is an internal problem with the controller.
Installation
Because inertia plays no role in the functioning of this controller, you do not have to mount the unit at any particular angle. Your mounting options are limitless, so long as you can still easily access the controller and manual override. And because the included wiring harness plugs into the back of the controller, you can easily remove the Activator when you're done towing so you won't bang your knee.
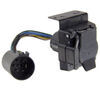
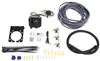
Note: If you don't already have a 7-way plug at the back of your vehicle, take a look at our exclusive 7- and 4-way brake control installation kit (ETBC7 - sold separately).
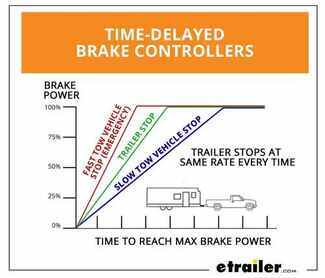
Time-delayed braking means that when you apply the brakes in your vehicle, the controller activates the trailer brakes at a pre-set intensity and rate. Both the amount of braking power (gain) and rate of application (load) can be adjusted to suit your preference, the road conditions, the type of trailer, and the weight of your load. To determine which levels are best for your application, test your towing setup and choose what feels right.

California residents: click here
Videos are provided as a guide only. Refer to manufacturer installation instructions and specs for complete information.
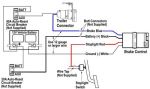
Today on our 1991 Ford F150, we will be installing the Tekonsha PowerTrac electric brake controller, part number 39523 in conjunction with the ETBC7 Brake Controller wiring as well as the replacement brake control plug in harness for Tekonsha and Draw-Tite type brake controllers, part number 20127. We will begin our installation here at the rear bumper. We will need to install the bracket to the rear bumper that will hold our 7 pole connector. We will take the bracket and the hardware, put the bracket in place here in the redrilled holes. Slide the bolt through, put the washers on the other side and lock it down with the nut. With both bolts in, we can go ahead and tighten it down securing it to the rear bumper. We are now ready to put the 7 pole into the bracket. We will take our 7 pole connector and the hardware here, put the connector into place making sure that the wires pass through the bracket and with our connector in place, we will pass the bolts through the connector, through the bracket, put the nut on the other side and tighten them down.
With all four bolts in and tight, our 7 pole is secured to the vehicle and we are ready to wire it up. To wire it up, you will notice that the 7 pole has a 4 pole on the other side. This vehicle already has a 4 pole so we will simply plug it in to our new connector and lock it down with a zip tie. This will ensure that it never comes apart where we can then wrap it in electrical tape further securing it and keeping the elements out. With that connection made, we will go ahead and secure it back to our hitch here using a couple of zip ties. We will now move on to our ground and reverse light lead. The white wire here with the ringed eyelet our ground and the purple wire with the yellow butt connector on it is our reverse light lead.
We will not be hooking this up so we are going to go ahead and attach the purple wire to our white wire just to keep it out of the way. With that done, we will find a good grounding location and using a self starting screw, we will attach it here to the frame of the truck giving us a good ground. We will again make sure that all our wires are neatly tucked away and secured with some zip ties. We are now ready to work on our brake control wiring. We will take our duplex wire, remove the sheathing and attach the white wire to the blue wire here on our 7 pole. We will take the black wire and attach it to the black wire of our 7 pole.
With that done, we will go ahead and wrap it in electrical tape just to keep it out of the elements. We can then secure it to the hitch and begin running our wire up to the front of the truck. As we run it up to the front of the truck, we are going to try to stay away from anything hot such as the exhaust or any moving components such as the vehicles suspension or steering as we route the wire. Before we move back to the top side of the truck, we are going to take the included corrugated loom and wrap it around our 7 pole wiring just to give it a good look.Now that we are done underneath the truck here, we move up to the top side. Here in the engine compartment of the truck, we will route our duplex wire up where we can now cut the majority of the sheathing left off of the wiring.
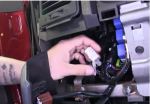
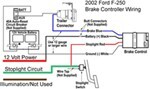
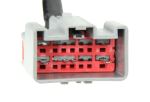
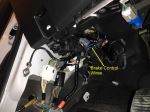
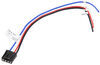
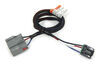
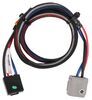
Our white wire, we will route through the firewall of the truck and into the cab. The black wire will continue up the firewall and around to our battery. Here at our battery, we will need about an extra 8 feet of our duplex wire. This will be our power and ground for the brake controller. We will start here at the battery and work in the same way that we ran the black wire back to the firewall where we can then pass it through the same hole that we ran the white wire through. With that done, we will move into the cab where we will mount our brake controller.We will find a suitable location and using the self starting screws, we will attach the brake controller mounting bracket to the dash of the truck. With that done, we can now attach our brake controller to the bracket using the included screws coming with the brake controller. Now that we have our brake controller mounted, we will move over back to our wiring. We will take our replacement brake control plug in harness and the wires that we ran into the truck from the firewall. We will connect the white wire from the duplex wire to the white wire on the harness. We will connect the black wire on the duplex wire to the black wire on the harness. We will take the white wire that was by itself coming through the firewall and connect it to the blue wire of our wire harness. The red wire will need to make a connection at our brake light switch. We are going to go ahead and extend our red wire just to make sure we can route it without getting in the way of any steering components or other electric accessories.We will now locate our brake signal. Heres our brake switch where we will back probe our connector. We will want to connect to the wire that energizes when you press on the brake. Now that weve located it, we will now take the wire tap included with hour ETBC7 and connect the red wire to the solid green wire on our brake light switch. You may need to peel the sheathing from the brake light switch wiring in order to get enough wire to tap it. We will now go ahead and plug the harness we just assembled into the brake control harness and secure it up underneath the dash. With that done, we will just make sure that our wiring is all secured underneath the dash where we can reinstall the cover that we removed previously.With everything done there, we will move back out to the engine compartment. We will take our 20 amp fused breaker and attach it to the firewall here. We will have three wires, two black wires as well as one white wire. The black wire that is within the duplex wiring sheathing will cut off, strip it back, and attach our small ringed eyelet included with the ETBC7 kit. We can then take the ringed eyelet and put it over the silver side of the breaker. We will take the excess that we cut from the black wire and attach another one of the small ringed eyelets and we will put it on the copper side of our breaker. This wire will run to our positive terminal on our battery. We will take the 40 amp breaker included with the ETBC7 and attach it to the side of the truck here. We will now take the black wire thats by itself and attach a small ringed eyelet to it. With that done, we will take the small ringed eyelet and attach it to the silver side of our breaker. We will then take another piece of black wire, attach our small ringed eyelet and attach it to the copper side of the breaker. With both breakers in and all of our nuts tight, we will attach the large ringed eyelets to the other side of both black wires where we can now make our connections to the positive side of our battery. We will take the white wire and connect it to the negative side of our battery and with that done, our brake controller is in and we are ready to pull a trailer with brake.That completes our installation of the Tekonsha PowerTrac electric brake controller, part number 39523 in conjunction with the ETBC7 Trailer Brake Wiring Harness as well as the replacement brake control plug in harness for Tekonsha and Draw-Tite brake controllers, part number 20127 on our 1991 Ford F150. .

As good or better than OEM!
Worked perfect, just as advertised.
Worked great!
Received my order sooner than expected.
as described
EXCELLENT PRODUCT
Excellent product!!
Factory plug, good value.
Fast service,good price, got the right part
5 stars5 stars
excellent customer serviceworks great
Arrived as ordered on time and installed no problem.
It plugged in and worked as advertised,Thank you so much,
Fantastic brake controller. Even better website.
shipping was free took 3 days and ever thing came in working order
Great controller, we install it on almost every system we do.
Good overall product. Meets needs and is inexpensive.
seller was super fast and product works very well good investment
this controller is great. etrailer delivery, packaging, pricing were ALL great...
Received my brake controler in perfect condition, I installed it the next day and works fine.
Love it.... Installed in my 2011 chevy in about 5 min and it works great. Recommend to anyone
recieved the product on time. bery happy with their service i will be using them in the future.
Needed an extra harness for another car. Works perfect!
Had to add wire it get it throught the firewall. this means pulling conectors throught the boot on the firewall.
Works great, very easy to use, and very easy to install thanks


Do you have a question about this Trailer Brake Controller?
Info for this part was:
At etrailer.com we provide the best information available about the products we sell. We take the quality of our information seriously so that you can get the right part the first time. Let us know if anything is missing or if you have any questions.


Thank you! Your comment has been submitted successfully. You should be able to view your question/comment here within a few days.
Error submitting comment. Please try again momentarily.