
To see if this custom-fit item will work for you please tell us what vehicle you'll use it with.
Get a brake controller in your truck that looks like it's supposed to be there. This sleek knob blends right into your dash and makes your settings simple and convenient to adjust.
Features:
Specs:
Note: The main unit must be mounted horizontally level and parallel to the direction of travel within 20 degrees.
Power output: To get more power output - the maximum amount of power that will be applied to your trailer's brakes - rotate the knob clockwise. To decrease the power output, rotate it counterclockwise.
Manual override: To engage manual override, simply press the knob. This will activate the trailer's brakes and brake lights independent of your tow vehicle, great for stopping sway or controlling your trailer's momentum in an emergency. The Voyager iD will reach the maximum set power in half a second.
The Voyager comes in 2 pieces: the main unit and the control knob.
The control knob can be installed in any convenient spot that's easy for you to see and access. This can be a blank switch panel, an open spot on your center console, or wherever there's space on your dashboard. Before you do any drilling, be sure there's enough clearance behind the dash for the entire knob to install!
Once you've decided where you want to put the control knob, you'll need to find a good place to install the main unit. It needs to be horizontally level and parallel to the direction of travel within 20 degrees. A mounting kit with hardware is included.
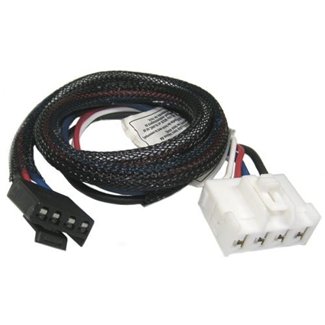
This kit comes with a vehicle-specific wiring harness that plugs right into the factory port beneath the dash of your vehicle. That means no hardwiring!
You will also need a circuit breaker kit to complete your installation:
Note: If you don't already have a 7-way plug at the back of your vehicle, take a look at our exclusive 7- and 4-way brake-control installation kit (ETBC7 - sold separately).
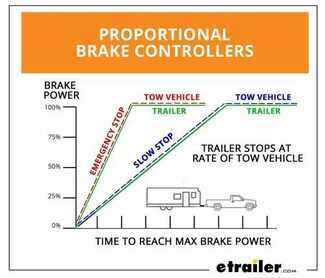
Proportional braking means that your trailer brakes mimic your tow vehicle's brakes. If you slam on the brakes in your vehicle, your trailer brakes will activate with the same intensity; if you brake lightly, your trailer brakes lightly too. The trailer's braking is in proportion to your vehicle's braking. This saves wear and tear on the tires and the brakes on both your vehicle and trailer.
The Voyager iD uses an internal inertia sensor to sense how your vehicle is braking so it can send the right amount of braking power to your trailer. It measures the inertia of your tow vehicle and activates the trailer's brakes to slow at the same rate. The result is uniform braking across your towing setup. No push-pull action - just smooth, proportional braking every time.
California residents: click here
Videos are provided as a guide only. Refer to manufacturer installation instructions and specs for complete information.
Today on this 2008 Dodge Ram pickup 1500 series quad cab, we're going to install part number 90885 from Tekonsha. This is a Prodigy P2 Trailer Brake Controller. Now to help us with our install, we're also going to be using part number 3020-P from Tekonsha. This is a plug-in wiring adapter for electronic brake controllers with Dodge tow packages. We're underneath the dash on the driver's side of the truck, and we'll go ahead and look for a tow package port. Now on this truck, this is the blue connector right here. That's a tow package port.
Now from the factory, it's not going to be sitting there. In fact, in this particular vehicle, it was buried behind the wires right here, and taped to the wires going to the grommet. It was almost impossible to see, so you have to kind of go by feel to pull it out. Then we'll go ahead and use our adapter cord to go from the tow package to our brake controller. This will simply plug together until it snaps. Let's go ahead and look for our brake controller. First off, we've got a choice how to mount our brake controller.
If you want permanent attachment, you can use the metal bracket right here, or if you want to switch it between vehicles, it may be a good idea to use the pocket here. Now the customer was nice enough to let us know where our brake controller should sit, so this is our location, and we're going to use our pocket right here. We'll go ahead and use one of the sheet metal screws that comes with the kit, and we'll go ahead and attach it to the plastic. Now, we want to make sure that the pocket sits in a straight line with the truck. It's not anything like this. And that way our brake controller will be the same way. And then we'll go ahead and user our second screw to permanently attach it. Should go for tight.
Now we'll take our cord, and run it to the back of the pocket, then plug into the back of our brake controller. Then, put the brake controller in the pocket. We'll take a few moments to go ahead and zip tie our wire and make sure it's safe and secure and out of the way. Now the zip ties we're using doesn't come with any of the parts shown today, so it's always a good idea to get zip ties when you do any electrical on your vehicle. Let's go ahead and check out our brake controller. We have power going to it, so it shows two dots. One dot's for power, and one dot's going to be your boost setting.
We'll go ahead and touch the boost button and we'll cycle through. Let's go ahead and put it back to the factory setting. And then we'll go ahead and check out the manual override. See it says "NC" for "no connection" because there's no trailer hooked up to it. Let's go ahead and hook up a trailer and see how it works from there. With our trailer connected, it shows a "C" for a "connection". We'll go ahead and use the manual override and see how it scrolls through the numbers. This is what's set right now for our total output. Now we control the output of the power from this knob right here. All the way to zero, and it actually shows you zero, to all the way back up to eleven. In this case, it's always good to start off with setting it about in the middle, say around six. Now we'll go ahead and hit the brake pedal, and we'll get a small amount of numbers to show up, and that tells us we got signal from our brake pedal as well, so it looks like everything works. And that'll do it for our install, part number 90885 from Tekonsha, Prodigy P2 Brake Controller on our 2008 Dodge Ram quad cab 1500. .

Easy install simple setup
Everything worked as it should! Very happy with the look as well
Works good
The install was pretty simple. It took some time to modify the knock out plug to conceal the adjustment knob but after a bit of work it fit nicely and looks like it’s supposed to be there. I missed a photo of the final mont of the control unit but I was able to install the supplied clip for the module just above the airbag. There is a clip that holds the wire for the computer input so I removed it for extra space and secured the wire with a zip tie.
Good product very easy to install.I recommend to buy the plastic insert for the switch since the blank in the truck didn’t have a flat backing to drill a hole for the knob
Works great. custom harness makes it plug and play!
Easy install. I used the cable harness that came with my 22 Silverado. Hardest part was just locating a place on the dash for the knob and access from behind for the 2 inches or so length of the switch assembly. Small and looks good on the dash.
Great service and great quality parts.
Plugged right in.
great service and product
Very simple installation.
makes life simple
The installation was a snap...
The right part for my job. thanks
Great product.
Very easy to install.
Perfect fit!
Product is correct for my needs!
Worked perfectly.
Fit perfectly, worked without any problems
Do you have a question about this Trailer Brake Controller?
Info for this part was:
At etrailer we provide the best information available about the products we sell. We take the quality of our information seriously so that you can get the right part the first time. Let us know if anything is missing or if you have any questions.


Thank you! Your comment has been submitted successfully. You should be able to view your question/comment here within a few days.
Error submitting comment. Please try again momentarily.