
To see if this custom-fit item will work for you please tell us what vehicle you'll use it with.


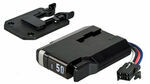
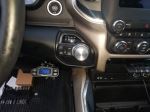
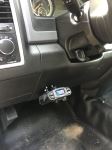
This compact brake controller fits nicely in your cab. It's designed to mount flush to the dash and is only 1" thick. The controls are simple, the LED display is large and bright, and the manual override is easy to reach in a pinch.
Features:
Specs:
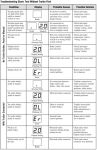
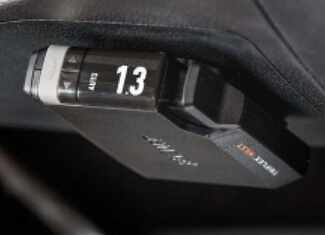
Gain is the maximum amount of power that will be applied to your trailer's brakes. How much braking output you need is determined by the weight of your trailer; a heavier trailer will need more power to bring it to a stop. You want to go as high as you can without the trailer brakes locking up. Use the gray rocker switch to adjust the gain on a scale of 0.5 to 9.9 in increments of 0.5.
Once you have the gain set, you can fine-tune your braking by adjusting the load control on a scale of 1 to 9 using the black rocker switch. This controls the aggressiveness of your trailer's braking, meaning how quickly the brakes reach the maximum braking level. If your vehicle takes too long to come to a stop, increase the setting. If it stops too abruptly, decrease the setting.
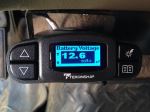
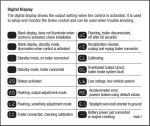
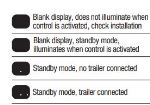
The LED display on the TriFlex is large and easy to read at a glance. You can adjust the brightness or trigger night mode so it won't glare obnoxiously on your dash. It also will give you error messages you can use to troubleshoot.
The TriFlex offers key safety features to prevent damage to various components of your towing setup. This starts with built-in protection against shorts and positive and negative power reversal, as well as continous diagnostic checks to alert you to any potential problems as they come up. To minimize the drain on your vehicle's battery, the TriFlex will automatically go into sleep mode after 5 minutes of inactivity. Sleep mode will turn off again the moment you press the brake pedal.
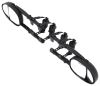
Automatic leveling means your mounting options are limitless, so long as you can still easily access the controller and the manual override. The included bracket is designed to mount the brake controller flush to the dash so it takes up almost no space at all.
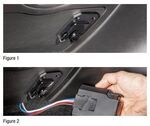
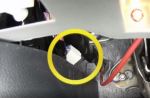
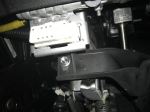
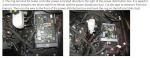
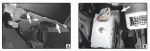
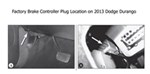
The included custom-fit adapter plugs into the port on your vehicle's built-in brake control wiring harness, which you'll find underneath the dash, to the left of the steering column, taped to another harness near the emergency brake pedal. Once you're plugged into the factory port, just plug the other end of the adapter into the TriFlex. No hardwiring needed!
Note: If you don't already have a 7-way plug at the back of your vehicle, take a look at our exclusive 7- and 4-way brake control installation kit (ETBC7 - sold separately).
Proportional braking means that your trailer brakes mimic your tow vehicle's brakes. If you slam on the brakes in your vehicle, your trailer brakes will activate with the same intensity; if you brake lightly, your trailer brakes lightly too. The trailer's braking is in proportion to your vehicle's braking. This saves wear and tear on the tires and the brakes on both your vehicle and trailer.
The TriFlex uses an internal 3-axis accelerometer to sense how your vehicle is braking so it can send the right amount of braking power to your trailer. It measures the inertia of your tow vehicle and activates the trailer's brakes to slow at the same rate. The result is uniform braking across your towing setup. No push-pull action - just smooth, proportional braking every time.
 Alternate Instructions
California residents: click here
Videos are provided as a guide only. Refer to manufacturer installation instructions and specs for complete information.
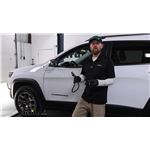
Hi there, I'm Michael with etrailer.com. Today we're gonna take a quick look at this Curt Triflex Next Trailer Brake Controller. So if you have electric brakes or electric over hydraulic brakes, you're probably already aware that without a brake controller your trailer's brakes won't activate. So they're really not doing you any good. So you are gonna need to have a brake controller. Basically what a brake controller does is when you apply the brakes in your tow vehicle it's gonna send a signal through your brake switch to your brake controller.
The brake controller is then going to send an electrical signal out to your trailer's brakes so that they apply and help to slow down your trailer. There are several different kinds of brake controllers. There's different basic technologies and that sort of thing. Really your two main categories are you have a time delayed set up or you have a proportional setup. So with your time delay, essentially you set how much power you want applied to your brakes and then no matter if you're just tapping your brakes or really slamming on them in an emergency sort of situation, it's going to apply that same preset power each time.
So there are some downsides to that. It doesn't give you as much control. It can be a little aggressive sometimes when you don't need it to be. But then with your proportional setup it is going to apply your trailer's brakes with the same intensity as your tow vehicle's brakes. So if you're just lightly tapping on the brakes it's just going to lightly apply your trailer's brakes.
So proportional systems like this one are definitely my preference. I think they're a little bit more, give a little bit more finesse to your performance. There are some downsides to these. Typically, they are gonna be a little bit more expensive then your time delayed systems just because they do have more components to them. They've got an accelerometer in there that's going to sense the inertia of your movement so that it can apply the brakes proportionally for you.
And then another downside is typically because it does have that inertia sensor in there, or an accelerometer, it's going to have to be mounted in certain configurations to follow your direction of travel. And that's one benefit to this particular model is that it doesn't have to be mounted in any particular configuration. So you can basically mount it wherever you want. So definitely a benefit to this one over even other proportional systems. So for this model specifically, it does have the LED display that's going to show the amount of power output. You can adjust that with your rocker switches here. So very easy to access those. That's going to allow you to adjust between 10 different gain settings. So you can adjust the amount of braking power to suit your performance, the road conditions, the type of trailer you're towing, and the weight of your load. If you select a higher setting for a harder braking and a lower setting for more gradual braking, you do wanna make sure when you're getting that set up a good rule of thumb is to go just shy of where your trailer's brakes lock up. So test it out a few times. As you're going down the road you don't want your trailer's brakes to lock up. So get to that point and then come down just a little bit to get that fine tune where you need it to be. And then typically your gain is only gonna have to be readjusted when you're experiencing changing road conditions or if the weight of your trailer changes. So if you drop off your trailer load and you're needing to you probably need to adjust that gain there. It also gives you nine different load settings so that you can adjust how quickly the brakes will reach their maximum braking level. So if your vehicle takes too long to come to a stop, good idea to increase your setting by pressing the upper rocker switch. And then if it's stopping too abruptly you can decrease the settings as well. So you kind of fine tune it to your preference. We also have the pinch trigger manual override here. So that's within very easy reach, very simple to operate. What that's gonna do is allow you to apply your trailer's brakes without having to apply the brakes in your tow vehicle. So say for instance, if your trailer starts swaying you don't really need to slow down your whole setup you just need to apply the brakes in your trailer to kind of bring that back in line. So you can just push in on that trigger switch there and that will apply your brakes in your trailer without having to apply the brakes in your tow vehicle. This does have several different integrated safeguards to help protect your vehicle, the trailer, and the controller itself. It's going to run continuous diagnostic checks to alert you to any potential problems. It will help to minimize drain on your car battery by entering sleep mode. After about five minutes of inactivity it's gonna help keep your trailer's brakes from overheating by reducing power output when you're sitting for prolonged periods or prolonged stops. So if you're in traffic or something like that it's gonna help decrease the power so your brakes don't overheat. It's also going to defend the brake controller and trailer brake away system against any shorts and prevent positive and negative power reversal with its built-in polarity protection. This is gonna be very quick and easy to get installed. Again because you're not having to worry about the orientation, you can basically just get it mounted wherever it's gonna be most convenient for you to reach and access those controls. They've got this mounting bracket here. As you can see we'll just use the included hardware to get this mounted in place. And then basically our controller just slides onto that so it can be mounted flush with your dash. So very convenient to get that mounted. When you're considering where you can mount this, give you a few measurements here. You can see it is right about three we'll call it three and one eighth of an inch wide. Our length, we're right about four inches long. And our height approximately one inch overall. So keep that in mind and when you're deciding where you can get this mounted. Now as far as wiring goes, that's gonna completely depend on your setup. So there are some vehicles that already have a plug pre-installed from the factory that will allow you to just plug this right in there. If you don't have that on your vehicle, there are some kits available that will allow you to make that installation process pretty simple. But they are very vehicle specific. So I'd encourage you to use our vehicle fit guide here at etrailer.com. You'll select your year, make, and model of your vehicle. We'll let you know which products are confirmed to fit with your vehicle. So that's another route to go. If your vehicle isn't already pre-wired with a plug then I would recommend that. Otherwise, it is gonna take a little bit of doing to get this installed. If you don't already have a seven way plug at the back of your vehicle, I would highly recommend using our ETBC seven plug that's gonna provide wiring and everything to get you set up so that you've got that connection so that your trailer can connect to your vehicle. But overall, a really great option here. Like I said, I really like the proportional system. The way this is going to allow your trailer's brakes to be applied at the same intensity as your tow vehicle. I like that this model gives you that option to have more versatility and where you get it mounted. And so overall, I think this is gonna be a great way to go if you are needing a brake controller for your trailer's brakes. And that completes our look for today. Again, I'm Michael with etrailer.com. Thanks for watching.
Customer Satisfaction Score:
95% were satisfied with this product
5% of customers were not satisfied
Ratings & Reviews

Excellent product with easy installation. It arrived very quickly--great customer service.

Info for this part was:
At etrailer we provide the best information available about the products we sell. We take the quality of our information seriously so that you can get the right part the first time.


Thank you! Your comment has been submitted successfully. You should be able to view your question/comment here within a few days.
Error submitting comment. Please try again momentarily.