Hello Bruce, Thanks for writing in! Using butyl tape between the trailer body and the Single Axle Jeep Style Trailer Fender - Diamond Plate Aluminum - 13" to 15" #HP96VR is exactly the route I would go. It stays flexible, creates an…
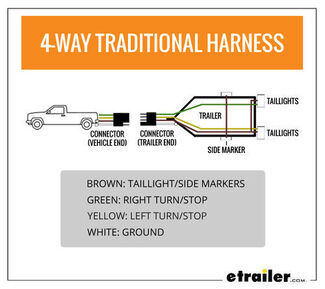
Stuart, since you’ve already confirmed the truck and trailer wiring through the junction box and verified the grounds, the fact that the running lights, brake lights, backup lights, and turn signals all work individually points us toward the tail…
A trailer that is over 80 inches wide is required by DOT regulations to have rear clearance lights. An over 80 inch taillight kit, like part #TL16RK, will have the side clearance light built into it. An under 80 inch taillight does not have the…
That's a very good question, we tend to be extra cautious and say to use 10 gauge wire because that would be more than enough. When you get into longer trailers that will end up using a lot of wire the heavier gauge wire becomes more necessary.…
Hey Mike! We don't have an all-in-one part that comes with the brackets and pigtail so you need to order those parts separately. The #AL91RB and #AL91AB will work with the Mounting Bracket #A91BB and then for a pigtail you can use the Right Angle…
I sure can Blake! I just heard back from Dexter and both of your axles are 3,500 lbs capacity. That's all the information they were able to provide. Here are the replacement parts you've requested: Hub/Drums - 5 on 4-1/2 Lug Nut Pattern item…
Hey Bryan, that's a good question. The pricing can definitely be misleading, but I wouldn't use it to judge the quality of the tire. A lot of that comes down to promotions, inventory, and whether you're looking at a tire by itself or…
We do offer a wide variety of replacement lights for trailer but since trailer manufacturers don't keep a record of what they use on trailers I would need some pictures of the lights you are wanting to replace along with some measurements so I…
In order to determine the torque rating for the lug nuts on your trailer you will need to know check out the chart I attached that shows all of the torque specs for all the trailer lugs available based on stud size, wheel material and wheel size.
Hello John, thanks for reaching out. Yes, the mounting holes on the TecNiq Contoured Seven Function Box Style Tail Light #TN42XR (driver side) and #TN62XR (passenger side) are exactly the same as the Wesbar 271595 tail light. They are 2" apart…
Hey Darren, the studs of the Optronics Fusion LED Trailer Light #OPT45KB that you referenced are not designed to thread out of the assembly easily. You could take a cutting wheel to them and cut them off flush pretty easily though if you wanted to…
Hey Robert, thanks for reaching out. The Curt Cold Weather 7-Way RV Style Connector #C23RJ uses a combination of 14-gauge and 10-gauge wire. The black 12V power wire and white ground wire are 10 gauge, while the brown, red, blue, green, and yellow…
In these days of customer "no service" I am usually disapointed when doing business with people I don't know. It was refreshing doing business with you. I'm impressed!
Ready for a clean swap? Command Electronics red trailer lights can be a direct replacement when your hole spacing matches, giving an OEM-style look. The red lens keeps signals easy to see, and a careful install goes a long way—match the wiring, seal the edges to keep water out, and on aluminum use stainless or zinc-plated screws with heat-shrink connectors.
Usually you'll need to supply those. Some installs reused the old gasket and provided their own screws and wire connectors. Have stainless or zinc plated screws and heat shrink butt connectors ready so you're not stuck mid-install.
Improve the seal during install. Add quality silicone around the screw holes and the light perimeter, or re-seal where old putty was removed. Check for a good gasket and follow the wiring color code printed on the back. Avoid overtightening to help prevent cracking.
Use stainless, aluminum, or zinc plated self-tapping screws to help prevent corrosion at contact. Pre-drill if needed and avoid overtightening. Seal around the screw holes and light perimeter to reduce moisture intrusion.
They can, if the footprint and wiring match. Check mounting hole spacing and wire exit location; some installs needed flipping the light to match holes, and one noted an off-center wire exit that required a small opening change. Verify the functions match your originals, like stop, turn, tail, and backup if needed.


 Clearance Lights
 Tail Lights
 Filters