
To see if this custom-fit item will work for you please tell us what vehicle you'll use it with.


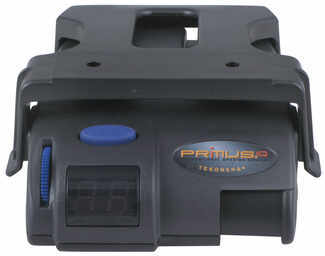
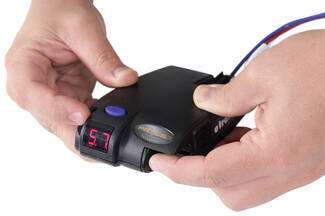
This proportional brake controller has simple controls and a digital display for diagnostic information. Includes 3 boost levels, a slide-bar manual override, built-in battery protection, automatic leveling, and continuous diagnostics.
Features:
Specs:
You can adjust the gain (also known as output) with the thumbwheel on the front of the controller. Gain lets you set the maximum amount of power that will be applied to your trailer's brakes. A heavier trailer will need more power to achieve smooth, safe braking, while a lighter trailer will need less. Typically, the gain is only readjusted when you experience changing road conditions or if the weight of your trailer changes.
The boost setting controls the aggressiveness of your trailer's braking, meaning how quickly the brakes reach the maximum braking level. You can adjust this when you're towing heavy loads and you need more umph to bring your trailer to a stop. Your tow vehicle doesn't need that much power to brake in time, but your heavy trailer does.
Depending on the level of boost, your trailer brakes can start at either 13 percent or 25 percent of the set gain. What this means is that, instead of starting at 0, the brakes will start at 25 percent and get to 100 percent sooner. This keeps the trailer from pushing your tow vehicle forward.
If your trailer weighs less than your tow vehicle, no boost is needed. But, if you want your trailer to lead the braking, you can select level B1.
Boost Levels:
| Approximate Gross Trailer Weight | Boost Level | Increase in Initial Power Output |
|---|---|---|
| Less than tow vehicle GVW | B1 | 13% |
| Equal to tow vehicle GVW | B1 or B2 | 13% or 25% |
| Up to 25% more than tow vehicle GVW | B2 or B3* | 25% |
| Up to 40% more than tow vehicle GVW | B3* | 25% |
*Both B2 and B3 offer a 25-percent boost in initial power. But the braking curve for B3 is more aggressive than that of B2. This means that, even though you will start out with the same intensity when using these boost levels, you will get an overall more aggressive braking experience with the higher level. So if you use B3, you will reach maximum braking sooner than if you use B2.
To adjust the boost, use the blue push-button on the top of the Primus IQ.
The Tekonsha Primus IQ comes with an easy-to-reach, slide-bar manual override, great for stopping sway or controlling your trailer's momentum in emergencies. To engage the manual override, just push the slide-bar to the left, towards the center of the controller. This will activate the trailer's brakes and brake lights without you having to apply the brakes on your tow vehicle, perfect for limiting trailer movement while you're cruising.
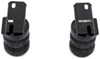
The Primus IQ can mount between -90 degrees and 90 degrees vertically, but the brake controller still needs to be horizontally level and parallel with the direction of travel.
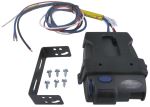
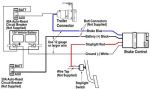
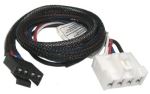
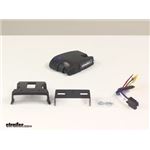
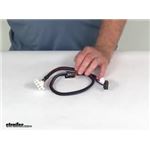
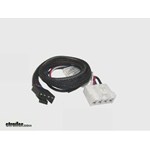
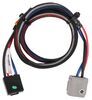
After mounting the Primus IQ unit in your cab using the included bracket, simply plug the included custom harness into your vehicle. The other end of the harness plugs into the brake controller. To remove the IQ for storage when you're not using it, just unplug the unit and slide it out of the bracket. With a replacement wiring harness (sold separately) and replacement bracket (6927 - sold separately), you can even transfer the IQ to another vehicle.
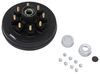
Note: If you don't already have a 7-way plug at the back of your vehicle, take a look at our exclusive 7- and 4-way brake controller installation kit (ETBC7 - sold separately).
The Tekonsha Primus IQ brake controller comes equipped with proportional braking to give you the best towing experience. Proportional braking means that your trailer brakes mimic your tow vehicle's brakes. If you slam on the brakes in your vehicle, your trailer brakes will activate with the same intensity; if you brake lightly, your trailer brakes lightly too. The trailer's braking is in proportion to your vehicle's braking. This saves wear and tear on the tires and the brakes on both your vehicle and trailer.
The Primus IQ uses an internal inertia sensor to detect how your vehicle is braking so it can send the right amount of braking power to your trailer. It measures the inertia of your tow vehicle and activates the trailer's brakes to slow at the same rate. The result is uniform braking across your towing setup. No push-pull action - just smooth, proportional braking every time.
 Alternate Instructions
California residents: click here
Videos are provided as a guide only. Refer to manufacturer installation instructions and specs for complete information.
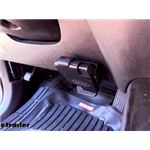
Kevin Bross: Today in our 2013 Dodge Durango, we're going to take a look at and show you how to install the Tekonsha Primus IQ Trailer Brake Controller. This is a proportional controller. It works for one up to three axles. Its part number is TK90160. We're also going to be using the Tekonsha plug-in wiring adapter, part number 3045-P. Here's what the Primus IQ's going to look like once we've got it installed in the vehicle.
We're going to have a three-position bracket here that will allow us to custom tune that, still keep it really nice, really hidden, in and away from where we might hang our feet on it or something like that. We're going to have a gain adjustment knob, or output adjustment knob, here on the side, so it'll go from 11 all the way down to zero, to give us a full range of adjustability of how much power is heading to the rear wheels, or heading to our trailer in a braking situation. For lighter loads, inclement weather, and stuff like that, we're going to want a little bit lower setting. Once our trailers get heavier, the terrain gets steeper, we'll want a little bit of a higher setting. In addition to that, we also have what's called the boost setting, right now it's at zero. We've got 1, 2, 3, and then back to zero to choose from, so we'll set that based on the trailer's weight in relation to the weight of the vehicle. If the trailer weighs less than the vehicle, we're probably going to run no booster, maybe run it on level one.
Once the trailer starts outweighing the vehicle, or greatly outweighing the vehicle, then that setting rises. The proportional aspect of this is really nice. What it's going to do is, it's only going to apply your brakes as quickly as what it feels the car's slowing down, so we step on our brakes really quickly, it's going to run that right up to peak output, whatever you've got it set at. If you've got it set at 11, if you've got it set at 10, if you've got it set at 3.6, whatever your maximum output there is, this is going to get you there quicker under an emergency stopping situation. If it's not an emergency stopping situation, or we're just in the stop-and-go traffic, it's going to gradually apply those brakes to give us a much smoother feel and a much simpler, smoother operation so we don't have such aggressive braking going on in the rear. We can set this plus or minus, 70 degrees for an angle, and we also have 20 degrees of side-to-side tilt.
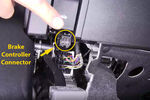
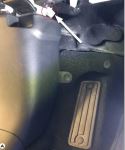
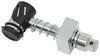
For a proportional braking system, it really has a lot of adjustability available, and we can still take full advantage of the proportional braking aspect. The first thing we're going to need to do is find our factory plug-in connector. That's going to be right above the parking brake here. You can see a small, gray plug there. We need to pull down on the little catch that's on the front side of it, use a screwdriver or a pick, then we can slide that right off the forward part of that bracket. As you can see, there it is, nice square gray plug.
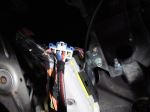
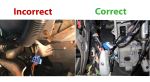
In the end of that, we'll slide in our wiring adapter, click that in, give it a couple of pulls, make sure it's nice and secure, then we're ready for our bracket for our brake controller. We want to find a good surface to mount our bracket to, and we want to stay within the level constrictions, so up here might not be the best idea. We do have a great spot located right underneath here that's going to allow us to get our brake controller put in place there without any kind of issue. We're going to use two of the self-tapping screws that are provided; we'll get our bracket right up into place and secure it. Take a look just to make sure you've got it nice and square underneath there. Now we can grab our pigtail. We're going to plug that right into the back side of our brake controller here, just like that. You can see it saying "MC." That means we've got no connection to our trailer, so that's good, since we don't have a trailer connected. We'll slide the back side of the controller right up into its bracket there. It's going to be height adjustable, so we can bring that down, just like that, give us just enough room to get to our button there. It's adjustable to three settings. You can move this up to the middle setting or all the way up to the top setting. I guess it'll just depend on how thick your fingers are and where you want that set. We'll have to go to the bottom for me to get to it, just like that. It's nice and secure, held in place. Those get the excess pigtail taken care of. I'll use a zip tie. As you can see, our pigtail's got a pretty nice little turn to it there. We'll go right around that, and then we're going to go right up around the part of our steering shaft here that doesn't move. It'll be right above the silver knuckle there. You'll see it, if you're looking underneath here. There's a black portion, we're not going to have to worry about it moving, spinning, rotating, so it really keeps our bracket and our wires away from any moving parts and stuff. As you can see, nice and clean up there, no interference when we're dealing with our brake pedal or anything like that, so perfect location to secure it off. Once we have it secured where we want it, we'll just trim off our excess zip tie there, and we'll be ready to hook our trailer up. With everything working as it should, that'll complete our look at this Tekonsha Primus IQ Brake Controller, part number TK90160 and our Tekonsha adapter, part number 3045-P on our 2013 Dodge Durango. .

Easy to install and very affordable.
Quick install works Great
Worked great!
easy to install
Just what the doctor ordered. Thanks
The package arrived on time (actually a day early!). It came with the correct Harness. It was easy to install and is working properly!
Great for the price
Ordered as replacement for one that quit after 18 years. New plugged into existing wiring and even fits in existing mounting bracket. So far so good.

was easy to install and works great
Easy to hook up , works flawlessly
Simple hook-up when using the model specific harness.
Easier to install than expected. Works flawlessly
Very easy installation.
Haven't tried it yet but it was very easy to install plug and play if you have tow package already
fast shipping, it installs easily. It's too early to comment on how good it works.


Do you have a question about this Trailer Brake Controller?
Info for this part was:
At etrailer.com we provide the best information available about the products we sell. We take the quality of our information seriously so that you can get the right part the first time. Let us know if anything is missing or if you have any questions.


Thank you! Your comment has been submitted successfully. You should be able to view your question/comment here within a few days.
Error submitting comment. Please try again momentarily.