

 Arrives before Christmas
 To see if this custom-fit item will work for you please tell us what vehicle you'll use it with.


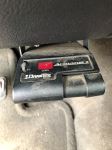
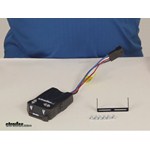
This stout brake controller has easy-to-reach button controls up front and a simple slide-lever manual override. The digital display is large and easy to read. And the included harness lets you just plug the controller right into your vehicle.
Features:
Specs:
Power output is the maximum amount of power that will be applied to your trailer's brakes. How much braking output you need is determined by the weight of your trailer; a heavier trailer will need more power to bring it to a stop. You want to go as high as you can without the trailer brakes locking up. It adjusts on a scale of 0 to 10.
Once you have the power output set, you can fine-tune your braking by adjusting the sync control. This controls the aggressiveness of your trailer's braking, meaning how quickly the brakes reach the maximum braking level. If your vehicle takes too long to come to a stop, increase the setting. If it stops too abruptly, decrease the setting. The sync setting is shown as a number followed by the letter "o" to differentiate it from the output reading. The least aggressive sync setting is 0o and the most aggressive is 9o.
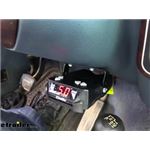
The Activator IV displays the power settings as you adjust them. While braking, the unit will display the power output setting. To see or adjust the sync setting, step on your brake pedal and press either the plus or minus button to increase or decrease the setting.
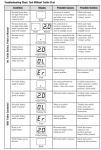
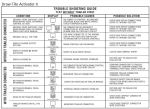
The display will also show trouble codes to alert you to any potential problems, such as short circuits or overloads, or if there is an internal problem with the controller.
Installation
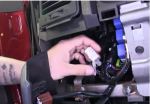
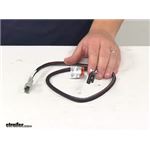
Because inertia plays no role in the functioning of this controller, you do not have to mount the unit at any particular angle. Your mounting options are limitless, so long as you can still easily access the controller and manual override. And because the included wiring harness is custom fit for your vehicle, you can just plug the controller in. No cutting or splicing needed!
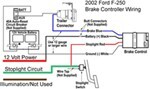
Note: If you don't already have a 7-way plug at the back of your vehicle, take a look at our exclusive 7- and 4-way brake control installation kit (ETBC7 - sold separately).
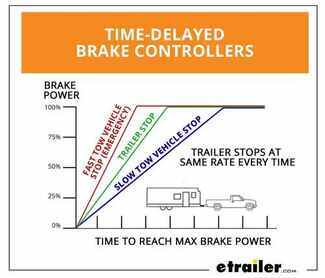
Time-delayed braking means that when you apply the brakes in your vehicle, the controller activates the trailer brakes at a pre-set intensity and rate. Both the amount of braking power (gain) and rate of application (load) can be adjusted to suit your preference, the road conditions, the type of trailer, and the weight of your load. To determine which levels are best for your application, test your towing setup and choose what feels right.

California residents: click here
Videos are provided as a guide only. Refer to manufacturer installation instructions and specs for complete information.
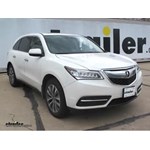
Today on our 2016 Acura MDX, we are going to be taking a look at installing the Draw-Tite Activator Trailer Brake Controller, part number 5504. In conjunction with that, we are going to be installing the Universal Installation Kit for Trailer Brake Controller 7-way RV and 4-way flat, part number ETBC7. In conjunction with that, we are going to be installing the pigtail for Tekonsha and Draw-Tite Brake Controllers, part number 7894, to attach all these together. Now, this braking system is a time delayed system. You can adjust the amount of energy that is going to apply to your trailer brakes and how fast it comes on, all adjustable by your switches on top. It's going to adjust your gain and that's going to adjust the intensity of how fast it will come on as far as how do you like your settings to be. As you apply your brakes, you'll see it climb up and that is going to let you know that it is applying your brakes on your trailer, and you can adjust it up or down to suit your needs.
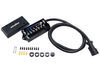
It also has a manual override, so if you needed to apply the brakes to your trailer for any reason, and not to your vehicle, you can do so in an emergency situation. One reason you might want a controller like this over a proportional one, is this can be mounted in any position, where your proportionals normally have to be mounted in a certain angle for them to operate properly. This one doesn't matter how you mount it, as long as it is mounted up under the vehicle. This is what our ETBC7 kit is going to consist of. Our shielded double wire. A bracket for our 7-way and 4 flat connector, which is going to allow you to plug into your 4 flat that your vehicle already has and add the rest of your circuits for your trailer brake, your 12 volt power supply, and if you need the reverse lights and a ground. Your kit will also come with some zip ties.
There's going to be 3 different circuit breakers included with our kit- a 20, a 30 and a 40 amp depending on your application. Miscellaneous hardware, and it does come with a small test light if you need it. There also will be a piece of loom included if you should have to run your wiring across any sharp edges that you want to keep her protected by. To begin our installation, we are going to go ahead and install our bracket for our 7-way connector. We are going to slide it up onto the screws that are supplied with our kit and we are going to place a flat washer, a star washer and a nut .. We'll run that down.
And we'll repeat that for the other side, then we can tighten this into position with our 8 millimeter socket. Now we can take our plug, we'll slide the wires through the gap from the bottom of our bracket . We are going to take our supplied screws, we're going to place them through. We can install all 4 of our screws locking nuts. Now we will take our flat blade screwdriver and our 9 millimeter socket ...
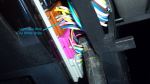
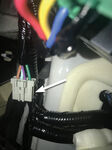
And we will tighten up our screws. Now we are going to take our 4-way flat that was previously installed on our Acura . We are going to take a little bit of Dielectric 00:03:48 grease available on our website, part number 11755. We'll squeeze some in to help protect against corrosion and we are going to snap these 2 together. Now, just a precautionary measure. I'm going to take a zip tie and go around our plug to ensure it stays connected together. We can trim off our excess and we'll wipe off our excess grease. Our white wire here we are going to need to attach to a body ground. We are going to attach it with our self tapping screw that was supplied. The purple wire on this application we are not going to be using, so we are going to put some tape over the end of it just to keep out any corrosion that could get in there. This purple wire would be used if you are going to have backup lights on your trailer, which we are not going to use. We're just going to bundle it up and we are going to attach it to our harness with some of our supplied zip ties. Our blue and our black wire, we are going to attach to the shielded gray wire that have that we are going to route to the front of our vehicle. Inside of our duplex wire, there is going to be a white and a black. We are going to attach the black to the black and the white to the blue. We'll strip these back about a quarter of an inch and we will take our black wire, we're going to place it in the bud connector, give it a crimp and tug. We'll do the same thing with our white wire. Give those both a nice tug, make sure they're tight. We are going to go ahead and tape up these as well, keep out any corrosion, dirt, moisture. Just going to wrap it all the way down to ensure that our jacket does not get anything inside of it either on our wiring. Now we can tie all of this up out of the way and we are going to route our wire to the front of our car. We ran our duplex wire through some loom clamps that are available on our website. Those are half inch claps, part number A0500. We've got them run along here, following our frame rail. We went up over our rear cross member. Then we started following our brake lines. Pulled this shield down and we just zip tied it to the brake lines all the way to the front. Then we followed our brake lines up the fire wall, right beneath the brake booster and we came out on top. We have one more of our loom clamps up top here as we came up. I've gone ahead and stripped back our sheathing on the outside because our white wire is going to run to the inside of the car, where our black wire is going to go to the 40 amp circuit breaker that is supplied with our kit. We are also going to mount a 20 amp that is going to take power from the battery and go inside the car as well to power our brake controller. I just took a marker and wrote on them, it is stamped on the side how many amps they are, just so we can see them a little better. This is our 20 amp and this is going to be our 40. Now, the side that is going to go to the battery is going to be the gold half, and the other part is going to be what goes to your accessory. We are going to go ahead and mount these right here. And off to the side of that, we are going to mount our 20 amp. Now we have got to remove the plastic trim panels and the air box cover just so you can see what we are doing here. We are going to run this black wire over to this silver half of our 40 amp circuit breaker, and we are going to put our supplied ring loop terminal on the end of there. Then we will take the excess wire and we are going to make a jumper that is going to go from the gold side to our positive battery. Once we figure out our length, we can go ahead and cut that off. We are going to strip it back. We are going to put one of our small ring loop connectors onto the end and we will cramp it in place. Now we will take off the nut and lock washer. Place it on. We are going to install our star washer and our nut. Now we are going to need to make our little jumper wire. It's going to go from the battery side of our circuit breaker and connect to the battery. I'm going to run down underneath here and across. I'm going to cut that piece of wire to the length that I need. We are going to strip off both the ends. On one end, we are going to put a large ring loop connector that is going to go to our battery. We'll crimp that on. On the other, we get a small one. Do the same thing, we'll take off the nut and we will set this into place. Our washer and our nut. Take a 3/8 socket and we'll tighten those down. Make sure you hold the wire so that you can keep it oriented the way you'd like it. We'll route our wire down and keep it in place until we are ready to hook it up. We are going to do the same thing on here, we're going to make a short jumper that's going to come down and follow that, and do the same kind of setup. We're just going to leave these here until we are ready to do our final connection. Now, we are going to need to bring this white wire that came from the back of the car, along with another piece of black and white wire and we are going to use the excess that we cut off from our wire from the back. We are going to route all those into the vehicle. I've gone ahead and stripped back some of the sheathing on the outside of our scrap piece of wire and to the white side I'm going to strip it back. This is going to be our ground that is going to go directly to our battery and go inside the vehicle to the back of our brake controller. We'll be mounting that onto the battery. Then to this side, we are going to put our ring loop onto the other side of our circuit breaker- the 20 amp. We'll take off this 10 millimeter nut, slide on our ring loop connector for our ground, and we will replace it and tighten it back down. Through the inner fender well here, I've run a piece of air tubing and we are going to attach the white wire coming from the back and this gray duplex wire. We'll tape that to the end of our piece of airline tubing and we are going to pull it through. I run the wire down through and I carefully popped out grommet for our door, and I poked a hole in the rubber. We are going to run these wires through that rubber grommet into the vehicle. After I came inside through that rubber grommet, I routed behind our e-brake bracket and brought our two wires. Then we are going to utilize our pigtail for a Tekonsha and Draw-Tite Brake Controllers. I'm going to go ahead all I'm going to cut all these back to the same length. Our single white wire from the back, we are going to strip it back, take one of our yellow bud connectors, place it in the position, cramp it on there. We are going to use that to tie into our blue wire out of our pigtail, which is going to be our brake wire to the back of the vehicle to actually get our brakes. The black wire from the duplex is our power wire from our 20 amp circuit breaker. That's going to go to the black wire coming out of our pigtail to power our brake controller. Our white wire is going to be our ground coming from our battery. Take the white wire from our pigtail and we will plug that in to the white wire going into the duplex. The last thing we did was tie into our brake light switch. So we just went ahead and pulled back our switch and we tested for power when the brake pedal is applied. We just quick connected into that. You can see here on our red wire where that is going up and is tied into our brake light switch. When you step on the brake, it is going to light your test light and that is how you are going to know you've got the right one.We just quick connected it to there, and we plugged it back in. As you can see here, we've tied up all of our wires neatly under the dash, making sure we stayed away from the airbag in tying everything out of the way. Now we'll remove the 12 millimeter nut that is on our positive battery cable. We will take our two power cords, place them in there and we'll replace our nut. Now we can tuck our wires out of the way. Put your cover back down. We can reinstall our air box cover. Now that we have our wiring all run and tied out of the way, we can snap it into our pigtail. You can see when we activate the manual slide switch, the light comes on letting us know that it is operating. Before we mount it . You can either mount it to your vehicle with some screws that are provided. Our customer has chosen to use a hook and loop system. We are just going to attach it to the bottom of our dash with a piece of hook and loop tape. That would make it more of a temporary thing. When you are going to use it, you just snap it into your pigtail and when you are done, you can just peel it off with a hook and loop and place it in the glove box our in your garage. We have our tester plugged in. We'll try applying the brakes, and as we push down higher, you'll see the voltage climb up. That's going to do it for our look at and install of the Draw-Tite Activator Trailer Brake Controller, part number 5504, on our 2016 Acura MDX.

Worked great!
It plugged in and worked as advertised,Thank you so much,
Fantastic brake controller. Even better website.
Great controller, we install it on almost every system we do.
Good overall product. Meets needs and is inexpensive.
this controller is great. etrailer delivery, packaging, pricing were ALL great...
Love it.... Installed in my 2011 chevy in about 5 min and it works great. Recommend to anyone
Works great, very easy to use, and very easy to install thanks
The item appears to be well made and as expected. I'm having some difficulties, but with my camper, not with the unit.
Probably not a really useful review.
Very easy to install. Works very well. I like the digital number readout to show power level being applied to brakes.
Top notch products,Service and Customer service help line.
You guys know your stuff.
Thank you so much for the help everything went flawless and works perfect.
Thank you so much.
Terry
Installing this into my 2005 Tahoe was a breeze. If you just follow the directions and check out etrailers videos you should have no problem. I went from a small popup to a bigger hybrid so I had to get the EBC system. This sure beats taking it to the RV or Dealer store and paying retail plus labor. Thanks etrailer.com
Easy to install. simple instructions, I have it wired up but just have not towed anything yet to get the settings set for my application.
Quality product. The video of how to install clinches the deal. Setup instructions worked perfectly.
Nice product, easy to useEasy to use an upgrade from my Activator I unit. Has the same manual brake control that failed on the Activator I unit. Hopefully this one does not fail.
thank you for the fast delivery ,and for the easy installation vid
was a breeze,ty
Great Product, VERY Easy to install. The only thing I would change is the length of the pig tail. The short length of the pigtail limits your options of product placement.
Great prices, quality products, great customer service and reasonable shipping!!!
Easy installation works great, great pr ice
ordered on a monday afternoon, received my order on wed after 3 pm...everything was in good condition..these are really good people...thank you so much for the fast service......max
Installed in Frontiier quickly with no problems,us the recommended adapter .Good product,quick shipping and great company to work with.
Controler works great, hook up was a snap with the plug and play harness.
Love the digital display! Digital display is now a requirement when I order a brake controller. It is amazing how much better brake control I have knowing before hand how much brake will be applied.
Had the same controller for years, it has worked well. I pull a 4 axle 24,000 # trailer with disc brakes on all four axles. simple, reliable, and inexpensive.


Do you have a question about this Trailer Brake Controller?
Info for this part was:
At etrailer.com we provide the best information available about the products we sell. We take the quality of our information seriously so that you can get the right part the first time. Let us know if anything is missing or if you have any questions.


Thank you! Your comment has been submitted successfully. You should be able to view your question/comment here within a few days.
Error submitting comment. Please try again momentarily.