
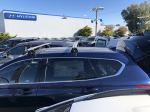
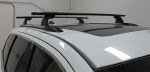
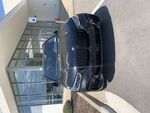
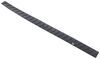
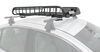
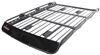
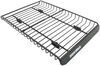
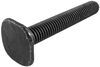
Yakima SightLine Roof Rack for Flush Rails - JetStream Crossbars - Aluminum - Black - Qty 2


To see if this custom-fit item will work for you please tell us what vehicle you'll use it with.


This stylish, aerodynamic Yakima roof rack gives you the space to carry gear on your vehicle. Rubber strips in the top channels push down to load carriers or accessories - no need to trim. Installs to flush rails on your vehicle's roof.
Features:
Specs:
 Alternate Instructions
California residents: click here
Videos are provided as a guide only. Refer to manufacturer installation instructions and specs for complete information.
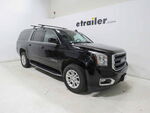
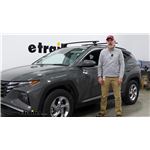
Hello neighbor, this is Curt with etrailer, and today we're gonna take a look at the Yakima SightLine roof rack on the flush rails of our 2024 Hyundai Tucson. Now if you've had any experience with this Yakima roof rack, or if you have questions about it, please leave those in the comments below. We'd love to take those experiences and those questions and use them to help our other neighbors make the best decisions possible. Now, when planning your next adventure in your Tucson, you might find yourself in a situation where you have some cargo that either doesn't fit or that you don't wanna travel with inside of the vehicle, and that's where a roof rack can come in really handy. There's all sorts of accessories that you can use on the roof rack to help you out in getting to where you're going. There are rooftop cargo boxes, maybe you'd like to put a kayak up there, you're going kayaking, ski carriers, bike racks, all sorts of items that you could travel with on your roof rack.
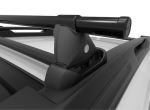
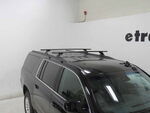
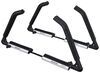
This is an arrow-shaped bar, which is gonna make it a lot quieter than those kind of more traditional circle or square bars. It's also gonna allow us to use not just clamp-mounted accessories, but track-mounted accessories right through this weather strip T-slot up here at the top, which you can access through the end cap of your crossbar by simply depressing on the rubber strip, and then sliding your T-slotted accessories to the point where you want them placed. It is gonna give us a little bit of an overhang. It's not gonna be too much of an overhang outside of the door threshold, so I'm not all that concerned about, you know, hitting my head on it or anything like that. But anytime you have an overhang bar, it is something that you wanna be conscious of.
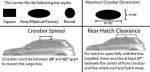
So with a 165 pound weight capacity, this is actually gonna let you carry pretty much most accessories that are out there. However, it is important to remember that although the bars do have a weight capacity of 165 pounds, you still wanna double check your owner's manual and make sure that your roof can actually handle at least that much weight. If your roof doesn't handle 165, you're gonna have to go with the capacity that your manual suggests. Now later in this video we're gonna go over how we got these installed, and in those instructions you'll find that Yakima is very specific about where to place your crossbars on your Tucson. So with that being said, they have a setup with a 32-inch spread, they have a setup where we're really kind of in between the door openings of the front and second row, and it's also leaning a bit more toward the front of the vehicle.
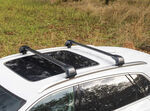
As you can see, there's a lot more space back here that they could possibly go, but in the case of where they suggested we mount it, it is toward the front of the vehicle. So if you have a sunroof, it is always important to remember that it may interfere with your roof rack. So for that we're just gonna take a measurement here to see just how much clearance we have from the bottom of the bar to our roof. And that's gonna come in right at about 3 1/4 inches. It is actually the same right back here on the second bar as well.
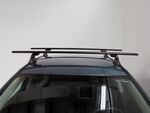
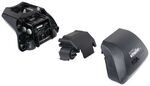
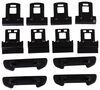
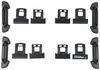
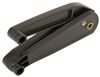
So while a sunroof may be your concern with the front bar, with the second bar, your concern might be this antenna that's located back here. Now the antenna comes up just above 2 1/2 inches up from the roof. So even if you had this moved back, or you had an accessory above here that doesn't come below the bottom of the crossbar, you should be able to clear that without any issue. Also, seeing that the second bar is all the way up here, you would need some really long type of accessories up here in order to interfere with the tailgate. So as far as placement goes, I'm pretty happy with where Yakima wants us to put these bars. Now the way this is going to fit onto your rails is that there's a little claw system assembly and a rubber foot pad that you'll have to add onto your towers during assembly in order to get it to grab properly onto these rails. So as you can see, it's got a rubber padding on the inside of this clip so that it doesn't do any damage to your rails. And really what we're gonna do is it's just gonna pinch right around that lip there and it's gonna be really solid. That rubber foot pad is again gonna keep any damage from occurring, even as you add weight on top of the bars, but it can be a little bit of a process assembling these towers this way. So why don't you follow along, and we'll show you exactly how we got these up on our roof. Now as we begin our installation process, the first thing we're going to need to do is assemble our towers, and there's a few different components that we're gonna have to to get through in order to get this ready to use on our vehicle. The first thing we're going to need to do is put in our pieces here that are gonna allow us to attach our towers to the bottom T-slot on our actual crossbars. So I find, because this bolt floats around quite easily, I find it easiest to take the provided Yakima tool, go ahead, and pop that in there from the bottom, and we're just gonna kinda hold it upright like this, just to keep that bolt upright and steady. We're gonna first place this plastic piece in here, and if you're confused about which way it goes, you'll notice there are some teeth on the edge of this that'll line up with some teeth that are on the inside of our foot there on either side of the bolt. So we're just gonna drop that right into place. After that, we're gonna take this metal piece here, drop it onto the bolt head, we'll just hold it all together like that, and we are going to loosely thread it in. We don't wanna tighten it down too much, 'cause we do want to have some freedom of movement once we get it into our T slot here. Next thing we're gonna wanna do is take our rubber footpad and we're gonna attach it through these slots here, right onto that exposed end of this metal bar. We wanna make sure the cutout of the footpad is facing the outside of the tower, and all that's gonna do really is just snap right down into place. And the next thing we're gonna do is remove this piece here. Now we will be replacing it, so set it aside somewhere where you can find it. This is actually the part where our lock core would be included. Now Yakima uses what they call the SKS, or Same Key System. You can buy locks with keys to match for all four of your towers, and you could also get them keyed alike to any Yakima accessories that also use the SKS system. But for now, we could just use a simple flathead screwdriver. We're gonna go ahead and get this unlocked. That'll allow us to remove it and expose this inside right here. So what we're gonna do at this point is turn it on its back like this. We've got these little braces here, we're gonna make sure those are hanging loose. And the first thing we're going to do is take our kind of shorter claw here, it's got a rubber padding on the inside, we'll make sure that's facing in. We're going to slip that right here behind this bar, and we are going to hook that slotted tab right in like that, okay Once that's done, we're gonna take these kind of spring loaded braces here and we're just gonna kinda line them up a little bit with those holes to brace them in. Once that's done, we're gonna repeat that process over here on the other side, we're just gonna be using this kind of bigger part of the claw. And once we've got that slotted into place, we're gonna go ahead and brace that down like so. And at this point we're gonna go ahead and replace our cover. There is a slot here and a metal tab. You'll need to slip it over, and just kinda work it around and down. It is gonna be loose until you lock it down. So just to make sure it doesn't go anywhere on you, we're gonna go ahead and lock that in place. And now we've got our tower assembled. At this point, what we'll now do is remove the end cap from our crossbar, just pulls right off. We're going to line this up into our T-slot and slide this on just like so. Once that's on there, we can replace our end cap. Now in your instructions that you get with your crossbar system, you're going to see a table like this that's gonna show a few different measurements. First thing you wanna do is find your vehicle over here, and then each of these measurements represents where the bars are gonna be placed on the roof and how to measure that out. It's also going to tell us where on our crossbar our foot pads need to be located, because with this particular system we're going to need to get these measured out and tighten these down to the crossbars before putting them on the vehicle. That's a little bit different from other crossbar systems where you could just get it on the roof, make some adjustments, and tighten it down from there. Unfortunately with this one we're gonna have to preset that distance before we get it up on the roof. So our instructions are telling us that we need to mark this at the 36 1/8 mark for our back set of bars, which is what we're installing now. It's not all that visible, but there is a measurement track right here, and it's calling for 36 1/8 to the end here. So we're just gonna put that in between that 36 and 36 1/4 mark. At this point we'll take our Yakima tool, and we'll go right here and we will tighten it down. Now in tightening this, the reason that this is such a special tool is that it's actually also going to let us know when we have it torqued enough. (tool popping) There we go. Once we hear that pop, we know that these are tightened to spec and ready to get up on our roof. Now before I go ahead and put the second bar up on the roof, I think it's important to talk about our placement on the first crossbar, because in order to determine where your second crossbar goes, you actually have to install this one first. So according to the instructions, where they want us to do it on this vehicle is from the very top edge of the glass of our windshield to the front of the first tower should measure 13 inches. And you wanna make sure you do that measurement on both sides, not just one and try to eye out the other. If you do the measurement to exactly 13 on both sides, then you can guarantee that your crossbar is perfectly perpendicular with your rail. Now that we've got that installed, we know that from center of the first tower to the center of our second tower should be 32 inches. So we're gonna go ahead and place this up on the roof just about where we think it might go. And also being careful not to scratch up or damage anything as we do it. And remember that the towers are fixed to your crossbar. So when you're laying this up here, you'll know with the taper in these rails if it's really out of place. If you get it into a place where the claws on both of the foot pads are actually going to be around the rail, then you're in a decent enough spot, you're probably close enough. We could just kind of get down, take our measurements. Remember 32 inches, center of tower to center of tower. We're gonna double check that on both sides. And once we have that, we're gonna go ahead and tighten everything down. Now that we've got everything marked out to our 32 inch spread, we're gonna go ahead and get our feet tightened down onto the rails. And in order to do that, our tool needs to access behind this panel. And if you remember, when we put the towers onto the bars, we put this piece back on. That was really to not lose it, and to kind of hold everything in our assembly together. But now that we've got everything up here, we're gonna go ahead and pop that back off temporarily. That is gonna allow us access right here. We're gonna take our Yakima tool and we're just gonna tighten that down. And as we tighten this down, the claws are tightening and grabbing onto the rail. So we're just gonna keep turning until we get our pop. (tool popping) There it goes. And once that's done, we can go right ahead and replace this piece here. So everything is tightened down, it's on there really solid, not moving anywhere at all. Last step in our installation process is to place our end cap here. All right, now we're ready to go ahead and load up our favorite rooftop accessories and hit the road. So that was a look at the Yakima SightLine roof rack system for our 2024 Hyundai Tucson. I'm Curt with etrailer. Thanks for stopping by.
Ratings & Reviews


Do you have a question about this Roof Rack?
Info for this part was:
At etrailer we provide the best information available about the products we sell. We take the quality of our information seriously so that you can get the right part the first time. Let us know if anything is missing or if you have any questions.


Thank you! Your comment has been submitted successfully. You should be able to view your question/comment here within a few days.
Error submitting comment. Please try again momentarily.