
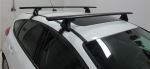
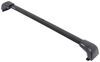
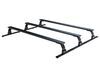
Yakima BaseLine Roof Rack for Naked Roofs - JetStream Crossbars - Aluminum - Black - Qty 2


To see if this custom-fit item will work for you please tell us what vehicle you'll use it with.
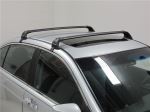
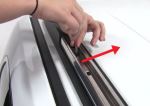
This stylish, aerodynamic Yakima roof rack gives you the space to carry gear on your vehicle. Rubber strips in the top channels push down to load carriers or accessories - no need to trim. Installs on your vehicle's naked roof.
Features:
Specs:
 Alternate Instructions
California residents: click here
Videos are provided as a guide only. Refer to manufacturer installation instructions and specs for complete information.
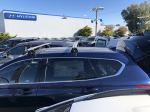
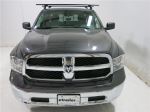
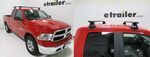
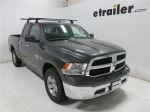
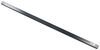
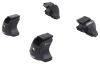
Hey, everyone, I'm Evangeline right here at Etrailer. If you're looking for a roof rack for a 2026 Ram 1500, today we're taking a look at the Yakima BaseLine Roof Rack. Now, this is gonna be one of my preferred recommendations just because you have a really good fit on this truck and you have a pretty good look, if I say so myself. But we're gonna go through some of the different features and I'll show you how to get this all installed on your truck. Now, this works out really well since we have a black truck and this all-black roof rack, so I think it looks really sleek. Now, our fit kit here today is a 60-inch long crossbar with specific towers, and most importantly we have our custom-fit hooks to work perfectly with your truck.
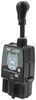
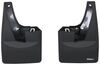
So you have this rubber pad underneath, as well as these hooks that have rubber on them, and you can see how they contour to the truck door. So I can even slam the door on these hooks and they're so low profile that they're barely even there. Knowing that it fits well on the truck is great, but let's take a look at some numbers so you can just visualize how this may work with your own accessories. So we have these 60-inch long bars, which give you a little bit of overhang. Overhang is measured from the end of the tower to right before the end cap.
So here we have 2 1/2 inches up front. This is helpful if you have accessories that mount all the way to the end of the bar and you have just a little space here for some clamps, and that's helpful especially on our Ram 1500 'cause this truck is tall. So do be mindful that you are going to have be getting up and onto your running boards or into your truck in order to hoist things up and onto your roof rack. So having that little bit of extra overhang does make things a little bit more accessible. You also have a pretty decent crossbar spread here on this truck.
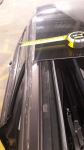
So crossbar spread, I measure from center to center of the bar, and that's 32 inches, which is on the edge of longer crossbar spread. But if you are carrying, let's say a really long ladder or a long kayak, you actually have the option of pushing that rear bar a little further out so you can get up to 40 inches of crossbar spread. That is helpful for those longer items, although I personally prefer 'em a little closer in to work with most roof boxes, roof bike racks, things like that. You do have a lot of clearance up here though, so roof height, I usually get two measurements. First is how much space do we have underneath the crossbars for clamps and things like that So from the top of our window to the bottom of our bar, here in the back, that's about, let's say 3 1/2 inches.
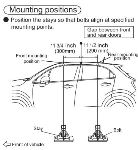
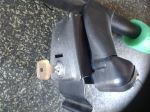
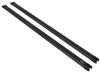
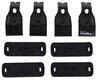
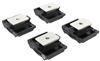
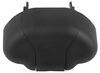
This number will change depending where you measure. I have plenty of space for most types of clamps that go around the bar. The next measurement I like to get is the height added to the top of our truck, and here it's about 4 1/2 inches. And that means if you have, let's say, garage door clearances that you're thinking about, that's something to add to your truck height. But also, let's say you have skis or other things you're carrying around like skis with tall bindings, you wanna make sure you have enough clearance with those bindings. Now, your truck may also have a sunroof like what we have here, which will change that number a little bit. You still have clearance to open up that roof, but you will have a little less space to work with. In those scenarios, I do recommend utilizing the T track or the T channel up top when you are attaching accessories. So those are items that can be slid into this top channel. And then you don't have to worry about clearance whatsoever underneath the bar. So you can really see how the crossbars plus the towers plus our custom-fit kit all work together for this great fit on our truck. So this is how this roof rack fits here on our 2026 Ram 1500 Laramie trim edition. Now, depending on your trim or your style of a truck, it may look a little different. So hopefully you're able to see those different numbers and measurements and help you figure out if this is the right fit for you. We also have this with a crew cab. So we do have a fit guide here at etrailer where you put your year, make, model, and you select the type of roof and the type of cab that you have and then you get all the confirmed fits for you. So if this is the one that you really like, well, stick around and I'll show you how I got it installed. For installation, it's a little tricky since there's gonna be a lot of different parts and pieces to put it together. So I'm gonna guide you through that process. Now, I already installed the rear crossbar so that we get to install the front crossbar together, especially since the front crossbar is where Yakima has the measurements and where you should start in the first place. Now, the first thing I like to do is set up the adapters onto your towers. So with your crossbars, you're gonna get these pieces here, and you need to put them onto the tower. And that's usually the trickiest part because first you need to pull this little tab on your tower and then pulling that tab reveals a bolt down here. So flip this tower right back over so you can see this open space, get that plastic piece, and drop that into place, make sure it's seated. And then you can put this metal piece on there. And remember that bolt we revealed earlier Well, go ahead and use your included tool to tighten down that middle piece just to where it doesn't come off. Setting up your towers ahead of time like that makes it where you can now put them into your crossbar. So here's our 60-inch crossbar. There's gonna be a top part that already has a rubber piece and then there's gonna be the bottom channel that will have numbers underneath. So what we want to do is we want to remove the end caps so that we can slide our towers into the channels with that metal piece. Now, to where you slide that tower to, you won't quite be able to see the numbers, but you'll want the front edge of the tower to line up with the measurements in your instructions. For the front tower, that's going to be the 46 1/2 line right there. And once you get there, you then go ahead and tighten down. Let's talk about these two bolts here. So this first bolt with that little small nib over there, that's called a toe, and then this other bolt here, well, that's the one securing the crossbar to the tower. Now, on other roof racks and other vehicles, there's gonna be a little bit more complicated numbers here, but fortunately for Ram 1500, when you tighten down these bolts, you want them centered on those notches right there. So this, This looks good. Tighten down all the bolts with your Yakima tool (tool clicks) until your tool clicks and that will prevent over-tightening. With your crossbars, you're also going to get some rubber strips, and I do recommend cutting those up and making sure those are on your crossbars before you finish the install completely. Now, I'm just doing some test fits here on a bunch of different trucks, so I'm not gonna put that wind strip on, but this is when you would do so. Now, we're just gonna cap this up by putting the end caps onto the ends of the tower. And to get these rubber pads with the plastic tabs, and those click onto your tower, make sure your arrows are facing out. And now you can lift your crossbar onto your roof. Now, I've done this a gazillion times, so I'm pretty confident in my ability to just balance this, but if you feel a little nervous about carrying this on there, then go ahead and ask a second person to help you out. Make sure that the tall part of the bar is facing the front 'cause that's gonna be the front edge of the bar. And now, you're gonna figure out where you put your crossbar by first measuring from the edge of your windshield. And from there you're gonna go out 10 inches. Now, that spot is going to be right where the leading edge of your crossbar is going to be. So do that and measure that on both sides. So with following all those measurements and the dimensions, you can see that on both sides, we have it centered, so now we have just a little bit of that plastic and then rubber pad sitting over where your water goes on your roof. Now, we're gonna save this spot here with the hooks. So the hooks fit right into the tower. See how they have it opening Well, there's a little latch there on the tower that holds that in place. So we're gonna get both of them on there. Again, using the tool, we are going to tighten down on our two bolts. So our top bolt is going to be our swing bolt. So you can see as we tighten this bolt, it pulls the hook towards the vehicle, and then our bottom bolt here is going to pull the hook up. So I do the top swing bolt until our hook just barely makes contact. And then the same for the bottom, only until the hook barely makes contact. Barely makes contact is a key phrase because you want to evenly tighten down your roof rack. If you fully tighten down one side, well, the other side's gonna visibly lift off of your roof, so you wanna just go back and forth to make sure you are evenly tightening. So let's say you go 50% on that side, you come over here, do 75%, and then finish off on the other side. All of this will work out so you can have the most secure fit. Make sure everything clicks (tool clicks) and then we're going to finish off our setup by putting these covers over the towers. These secure from the bottom, they kind of hook up into place, (covers clicking) and then they click up top. If you are using Yakima Same Key System lock cores, you can switch out those plastic covers for those metal lock cores. I personally, when I use these roof racks, leave it just as is. And that's gonna be it for your install. You're now ready to load this up and hit the road.
Ratings & Reviews


Info for this part was:
At etrailer we provide the best information available about the products we sell. We take the quality of our information seriously so that you can get the right part the first time.


Thank you! Your comment has been submitted successfully. You should be able to view your question/comment here within a few days.
Error submitting comment. Please try again momentarily.