
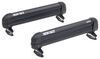
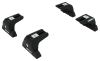
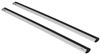
Yakima BaseLine Roof Rack for Naked Roofs - JetStream Crossbars - Aluminum - Black - Qty 2


To see if this custom-fit item will work for you please tell us what vehicle you'll use it with.


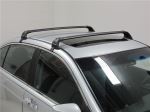
This stylish, aerodynamic Yakima roof rack gives you the space to carry gear on your vehicle. Rubber strips in the top channels push down to load carriers or accessories - no need to trim. Installs on your vehicle's naked roof.
Features:
Specs:
 Alternate Instructions
California residents: click here
Videos are provided as a guide only. Refer to manufacturer installation instructions and specs for complete information.
Hello neighbor, this is Curt with etrailer and today we're gonna be taking a look at the Yakima JetStream roof rack and see how it fits and see how it installs on our 2025 GMC Sierra 1500. Now, why would you need a roof rack on a pickup truck Well, there's a few reasons that people might have. One might be that you use your truck bed a lot, it's got a lot of stuff in it, it gets pretty dirty back there maybe, and you wanna carry some things with you that you can't carry in the cab, but you wanna keep clean compared to all the stuff you have in here anyway. Another reason might be that you're traveling with something that's a lot longer than your truck bed. So if you have a long kayak or a canoe, having a carrier up here is gonna kind of keep it all out of the way and allow you to still use your truck bed as well. And finally, another reason would be maybe you have a ladder rack without a cantilever that goes over your cab and you're just carrying something particularly long that day and you just want the extra support underneath whatever item that is going over your cab.
All sorts of reasons that you might wanna put a roof rack up on your pickup truck. But in the case of the Yakima JetStream what this offers is an overhanging bar, which is just gonna give you more space to load up there. And honestly, when you have a vehicle this high, I do like having an overhang bar because I can mount things closer to the side of the vehicle, just making it easier to reach. The weight capacity on these is gonna be 165 pounds. However, you always want to double check your owner's manual and double check your roof capacity.
Whichever one of those numbers is lower, that's how much you're gonna be able to carry up on your roof. This is also what they call an Aero shaped bar. So the Aero bars are gonna be kind of wider in the front, more of a blade shape in the back. The idea being it's gonna be a lot less wind resistant and offer a quieter ride going down the road than you're gonna get out of square or round bars. But with all that being said, let's take a few measurements and see how it fits on our Sierra.
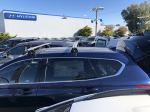
Now, as far as where our bar placement goes, we are gonna go over that in the installation a little bit later in the video. But what we have up here now is a 60 inch bar and being an overhang, it's gonna offer us that full 60 inches to be able to load accessories up here. The only spot you can't would be your clamp style accessories where it meets the tower, but if you're using the T slot accessories up here on the top for 'em, you're gonna have the entire 60 inch space to work with. It is gonna also have a 32 inch crossbar spread. So from the center of one bar to the center of the other, we're at 32 inches.
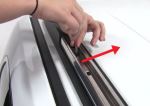
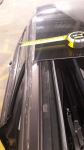
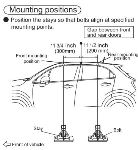
And that to me is really kind of a perfect number. 26 to 36 inches is generally what you're gonna see rooftop accessories require. So having it being right in the middle of that at 32 inches is really perfect for me. I don't see a whole lot of accessories that you won't be able to use up here with that sort of crossbar spread. We're also gonna take a look at how much height this is gonna add to the vehicle. So with the bars up on top, we're gonna be adding another 4-1/4 inches above the roof of the vehicle. So just keep that in mind whenever you're pulling into a garage or a low hanging space. You're also gonna wanna add that measurement to the height of whatever your accessories are if you're trying to calculate your vehicle height that way. It's leaving us plenty of room between the roof and the bottom of the bar to the tune of about 3-1/4 inches. And that's more than enough space to fit any of those clamp mounted accessories on here as well. Now the Sierra 1500 is a really tall vehicle. In fact, I think most people aren't gonna worry about hitting their head on these bars at all being an overhanging bar, but if you do wanna know what the overhang is on this, it's gonna be overhanging by about 3-3/4 inches up here if we're going from this point right here, the widest point. And while that does get it kind of outside the door threshold here, I don't think anybody's really gonna be stepping up and then out of a truck like this, they're just gonna be more going out and down. So I'm not really worried about head clearance on a truck like this. But after looking at the features and looking at how it fits on our Sierra 1500, let's take a look at exactly how we got these up on our roof. So the first step of our installation is going to be to attach our towers to our crossbar. And to do that, the first thing we want to do is remove our end cap from the crossbar. We'll just lift that tab and slide it right off. Then we're gonna take our tower and we're gonna turn it upside down. Now this silver block right here is going to slide into this T slide underneath and we're just gonna kind of work it over. Now if you look in your fit kit instructions, it's gonna give you different measurements, M1, M2 M3, M4. So M1 and 2 are in regards to our front bar, which we already have attached. So for the rear bar, we're gonna be looking at measurements M3 and M4. Now one of the measurements that they give you is going to determine how far apart your towers are and that measurement is taken from the inside edge to inside edge of your towers. There is this handy little scale that we have here though on the underside of the tower. It might be a little difficult to see, it's difficult to see with the naked eye, but you can use this scale to help determine where your tower needs to go. Now the instructions for the Sierra 1500 called for 44-5/8. However, after testing that out and putting it up there, we actually find that 45-1/4 is a much better fit. So I'm gonna move this along its edge until the edge hits the 45-1/4 mark. Take my provided Yakima tool and in this hole back here, not this one here, but this one here, I'm gonna go ahead and hold the tower in place and tighten this down. This is going to tighten that block, that T slotted block up against the underside of the bar. And we're gonna turn this until we get a popping noise from our tool. This is a torquing tool, so it is gonna let us know when we have it tightened properly, just like that. Now it's securely on there and it's in the spot where we want it. Now we can take our end cap and we can replace it. And the next step we'll take is to go ahead and take our foot pad here that came in our fit kit. Now the foot pad is gonna have an attachment point here that's gonna attach to this bar going across the bottom of our tower. We wanna make sure that this cavity in it is facing the outside. Now the M1 and the M3 measurements in your instructions are in reference to how far apart those towers are, which we just use the scale at the bottom of the bar to mark off where we need it to be, which was that 45-1/4. The other measurements that you're gonna see on there, the M2 and the M4 are gonna be in reference to where the bar is placed on your roof. So the first measurement for the front bar goes from the top of the windshield to the front of the tower. They want that at 13 inches. Then for the second bar placement, once you have this set is gonna go from the center of your front bar to the center of your second bar, and they're asking for 32 inches there. So we're gonna go ahead and get our bar and get it up close to that vicinity and we'll tighten it down at 32 inches. So our 32 inch mark is gonna be roughly around this area. So I'm gonna go ahead and get this seated up here. There is a little edge to the rubber foot pad that's gonna kind of come across this outer edge of the track up here on the roof. So I'm gonna set that in its spot and you know, get that seated nice up there. I'm gonna go ahead and do the same thing on the driver's side. And then I'm gonna come back and I'm gonna measure this out. Sorry, my 32 inch marks a little further back, right about here. So I'm gonna go ahead and get that measured out before I finally tighten it down. So now that I've got it in the general vicinity, what I'm gonna do is take my measuring tape and I'm gonna measure center of the bar to center of the bar, and the center of the bar basically comes to where the back of the weather stripping is. So I'm gonna start with the back of the weather stripping here, bring it over and I need to get it to 32 inches. So I gotta move it back a little bit. It's gonna be closer to this area here. And what I'm gonna be doing is just going back and forth. I wanna make sure I have that same 32 inches on the driver's side as the passenger side. That's gonna guarantee that my bars are perfectly parallel with each other. So with our bar spacing even on both sides, the next step we're gonna have is to take our clip and our Yakima tool and we're gonna get our clip inserted into our tower. So first what I'm gonna do is this kind of gray, it's almost like a door. I'm gonna just kind of pop that out. And what we'll find in there is a bolt hole for our tool and a slot right here that we're gonna just slide this into. And on the bottom of this metal block, there's a little latch that's gonna kind of keep it in place, but what we need to do at this point is get this snugged down some. So I'm gonna go ahead and tighten it down a little bit. Now I'm not trying to tighten this down really all the way at this point, what you really want to do is kind of get it to the point where it's snug and not really going anywhere. And this point here is where we want to end up with. But what I'm gonna be doing is tightening it down a little bit on this side and then a little bit on the driver's side. I don't want to totally tighten down one side and knock the looser side outta the place. So what we want these to do is kind of grab against each other up on the roof and be able to stay in one spot. So once I get this seated to right here to where it's like snug but not too tight, I'm gonna do the same thing on the other side and then incrementally tighten each side down until they're both completely tight. And once you've got it tighten down enough that both sides are feeling really snug, you could go ahead and finish tightening them down until you get that same popping sound out of the Yakima tool. There we go. Now once that's done on both sides, you can go ahead and close that little gray door up there. We're gonna take our tower cover and this has a kind of a hinge at the bottom here. We're just gonna set it on that, bring it up and pop it right into place. Now at this point would be a good time to go ahead and lock your towers. However, when you purchase them from Yakima, they don't come with the key cores. I would suggest that you purchase a set of key cores from us here at etrailer. They can be keyed alike to your other Yakima accessories. So if you have like five different Yakima items, including the bars, you don't need five keys. You keep them all keyed alike using their SKS system. So that's a pretty straightforward install. In fact, I think it's a rather easy install on this truck. And with all the features and benefits you do get out of the JetStream crossbars, I think this could be an excellent choice for you and your truck. Now if after watching this video you decide this is the crossbar set that you want to go with on your GMC Sierra 1500, go ahead and get 'em. Use 'em a few times and share what you think about 'em in the comments below. We'd love to share your experience with our other neighbors so they can make the best decision for themselves. I'm Curt with etrailer. Thanks for stopping by.

Do you have a question about this Roof Rack?
Info for this part was:
At etrailer we provide the best information available about the products we sell. We take the quality of our information seriously so that you can get the right part the first time. Let us know if anything is missing or if you have any questions.


Thank you! Your comment has been submitted successfully. You should be able to view your question/comment here within a few days.
Error submitting comment. Please try again momentarily.