
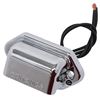
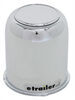
LED Reversible Trailer Fender Light with Chrome Trim - Submersible - Amber/Red - Driver or Passenger
(88 reviews)
Price: $20.81
In Stock
LED Reversible Trailer Fender Light with Chrome Trim - Submersible - Amber/Red - Driver or Passenger
Item # MCL181ARCRB
Our Price: $20.81
In Stock


- All Info
- Reviews (88)
- Q & A (0)
- Videos (2)
- Photos
Optronics Trailer Lights - MCL181ARCRB
- Clearance Lights
- Rectangle
- LED Light
- Red and Amber
- 1-5/8L x 1-1/4W Inch
- Surface Mount
- Rear Clearance
- Side Marker
- Submersible Lights
- Optronics
Waterproof, 2-LED marker light with chrome trim can be installed on either your driver's-side or passenger's-side trailer fender. Amber light faces front, and red light faces rear. Surface mount. 2-Wire pigtail. P2 rated.
Features:
- 2-Sided clearance light installs on your trailer fender
- Amber light faces front of trailer
- Red light faces rear of trailer
- Reversible assembly can be installed on either driver's-side or passenger's-side fender
- Sonically sealed, waterproof unit is submersible
- LEDs make great replacements for incandescent lights
- Last 50 times longer
- More efficient - provide brighter light with less power output
- No bulbs to replace - no brittle filaments
- Clear polycarbonate lenses with red and amber LEDs
- Chrome-plated ABS plastic trim snaps on for a finished look
- Mounts on surface of trailer - hardware not included
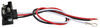
- 2-Wire pigtail with power lead and ground wire
- DOT compliant
- P2 rated
Specs:
- Dimensions: 1-5/8" long x 13/16" tall x 1-1/4" wide
- Distance between mounting holes (center to center): 1-1/4"
- Diodes: 2
- Power draw at 12.8 volts: 0.04 amps
- Quantity: 1 fender clearance/marker light
- Lifetime warranty on LEDs

Sonically Sealed, Waterproof Trailer Light
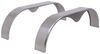
The waterproof construction of this light makes it ideal for use on trailers that may be submerged, like a boat trailer. The unit is sonically sealed, which means that water will not get into the light and damage the diodes or circuit board.
Surface-Mount Light

Surface-mount lights install flat against the surface of the trailer, so a hole does not need to be cut into the trailer for the light. This type of light is installed using a flange or bracket that has mounting holes. And mounting hardware is used to secure the light to the trailer.
P2-Rated Lights

A P2-rated light produces a 45-degree angle of light to either side of its centerline for a total of 90 degrees of coverage. This beam pattern can be seen straight on, but it cannot be seen clearly from the side. So this type of light can be used as either a side marker light or a clearance light, but it cannot function as both. If you need both functions, then you must install 2 separate lights on your trailer - one as a front or rear clearance light and one as a side marker light.
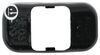
MCL181ARCRB Optronics Reversible Dual Face LED Trailer Fender Marker Light - P2 Rated - Amber and Red - Chrome Plated ABS Plastic Base
California residents: click here


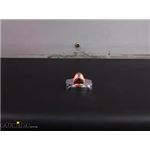
Video of LED Reversible Trailer Fender Light with Chrome Trim - Submersible - Amber/Red - Driver or Passenger


Videos are provided as a guide only. Refer to manufacturer installation instructions and specs for complete information.


Video Transcript for Optronics LED Reversible Trailer Fender Light Installation
Hi there, trailer owners. Today, we're going to be taking a look at Optronics submersible and reversible LED fender marker light with chrome trim. This marker light is considered reversible because on one side we have our amber light and on the other side we have our red led light Amber for the front and red is for the back. And it's considered reversible because it's the same on both sides and you can easily swap this over to the other side of your trailer and it works fine on both sides. Each of these lights has a single LED. One for the red and one for the amber.
And you can see how small this marker light is. It's considerably smaller than any of your incandescent markers. There's small little peanut bulbs you can get, but with those, you're going to have a light that's going to be this size or larger, and you're only going to get a single function out of it. It's going to produce one color with this one. We are able to have an even smaller size and get both the red and the yellow light.
So having a small form factor in space is good for you or maybe you just don't like the look of big lights, you want something more modern, smaller, and sleek, this is a great option.We've got it installed on our tandem axle trailer here. And I really like the way that it looks. And me personally, when I'm messing around with my trailer, doing some work and stuff, I like to set a lot of things on top of the of the fenders. Maybe I'll sit on them while I'm working on stuff for just a second. And it's nice that I don't have a big bulky light here in the way.
I can kind of have freedom to use the fender as I would use it. Here you can see our old fender. We just got done putting a new fender on this one. And we decided rather than swapping over this old style light here, it's much larger, to give it a much more modern look to it. And you can see how much smaller this is.
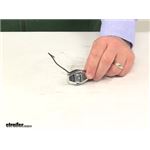
This is also an LED light versus the old incandescent light here. And with incandescence, typically the incandescent bulbs are going to be dimmer. So this one, even though it's smaller, it's going to be brighter with a little more presence and it draws less power than the incandescence here.So that means you can potentially run even more lights, or if your trailer is often maybe going off grid, you use solar a lot, by removing incandescent lights and going to LEDs, you can save a lot of energy. And beyond that, LEDs also typically have a lifespan usually about 50 times longer than that of an incandescent bulb. It's a quick and easy installation to get one of these installed. You will have to provide your own mounting hardware so you can get some small button head self-tapping screws. Unless you can reuse your old light's founding hardware if you're just replacing one of those.If you want to follow along with us, it's just two wires to get it connected. Let's go ahead and get that installed now. We'll begin our installation by determining where we're going to place our light. We've decided to put ours right in the center of our fender, which just happens to run right down here along the beam here. And then we are going to put it about three quarter of the way out. So we just measured from six inches out. Now yours is likely going to be different. You can put this anywhere you want on your fender. Doesn't have to go where we we're putting it. So I've gone ahead and made a mark there. And now I'm going to use a three eighths drill bit to drill out a hole. So that's where we're going to pass our wires down through. Now, if you're just replacing an existing light, once you remove the old one, you'll likely already have a hole there that you can pass your wires down through. But since this is a new fender and he has no holes, we're going to have to make our own. So I've already marked out the spot. I'm just going to drill down through it.And now we're just going to put a little flat black paint on it. It's going to match our paint and it's going to protect us from corrosion there. You can also use a clear coat if you don't have matching paint for your fenders. We can now slide our wires down through the hole. You do want to pay attention though. There's a sticker next to your wires, and you can see here that yellow and red. So the yellow is for our amber light reds for the red light. The red needs to face towards the rear of your trailer and the amber towards the front. So we're just going to slide those down through making sure we keep it in the orientation where red is towards the rear. Well, now I'm just going to make sure our light is centered front to back so that way it's going straight down. And then we're going to use small button head self-tapping screws to run it into place. You can get these at your local hardware store. So we're going to leave it just a little bit loose so that way we have a little bit of play in it so we can make sure that it is straight. And then we'll just run in our other self-tapping screw.We're now right underneath the fender here, we've got our wires passed down and then we also have our wiring for our light here. We've got our ground wire and then running from the inside we have our power wire. So we're going to go ahead and strip back. Just starting with the power wire. We're going to do that one first. The wires on our light do come pre-stripped, but I like to strip just a little bit more off of there just to make it a little easier to make my connection. We'll now take a heat shrink butt connector. We're going to slide it onto our power wire. Crimp it down. And then on the other side of our butt connector here, we're just going to bring it on over to our light and attach it to that. We're going to go ahead and twist the wires. You see they kind of frayed. We want to get all those strands in there. We don't want any loose these strands, especially on our power side because those could potentially short out to a ground source. I went ahead and connected the ground wire in the same way that we did our power wire. Now we're just going to use our heat gun to shrink down our butt connectors. If you need any shrink butt connectors, you can get those here at etrailer.com.Now before we go ahead and snap our cover on, I recommend go ahead and testing it out. You can plug it into your truck and turn on your tail lights and we can see it's working properly there. It's just a good idea to test it first in case you need to remove it. Maybe you swapped it and had it the wrong way. Popping these covers off, you do just put a screwdriver under it and pop it up to get it off. But it is made of plastic so you don't want to put dings in it with your screwdriver or anything and potentially causing any damage to it. So now we know it's working, we just set it right down on top and just push it into place. We can then repeat that on the other side if we've got one for over there and you can put as many on as you want. Maybe you got some for the side of your trailer as well. And that completes our look in Optronics submersible and reversible LED trailer fender light with chrome trim.
Customer Satisfaction Score:
99% were satisfied with this product
1% of customers were not satisfied
Customer Reviews
LED Reversible Trailer Fender Light with Chrome Trim - Submersible - Amber/Red - Driver or Passenger - MCL181ARCRB
Average Customer Rating: 4.8 out of 5 stars (88 Customer Reviews)
Waterproof, 2-LED marker light with chrome trim can be installed on either your driver's-side or passenger's-side trailer fender. Amber light faces front, and red light faces rear. Surface mount. 2-Wire pigtail. P2 rated.by: Bill 02/14/2024
I looked everywhere for this light.
Etrailer is the only place I could find that had one. I’m extremely satisfied.
by: Brian 08/16/2023
I installed the lights on my trailer fenders. I tied them into the directional/brake circuit. Other traffic can see my vehicle braking or changing lanes.
by: BK09/03/2023
OEM replacement marker light on Aluma trailer. George J is great to work with!
by: John A03/16/2024
like the look and the quality.
by: Reinhardt10/06/2023
Was exactly what I was looking for and easy to install. A year latter it still works great
by: Sean 05/07/2023
Exact match to the factory lights on my T@G trailer. Thanks for the quick service.
by: Jeffrey 10/13/2022
I looked everywhere for these lights and didn’t think I was going to find the exact match from what I needed, I finally found them on etrailer, I never heard of them before, I ordered the lights and was updated all the way until they arrived in my mailbox. Opened them up and perfect match, I will definitely use etrailer again, great company, I appreciate all that they did for me.
by: Chad05/20/2023
Looks great, can’t wait to install. Packaging has much to be desired though as they were thrown into a much larger box with heavier items and by the time I got them I had to fish the separate pieces out of the box. Luckily everything stayed contained within then box and didn’t get broken.
by: Greg 05/29/2023
A year later these are doing great, chrome is still in tact. Very
by: Joshua03/26/2019
Perfect match to what I have people really don't carry these lights so glad they did.


by: Todd 11/27/2022
Lights were a direct replacement for existing. Excellent parts and service.
by: Bryan 11/06/2022
Need to provide shrink fit connectors with light.
by: Floyd 01/24/2022
Etrailer is a excellent team, very kind, polite and was very willing to help to its fullest to satisfy the customer, I was very pleased and will refer etrailer to friends or any one anyone that may ask of trailer accessories, very professional and again very willing to satisfy their customers, thanks Etrailer for your courtesy.
by: Alicia04/19/2018
Like original equipment. Much cheaper than dealer. the model of my trailer didn't come with them. haven't got chance to install yet waiting on wire channel that goes on inside of fender.
by: Bonnie05/30/2019
Recieved marker lights and had them on that night. mounted on outside of fender .so on comeing traiffic could see the the outside edge of the fenders .nice and bright . trailer is 8x12
by: Pat 10/21/2019
Lights were exactly as described and worked perfectly on my fenders. The fenders are diamond-plate and these were small enough to fit well between the tread profile on the fender. My fenders also have wire management inside the fender so these worked very well and provided a nice, clean look as far as how they look after installation.
by: Jack 10/05/2019
Received in a short time. Installed on my trailer and couldn't be happier with the results. Very bright, easily to see, even in bright sunlight. Installation was very easy. I highly recommend this product.
by: Rick P05/10/2020
It came fast. Hooked it up and is still bright today. One year later I'm Very very happy with this light. Will be ordering more for my other trailers when I change the lights.
by: Tony 04/22/2023
Quick transaction and excellent customer service
by: Spa City I Repair05/25/2020
Thanks for the follow up making sure I received my order and on top of emails along the way I have not opened any of it yet but I am sure it will be right for I have ordered other stuff and it’s always been correct and very good products. Thank you to your whole staff for always being committed to quality service.
by: Wayne05/25/2021
All products are in excellent condition, just ordered the lights for spare before trailer manufacture changes design and can get them.
by: Peter L03/30/2020
This LED light is exactly what I was looking for.
It is easy to install , very bright for such a small unit and submersible.
by: Jeff 10/30/2021
Small. Bright. Will see how plastic pop on cover holds up to boat trailer abuse. Very expensive for what it is.
by: Scott 06/13/2021
The side markers are smaller than thought. Hopefully the diodes are powerful enough to be seen otherwise may have to get larger ones. Overall solid products.
by: Jimmy12/02/2022
Good light
25
88
Show More Reviews
See what our Experts say about this Optronics Trailer Lights
- Troubleshooting LED Reversible Lights That Turn On When Trailer Battery Is ChargingNo. The # MCL181ARCRB should operate in the same manner as your regular lights, so they shouldn't come on when the battery is charged. This would lead me to believe there is something going on that was bleeding power to the lights or the lights are connected directly to the battery instead of the running light circuit on the trailer. If you can confirm that they've been installed on the running light circuit and not directly to the battery, let me know and I can give you a few other things...
view full answer... - Chrome Trailer Clearance LightWe do have a chrome light but it's not exactly the same as the clearance light # MCL180ARB. Part # MCL181ARCRB is chrome but not the exact same design. It's the closest we have though.
view full answer... - Is It Common For 2019+ Chevrolet Silverados To Have Issues With Trailer Lights?You are correct that GM changed the wiring to the 7-way connector on the 2019 and newer Chevrolet Silverados and 2019 and newer GMC Sierras. We have run into some customers that have had issues with getting the trailer lights to work properly, but this is usually when the trailer has LED lights. If your trailer has LED lights then you will need 7-Way Trailer Adapter for Towing Trailers with LED Lights # C57003 which has built in load resistors to trick the towing system into recognizing...
view full answer... - Correct Heat Shrink Butt Connectors for LED Reversible Trailer Fender Light with Chrome TrimThe LED Reversible Trailer Fender Light with Chrome Trim part # MCL181ARCRB likely has 16-18 gauge wires so you'll use the Heat Shrink Butt Connector part # DW05744-5.
view full answer... - Troubleshooting Running Lights and Trailer Brakes Not Working When Connected To 2019 Chevy SilveradoI would be happy to help. Since you have identified that the issue is on your 2019 Chevrolet Silverado 1500 since the trailer works when you connect it to other trucks, I would first check your trucks connector for any debris or corrosion that could be causing the connection issue on these two circuits. Next for the running lights you will need to use a circuit tester like # PTW2993 to test the 11 o'clock pin while you have the head lights of your truck turned on. If you do not get power,...
view full answer...
Do you have a question about this Trailer Light?
Info for this part was:

Edited by:
Leah B

Video Edited:
Jacob T

Video by:
Dustin K

Installed by:
Cole B

Installed by:
David F

Updated by:
Wilson B

Updated by:
Brian T

Written by:
Anna W
At etrailer.com we provide the best information available about the products we sell. We take the quality of our information seriously so that you can get the right part the first time. Let us know if anything is missing or if you have any questions.
Thank you! Your comment has been submitted successfully. You should be able to view your question/comment here within a few days.
Error submitting comment. Please try again momentarily.