

 Arrives before Christmas
 To see if this custom-fit item will work for you please tell us what vehicle you'll use it with.


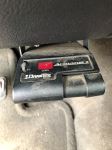
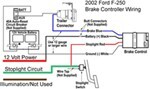
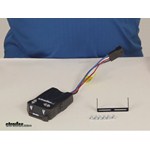
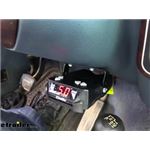
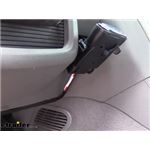
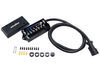
This stout brake controller has easy-to-reach button controls up front and a simple slide-lever manual override. The digital display is large and easy to read. And the included harness lets you just plug the controller right into your vehicle.
Features:
Specs:
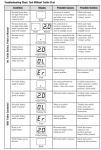
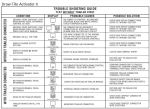
Power output is the maximum amount of power that will be applied to your trailer's brakes. How much braking output you need is determined by the weight of your trailer; a heavier trailer will need more power to bring it to a stop. You want to go as high as you can without the trailer brakes locking up. It adjusts on a scale of 0 to 10.
Once you have the power output set, you can fine-tune your braking by adjusting the sync control. This controls the aggressiveness of your trailer's braking, meaning how quickly the brakes reach the maximum braking level. If your vehicle takes too long to come to a stop, increase the setting. If it stops too abruptly, decrease the setting. The sync setting is shown as a number followed by the letter "o" to differentiate it from the output reading. The least aggressive sync setting is 0o and the most aggressive is 9o.
The Activator IV displays the power settings as you adjust them. While braking, the unit will display the power output setting. To see or adjust the sync setting, step on your brake pedal and press either the plus or minus button to increase or decrease the setting.
The display will also show trouble codes to alert you to any potential problems, such as short circuits or overloads, or if there is an internal problem with the controller.
Installation
Because inertia plays no role in the functioning of this controller, you do not have to mount the unit at any particular angle. Your mounting options are limitless, so long as you can still easily access the controller and manual override. And because the included wiring harness is custom fit for your vehicle, you can just plug the controller in. No cutting or splicing needed!
Note: If you don't already have a 7-way plug at the back of your vehicle, take a look at our exclusive 7- and 4-way brake control installation kit (ETBC7 - sold separately).
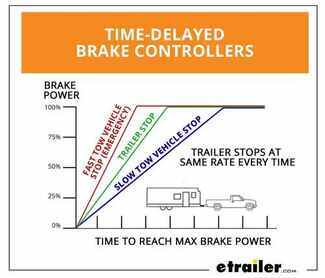
Time-delayed braking means that when you apply the brakes in your vehicle, the controller activates the trailer brakes at a pre-set intensity and rate. Both the amount of braking power (gain) and rate of application (load) can be adjusted to suit your preference, the road conditions, the type of trailer, and the weight of your load. To determine which levels are best for your application, test your towing setup and choose what feels right.

California residents: click here
Videos are provided as a guide only. Refer to manufacturer installation instructions and specs for complete information.
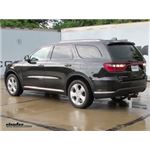
Today on our 2014 Dodge Durango, we're going to take a look at and also show you how to install the Draw-tite Activator 4. This is a time delayed, trailer brake controller that'll work for one of the four axles. Part number is 5504. We're also going to be using the Tekonsha Plug-In Wiring Adapter, part number 3045-P. The Draw-tite Activator 4 is going to be a time delayed brake controller set up. What that means is when we hit the brakes on our vehicle the brake controller is going to pick up on that and it's going to bring up the brakes on our trailer in a specified kind of a time.
We're going to time delay it fast and so it's slowly going to ramp that up. That speed is going to be dependent on how we got our sink set. You can see we've got two buttons up here in the top, plus and minus. The higher we go on that sink setting, the quicker and more aggressively our brakes are going to engage. See we can bring that down. That allows us to fine tune this for the trailer itself.
Basically, the size and the weight of the trailer in relation to the size and weight of your vehicle. We also have a gain adjustment here. You can see those are adjustable in half number increments. That allows us to fine tune for the terrain. It also allows us to fine tune the amount of braking power that we're sending back to our trailer.
On lighter trailers we want our gain to be adjusted lower. If we're on flat terrain we want our gain to be adjusted lower. As we start to raise that gain, our trailer weight is going to get heavier and heavier and our terrain is going to become more hilly. That's the amount of power being sent back to the trailer. You want to be just enough where it's not going to actually lock up the tires on the trailer, which can cause flat spotting. Get a nice manual override lever here.
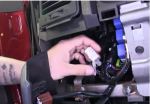
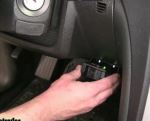
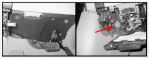
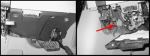
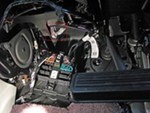
As you can see we bring that all the way over maxed out and it's going to go right up to whatever we've got the maximum gain set up. In an emergency if we need to apply those trailer brake without applying the brakes in the car, we can pull that over. It's going to go right up to what we've got set and that's going to prevent us overpowering the tires on the trailer and locking them up. Another benefit of a time delayed brake controller is that you don't have to worry about mounting angles. These could be mounted in any position in any configuration. You just really want to keep in mind, you want it to be close enough where it's in arms reach and you can operate your manual override. For the first step in our installation is going to find the plug underneath the dashboard that matches our 3045-P. As you can see this is going to have a plug that will go right into the connection in the brake controller. It's going to come right from our factory connector, which this will plug into. To find that we need to look up here behind the emergency brake petal. Some vehicles are going to have a felt panel down here. You can kind of see it here. We're going to get this pulled down and out of the way. We've got two push fasteners. We've got one located right here. If we come over there would be another one right here in this area. To remove these I'm going to use a trim panel tool. You can also use a screw driver. You just want to get in behind the head of it there. Just pull down. See there. We'll pull that down and out of the way. May have a little plug here for the light. Just take that off. We'll set this aside for now. If you look right back there, it's going to be our plug. There's a zip tie holding it in place there. Let's trim that so we can get it angled up here, so we can work with it. There we go. On the back side of that plug, or right above where that plug as located, that's our brake pedal arm. We don't want to get anything back behind there so we're going to run our plug. Our brake controller's going to be going over here on the right side the steering wheel so we know we want our plug over in this location. I'm going to run this up over a few of the braces that are up here on the dashboard that way you'll have plenty of support. Got a few things we can zip tie too off of up here. That floor vent would be a good area to use there. Back on this side we're just going to plug in our two connectors. Then I'm going to bring it up and we can zip tie it off right to this wire loop. We'll bring out as much as we need here of our pig tail to make a connection with our brake controller an then we can zip tie it off right underneath here so the vent for the floor heat or for the heat that hits your feet. I'm going to go right around that using a pretty good length of zip tie and once we have that where we can get to it you see we can pull out some or be able to bring out back just depending on how our connection needs to be. We'll want that to come out there and then we can put the panel back in that we removed out earlier. All right that should work out real well for us. This is what our bracket is going to look like that we'll use to install the brake controller on our dashboard. Here's where the previous brake controller was installed. You want to kind of stay over on the right side of the dashboard. You can mount it on the left side, but when you get in and out, you run the risk of bumping your leg on it. We're going to mount right up there where the old one was. There's a little bit of a difference in those panels, so we're going to be using those small, flat washers to help accommodate for that. Then we can take our provided hardware or self-tapping screws. We can get those started there and thread it in. Now they give us a great, solid attachment point. At that point we'll bring in our brake controller. You'll have to decide whether you want it to be on the bottom set of holes or on the top set of holes. It looks like the upper set of mounting holes here give us just enough room to slide our fingers in there and get to those adjustments, so I'm going to set it there to keep it as far away from our legs as possible. Your application may be a little bit different. What I like to do is a use a little bit of electrical tape here and just wrap up the wires coming out of the controller. That's going to give us a cleaner look rather than having four different color wires, we'll just have one black wire running down. You want to simply plug those together. Just touch your manual override lever there. Make sure it's working. Then we can tuck these right back up underneath that panel. With everything working as it should, that's going to complete our installation of the Draw-tite Activator 4 trailer brake controller part number 5504. Also using the Tekonsha Plug-In Wiring Adapter, part number 3054-P, both on our 2014 Dodge Durango.

Worked great!
So far so good
Easy install. Competetive price
fast shipping good price perfect fit
It plugged in and worked as advertised,Thank you so much,
Fantastic brake controller. Even better website.
Great controller, we install it on almost every system we do.
Good overall product. Meets needs and is inexpensive.
I ordered a brake controler and was delivered in three day and it works great. Will order other parts in the future
this controller is great. etrailer delivery, packaging, pricing were ALL great...
Love it.... Installed in my 2011 chevy in about 5 min and it works great. Recommend to anyone
Works great, very easy to use, and very easy to install thanks
The item appears to be well made and as expected. I'm having some difficulties, but with my camper, not with the unit.
Probably not a really useful review.
Very easy to install. Works very well. I like the digital number readout to show power level being applied to brakes.
Top notch products,Service and Customer service help line.
You guys know your stuff.
Thank you so much for the help everything went flawless and works perfect.
Thank you so much.
Terry
Installing this into my 2005 Tahoe was a breeze. If you just follow the directions and check out etrailers videos you should have no problem. I went from a small popup to a bigger hybrid so I had to get the EBC system. This sure beats taking it to the RV or Dealer store and paying retail plus labor. Thanks etrailer.com
Easy to install. simple instructions, I have it wired up but just have not towed anything yet to get the settings set for my application.
Quality product. The video of how to install clinches the deal. Setup instructions worked perfectly.
Nice product, easy to useEasy to use an upgrade from my Activator I unit. Has the same manual brake control that failed on the Activator I unit. Hopefully this one does not fail.
thank you for the fast delivery ,and for the easy installation vid
was a breeze,ty
Great Product, VERY Easy to install. The only thing I would change is the length of the pig tail. The short length of the pigtail limits your options of product placement.
Great prices, quality products, great customer service and reasonable shipping!!!
Easy installation works great, great pr ice
ordered on a monday afternoon, received my order on wed after 3 pm...everything was in good condition..these are really good people...thank you so much for the fast service......max


Do you have a question about this Trailer Brake Controller?
Info for this part was:
At etrailer.com we provide the best information available about the products we sell. We take the quality of our information seriously so that you can get the right part the first time. Let us know if anything is missing or if you have any questions.


Thank you! Your comment has been submitted successfully. You should be able to view your question/comment here within a few days.
Error submitting comment. Please try again momentarily.