
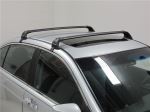
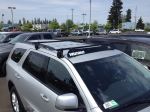
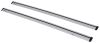
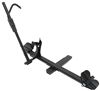
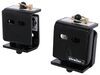
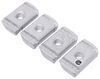
Yakima BaseLine Roof Rack for Naked Roofs - JetStream Crossbars - Aluminum - Black - Qty 2


To see if this custom-fit item will work for you please tell us what vehicle you'll use it with.
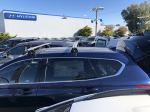
This stylish, aerodynamic Yakima roof rack gives you the space to carry gear on your vehicle. Rubber strips in the top channels push down to load carriers or accessories - no need to trim. Installs on your vehicle's naked roof.
Features:
Specs:
 Alternate Instructions
California residents: click here
Videos are provided as a guide only. Refer to manufacturer installation instructions and specs for complete information.
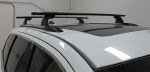
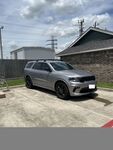
Hello, neighbor, this is Curt at etrailer. Today, we're gonna take a look at the Yakima Roof Rack with baseline towers and JetStream crossbars on our 2024 Toyota Tacoma. Now if you have any experience with a Yakima roof rack system or if you have any questions about it, please leave that in the comments below. We'd love to take your questions and your experiences, and use them to help our other neighbors make the best decision for themselves. Now if you are a pickup truck owner, you may ask yourself, now why would I need a roof rack when I've got this nice big bed here to go ahead and haul and store everything else Well, if you're the owner of a Toyota Tacoma, you likely bought this truck because you have adventures that you wanna go on. There's places that you wanna be able to go that other vehicles just can't get you there.
And the Tacoma is a very, very popular vehicle for those kind of more off-road adventures. And if that's the case, then you're gonna wanna be able to carry everything in one trip as much as possible. One of the things that a roof rack can do for you, especially if you own a bed rack, like one of Yakima's truck bed racks, you may want that extended bar space if you're carrying, say, like a long canoe or a paddleboard to where just these two or the two on the bed rack just are too short together to really hold it safely. The other thing is, is you may wanna be able to move that cargo forward because you want to pull a trailer behind you as well, and you don't want some long canoe hanging all the way off the back that might interfere with that. As far as work applications, you may have some longer lumber that four bars are gonna work better for you than just two.
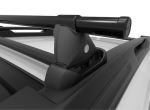
There are load stops available to get with your Yakima bars in order to assist with all those different applications. Now the crossbars with this system are called Yakima JetStream Crossbars. They aren't arrow bars, meaning they have an ovular shape, they're thin toward the back. This is really gonna help with wind resistance and keeping the noise down as you're riding along. The kind of noise that, you know, frankly, square bars and round bars are gonna give off as you're traveling.
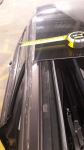
You're gonna get this long weather strip up at the top, there is a T channel in here that you can mount accessories into, and you'll do that by removing the cap to access that same channel. You can mount them to the side, to the center, to the edge. The important thing to remember is that these bars have a 165-pound weight limit. Now despite what the weight limit on the bars is, you still wanna check your owner's manual to make sure that your roof capacity can hold that much weight. If your roof capacity is below 165 pounds, the roof capacity is gonna be the limit.
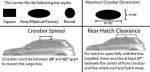
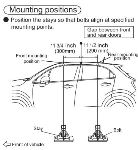
We are limited to whatever that lower number is. The spread of the crossbars is gonna be 32 inches. So from here to here, any accessories, roof box, rooftop tent, anything like that that you might wanna put up here, you just wanna check that that 32-inch crossbar spread is gonna be okay for you. And then, of course, if you have the ladder rack, you're gonna have two more bars to the back that you'll be able to load up with as well. But while we're up here, why don't we go ahead and check exactly what kind of clearances that we're gonna get with this, how far to the back, and how much clearance under the bar we're gonna have. That way, you have the best idea of what kind of accessories you're gonna be able to mount up here on the Tacoma. So the JetStream bars in this kit are 50-inch bars, so that's gonna give you a total of 50 inches on this track to be able to mount anything. There's not a whole lot of overhang. And in fact, it doesn't even overhang the threshold of the door. So if it's a concern of yours with an overhanging bar of hitting your head, on the Tacoma, you will not. This is pretty much flush right with the door here. So as we're looking at this, we may wanna also keep in mind how much clearance we have underneath here. We also have this antenna that we have to be mindful of, which does frankly stick just slightly above this bar. So you may find yourself in situations, where you're mounting it to either side of this so as not to bump in or interfere. Our clearance underneath the bar is going to be right at 3 1/4 inches. Even over here, under the very center of the roof, we're at 3 1/4 inches. The height that we're going to get out of this antenna comes to about 3 3/4. The height of the bars is at four inches. So if you've got something sitting on top of here, if the clamps don't raise it above the bar here at all, you only have a quarter inch of clearance from the top of this to the bottom of your accessory. So keep that in mind when you're choosing accessories to go on the roof of your Tacoma. So one of the things you might be asking yourself in regards to your roof rack is, how exactly would I keep this and my accessories up top secure Well, Yakima uses what they call the SKS or same key system, where you could buy sets of keys and lock cores that are keyed alike, that'll fit in all of your Yakima products that use the SKS system as well. So you'll be able to get a set of four of these, so that you can lock all of your towers through there. They'll all be able to be unlocked and re-locked using the same key. And you could also add cores using the same key to some of your rooftop accessories. So you may have a rooftop cargo box and have that key the same as all your towers. That'll help keep you organized and be able to get in and out of everything without any kind of confusion. One more thing I always recommend to anybody getting a roof rack on a taller vehicle like this is the Moki Doorstep. Now you may be able to get up into here pretty easily by using the bed, but there may be also times where you're storing things closer to the front and you just need that extra little level of reach. While the way this step is going to work is by deploying it as such, we'll have this little hook here. We're gonna hook that right in to the hook against our door here. It's gonna create a ledge for us with a 400-pound weight capacity. And we're gonna go ahead and use that to step right up. Now I can get myself access all the way to the other side and to the front if I need to that I wasn't really able to get to in the back. Especially if I have anything on the bars that's overhanging past the cab, that's just gonna limit our reach even more, making this a very handy tool to keep in the truck with you, which can be stored very easily. It can even be placed right here inside the door if you like. Now that we've had time to review this roof rack system on our Tacoma, let's go ahead and take a look at exactly how we got it installed. Now as we're getting ready to install these on our roof, it's important to kind of understand the components that we're working with. There are three main components to the roof rack, starting, of course, with the crossbar itself, which is going to be mounted on to our towers, which will then be mounted on to the custom kit that is really specifically made for your roof. So generally speaking, when you see these systems, the towers in the bars all remain the same. It's how they mount on your vehicle that really makes a difference from kit to kit. So the first thing we're gonna wanna do is take one of our towers and install our footpad. The footpad's gonna go on just like this. There is going to be a little arrow here that you could follow, make sure that's pointing outward or this notch is pointing on the outside of the tower. This is gonna install right onto this little bar right here by just compressing it down until it snaps in. And once we have that popped on, we'll be ready for the next step. The next step is going to be to attach this part, which is gonna hold it on to our vehicle frame. And in order to do that, we're gonna simply move this aside. We're gonna see this piece here. Now you'll notice that this has a tab and kind of a hook here. What we'll wanna do is turn that around and make sure it's facing down. What we'll then do is through this slot right under here, we're gonna slip our hook, make sure it gets under there, and then grabs on to that little hook that we found in back there. Once that is in place, we can close this up, and then we're gonna mount it on to our bars. So the first thing we wanna do before we get this on our bars is go ahead and remove our end caps. We could do that by lifting this tab and popping it right off, as such. And then we're gonna see a little T slot going through right here. That is gonna be connecting through this attachment here. So we'll start by kind of rotating this upside down, sliding it through that T slot, just like so, bringing it over. And then we'll replace the cap just to make sure this doesn't slide over and come off while we're making our adjustments. Now when you get this, it's gonna be fit for several different vehicle roofs. So Yakima provides a chart, not just in your instruction guide, but also online for you to follow through. Because it's a naked roof, it's gonna give us the measurements of exactly where our bars should be placed. It's also giving us measurements of exactly how far apart these feet should be on the bar. And our measurement for this is gonna be 38 7/8 inches. So we're gonna go ahead and measure it from this bar here on over. 38 7/8 should get us right about here. And once we have that taken care of and settled, the next step is to use our torquing tool that we get from Yakima. And we're gonna tighten it down, going through this hole right here. Not this one here, but this one right here. We're just gonna reach in and tighten that down until we hear a click or a pop come out. That's the torquing tool, you didn't break anything. That just means you've got it tight enough to spec. And there you have it. It's all in place. Our measurements are even, the bars are even from the end. We should be showing roughly three inches on each end. That way, the bars look even when you're riding down the road and we're right on the money. Now we're ready to go ahead and get it mounted up on our roof. Now your bar placement is gonna be determined in your vehicle installation guide that you're gonna get with your fit kit. There's also a backup table that I found a little bit easier to use on Yakima's website, where you could plug in your car and it'll tell you the measurements. But after reviewing that, we went ahead and installed our first bar. And the reason is because we need the placement of our first bar in order to determine where our second bar is going to go. Now the measurement that we got out of the fit guide for the first bar would be that the very front end of our foot pad here should be 11 inches to the top of the windshield. So we measured it out as such. We attached it up here, and now we can use this to place our second bar. The second bar placement is called for 32 inches, center to center, from the front bar to the back. Now a good way to measure that on the front bar is either right in between the two gurus on the clip, but I think a little easier visual to see would be the eye on the Yakima logo. It's pretty much dead center on our tower. So from this eye to the eye on our second tower, we should come out to exactly 32 inches. Now we've gone ahead and measured that out. We marked it with a piece of painter's tape. So the edge line of this should line up with the eye on our second tower. Now that we know where it's going, let's get up there and put it on. Now admittedly, the front bar can be a little tricky and any installation like this is always easier with a friend. However, it isn't entirely possible to get it done on your own. The back bar is gonna be a little bit easier because on the Tacoma, we're gonna have the truck bed to kind of help us out as far as making sure it's level on both sides. So the first thing we're gonna do is kind of set this down here. We wanna get our clip over the edge and we wanna get it, so that it's pretty much right in the middle there of those grooves, which again, is the center of the tower where that eye is going to be. So we're gonna get that attached right around there. We're gonna go ahead and kind of get our foot pad level as we can. It does swivel a bit to help you out with that. Before we go over to the other side and attach our clip over here, again, making sure the foot pad is level. Now the next thing that we're going to wanna do is make sure that it's going perfectly perpendicular across. We're gonna do that by measuring from the end of this foot pad to the end of the cab, and making sure that that measurement is equal on the other side. That way, we're gonna guarantee parallel bars, which is gonna be the safest and most secure way to load your accessories and your goods on your roof. Now that we've got our foot pads seated and we have a perfectly perpendicular setup between our bars, we're even to the back on both sides, so we know that. We're gonna be ready to tighten down our clamps and towers. Now if you're doing this on your own, one of the things that we notice is if you try to go full bore on one side, it could unsettle the other side. So if you don't have a friend to help you by holding the other one in place, might be a good idea to tighten down some over here, make your way around to the other side, do the same thing, and just kind of go back and forth and incrementally tighten everything down. And we're gonna do that in two different places. So we've got this bolt here that's gonna help tighten it down. And then underneath this, we have a bolt here that we're gonna go up through and tighten down from here. And we've been back and forth a little bit on this. So I'm gonna go ahead and get this tightened all the way up. And that pop lets us know that it's well and in place. We're gonna do the same thing here. And that one's already good before we put this down and we place our tower covers over it. So we're gonna go ahead and take our tower covers, and get them in place. One quick note though, the SKS replacement keys and locks and things like that, this is the spot, where those would go if you decided to purchase them. And the key core would go in this area right here while we've got it open and taking a look. So to put this on, we're gonna go ahead and hook these on to these tabs right here before pushing it into place. Now we've got that on there and we are ready to load up and hit the road. So there's a look at why this Yakima roof rack system will be an excellent addition to your Tacoma for your next adventure. Once again, this is Curt at etrailer, thanks for stopping by.


Do you have a question about this Roof Rack?
Info for this part was:
At etrailer we provide the best information available about the products we sell. We take the quality of our information seriously so that you can get the right part the first time. Let us know if anything is missing or if you have any questions.


Thank you! Your comment has been submitted successfully. You should be able to view your question/comment here within a few days.
Error submitting comment. Please try again momentarily.