
To see if this custom-fit item will work for you please tell us what vehicle you'll use it with.
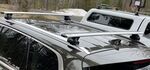
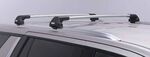
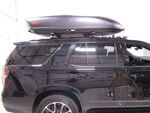
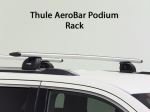
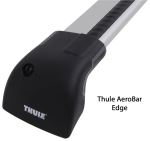
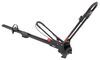
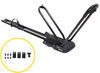
This aerodynamic Thule roof rack mounts flush on your roof for a sleek, factory look. Crossbars with split rubber strips in top channels work with channel-mount and clamp-on accessories. Installs to flush rails on your vehicle's roof.
Features:
Specs:
 Alternate Instructions
California residents: click here
Videos are provided as a guide only. Refer to manufacturer installation instructions and specs for complete information.
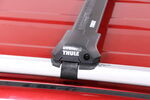
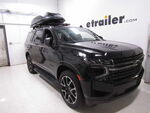
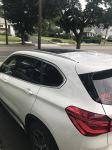
How's it going neighbors This is Ed here with etrailer.com and today we're taking a look at the Thule Wing Bar Edge on our 2023 BMW X5. Now to the X5 owners, you guys know that it's a very nice vehicle, but cargo space is very limited. Adding a roof rack to your vehicle is gonna allow you to take advantage of that negative space on top of your ride. So let's take a closer look and see what's special about it. So as far as the wing bar, just like the name implies, you're going to have a wing shape that's gonna help reduce your wind noise, along with the weather stripping on top, that's gonna allow you to have less noise, however, you know with crossbars, these guys, you know, it's just the nature of it that you're gonna get some wind. However, I have used these wing bars on my vehicle and I didn't notice a lot of wind.
It was on a Honda Odyssey and they, you know, I didn't notice I had 'em on there for a week straight. As far as the way this guy's gonna connect, you can see that the fit kit fits really precisely along with the raised rails. And the way that the clamps clamp this ridge here is gonna make sure that you're ultra secure. If you have any T channel track accessories, you can trim your weather stripping to fit along that line, and that way you can get a lot of use out of it. Now, one thing I usually recommend with these guys is upgrading to the additional lock and just keeping in mind that you are gonna have a limited amount of space that you can put on there.
So you want to make sure that you go with the manufacturer's recommended load limit for your rooftop. As far as your spacing, you're gonna go for a minimum of 27 1/2 inches. However, you did have a lot of flexibility because there are no fixed mounting points. With Thule products in general, the installation is straightforward. And with this all you're gonna need is a tape measure because the wrench you're going to need is included in with your kit.
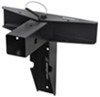
This is one of those real easy to install things that you can get done pretty quick. And it'd be cool if you send a photo, just link it below, and of how it looks on top of your vehicle. So now let's go ahead and get this guy installed. So we're gonna start our installation with our towers. We're gonna remove the cover and you want to keep in mind that the orientation for this notch here is gonna point towards the rear on both your front and rear.
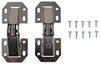
From here you're gonna grab your clamps for your fit kit. You're gonna go with the A bracket, taking the two hooks and placing it right above, actually right underneath the bracket. Now you're gonna take B, the rubber foot, and align it with the holes underneath. It matches the shape and it just pops right in. And then finally, the C portion with the bubble part pointing out, you're gonna hook that on the top where you can have the threaded bolt sticking through and you can kind of work this guy in. And that's good enough for now. So from here we're gonna install it onto the crossbar. So right here, this plastic notch is what we're gonna align with the hole on the inside of our crossbar. It's gonna slide that guy in and I'm just gonna press down and work it in. And now we're gonna go ahead, flip this guy over, and we're gonna get a measurement on our spread here for our crossbars going across and we'll get it locked into place. Now that I have my measurement, I'm gonna make my adjustments here and we're gonna put our weather strip on, sometimes Thule'll send it pre-installed, but if you don't receive it, it's gonna come in one piece and you're gonna tear it apart. So from here you are gonna actually drop it right into the channel. You want the arrows pointing towards the front on the rear part of the bar, and if you have a little extra hangover, you can just trim it off with scissors or a knife. Now that I have my cross spread, I'm just gonna reach over to my other crossbar and I'm just gonna get this positioned. Now I'm gonna go to the other side and make sure I have this clamp clipped around just like this, where you're gripping on both side of your raised rail. Now I'm gonna do that positioning just like that, make sure everything is gripping. And then from there I'm gonna get my measurement. So you're gonna measure from the front of this bar to the back of this guy and make sure that you're at a minimum of 27 1/2 inches. As far as weight requirements, you want to keep in mind that you want to see what the owner manual says about how much you can put on top. Alright, now that we have this guy torqued down, we're gonna go ahead and put our cover on. Now we're nice and secure and we're ready to roll. Now if you wanted to add on a key lock core, you can throw it in at this point, or you can use the plastic lock knockouts to go into the hole. Thanks for taking a look at the Thule Wing Bar Edge roof rack for our 2025 BMW X5. I'm Ed, this is etrailer, and you have a great day.
Ratings & Reviews


Do you have a question about this Roof Rack?
Info for this part was:
At etrailer we provide the best information available about the products we sell. We take the quality of our information seriously so that you can get the right part the first time. Let us know if anything is missing or if you have any questions.


Thank you! Your comment has been submitted successfully. You should be able to view your question/comment here within a few days.
Error submitting comment. Please try again momentarily.