
To see if this custom-fit item will work for you please tell us what vehicle you'll use it with.


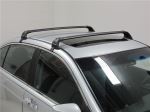
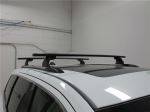
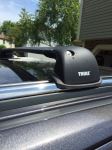
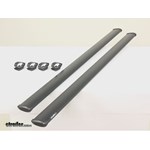
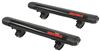
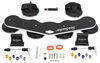
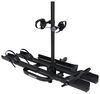
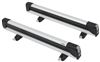
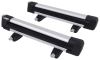
These crossbars combine the strength of steel with an aerodynamic shape to create a heavy-duty yet quiet roof rack for your vehicle. Full-length bars work with most clamp-on accessories. Installs on your vehicle's naked roof.
Features:
Specs:
 Alternate Instructions
California residents: click here
Videos are provided as a guide only. Refer to manufacturer installation instructions and specs for complete information.
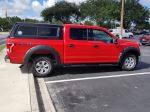
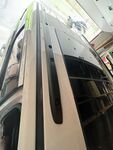
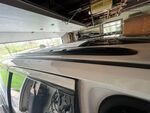
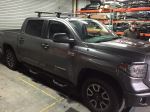
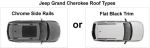
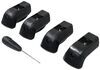
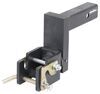
Hey, everyone, it's Evangeline here at etrailer. Today we have the Yakima Roof Rack System here on the 2018 Jeep Grand Cherokee. Now this specific system is designed for the Grand Cherokee that has the matte flush rails, so with this, you are able to carry around different cargo, baskets, kayaks, and all those fun accessories. So we'll take a look at how this fits this vehicle, and I'll also show you how to get it installed. So there's a bunch of different types of rails on the Grand Cherokee, so I was very specific about the matte black ones just because while these are technically flush rails, you can't really clamp much to it. So for that reason, Yakima found that the best fit for a roof rack is a BaseLine tower system, one that has pads that contour to the curves of your roof, as well as hooks that fit perfectly into the door area of your Grand Cherokee.
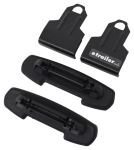
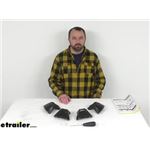
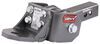
So with this kit, you have three important pieces. You have your crossbars, you have your foot pack or towers, and then you have your custom fit kit. It might be a little confusing getting them all paired together, but that's what our fit guide at etrailer is for. Put in your year, make, model, select your type of roof, and then we'll have the kits all kitted together for you. By the way, what I have here today are the 60-inch long CoreBars, which are very helpful for being aerodynamic.
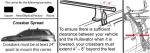
But if you do want the other style, let's say JetStream bars or HD bars, we have kits and fits for those too. With the 60-inch bar, these are gonna sit a little bit further past the tower. That's called overhang. I like overhang 'cause then you can maximize your crossbar space. Here we have from tower to end cap 4 1/2 inches.
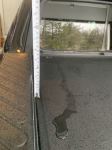
So this is areas that you can still clamp other accessories too if you want them further out or a little bit easier to reach. Some other measurements that are important though are roof clearances, and there's two measurements here. The first is how much space do I have underneath the crossbar and the roof. So here I have about three inches of space. Now, that will be a little bit different depending on where you measure, but that's still pretty good space for most types of clamps that clamp around your bar.
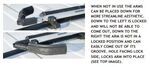
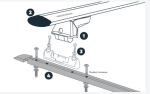
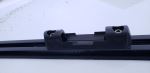
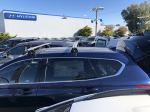
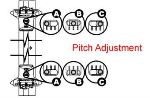
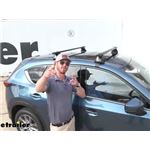
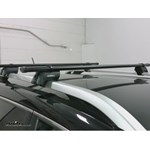
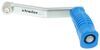
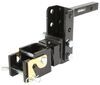
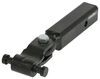
The next one is gonna be the height added to the roof. So roof to the top of crossbar, a little past four inches. That's where your cargo sits. So let's say you have skis with extra tall bindings. You wanna make sure that you have space for those bindings when your skis are on your roof and you're not scratching things up. And if you find you don't have enough space, that's when you can take a look at some of our ski carriers or other accessories that give you that extra height and extra clearance. So the measurements here on our Grand Cherokee are pretty good. A lot of clearance but not too much where we still look pretty sleek. The clearance underneath is also important because you can't channel mount your accessories. They have to be clamped around accessories. So compared to the JetStream bars, which has channels that run in the middle of the bar, this one is a very straightforward, very sleek, very aerodynamic crossbar. So if you do have channel accessories, check out the JetStream 60-inch bars as an alternative kit. But if you're fine with clamp style only, then that's what the CoreBar is very popular for. You don't have to worry about extra features that you may not even use. The main benefit of the Yakima BaseLine roof rack is also its main downside compared to either roof racks. So this roof rack is pretty tricky to install if you're installing it for the very first time. Now, I do have an installation video at the end of this video that help guide you through that process to make it a bit easier. But the bonus to it is that you can then get the most custom fit roof rack on top of your roof. Meaning, you'll notice here that your roof on your Jeep Grand Cherokee is angled downwards towards the front, and then the tower then compensates and angles itself as well as the crossbars so that you have a very level surface from the first crossbar to the last crossbar. You also have it at a really easy to use or not as intrusive spot on your vehicle. Meaning, if you have your crossbars further back, you then run out of things that you can carry because then you can't open up your hatch. So that's why Yakima placed their crossbars in this position. You then get a 32-inch crossbar space. Meaning, from one crossbar to the other, that's 32 inches of space, which is on the longer end. You'll still be able to fit most types of accessories, but you'll especially be able to fit longer ladders, longer kayaks and canoes, things like that. So if you want something that is very custom fit for your vehicle despite being an aftermarket roof rack and still gives you a very strong and level surface, then that's where the Yakima roof rack comes in handy. On the other side, it does take longer to install and to fine tune to get that very specific measurement. So it does depend on what your priority is. Installing your roof rack might seem a little complicated and that's because it is. There's gonna be a bunch of different bolts and measurements and things like that. So I'm gonna guide you through that process and hopefully that'll make it a bit easier. I already installed the front crossbar and we are going to install the rear crossbar together. Now I am installing the Core crossbar. So if you have a JetStream bar, it will look a little similar but be a slightly different process. For the Core crossbar, it all starts with removing at the end cap and getting at these collars on there. So you're going to want two collars on your CoreBar and then you put the end cap back on. And that way for the tower or the foot pack, we can then get that set up. So you first start by going to the front and you're gonna pull this door. Pull it would open till it clicks. Then you're going to go to the top and then you're gonna get your adapter plates, and then this also clicks into your tower. (adapter clicks) And then when you turn it around, since you open that door, you'll then be able to see that bolt on the inside. So go ahead and get your tool 'cause this will fit for that bolt. And that way when you fit this tower over the collar, that bolt will line up. Do this for both sides of the crossbar. The instructions will have you slide the bar onto the collar. That, I find, is pretty tricky to do, so this is the route that I go. Once you're on there, you're only gonna need to thread that bolt on in just a couple threads. Do not tighten it back down yet because you're still gonna need to slide that collar back and forth. Here we're gonna have our M3 measurement, and that's gonna be 41 inches and 5/8 of an inch. You do get a tape measure included with your kit. Now, you also have to make sure that that measurement is centered. So in our case here for the rear crossbar, 41 5/8 would half down to 20 13/16 of an inch, so make sure that's where the arrow is, and also make sure the arrow is facing away from you. Once you've figured out where the tower goes, you're then going to tighten it down in that spot. So this is when you adjust for the pitch. So see how it is adjusting the tower back and forth. Now for the case of the rear bar, the pitch is B, which is just the center, so very straightforward, we're gonna use our tool to tighten that down. Now, before I fully tighten down, I'm also gonna double check the toll. Now, the toll is adjusted by just pivoting the tower side to side. In our case here, we don't need to adjust the toll. It's gonna be in the middle, so that also gets tightened down. So listen for this click. (bolt clicks) With our special tool, whenever we tighten down a bolt, it stops at this very specific torque. So always tighten down all your bolts until they click when instructed to do so. (bolts clicking) Next step is to get your foot packs. For the Jeep Grand Cherokee, all the foot packs at the same number, so I'm not concerned about it. Just get one and pop it onto that tower, (foot pack thudding) making sure that that arrow and number are facing the ends of the bars. And then for figuring out where on your roof the crossbars go, you do have those measurements written. So for the front crossbar, it's gonna be 10 1/2 inches from the edge of your windshield to the center of your tower. But then for the second measurement, which is M4, we go from the leading edge of the front crossbar to the leading edge of the rear bar. So we're gonna go for 32 inches, and then we're gonna make a tentative mark here on top of the vehicle to get this on there. Making sure that those rubber foot pads are on there, we're then going to gently place our crossbar into position. And you wanna double check that your crossbar's facing the right way, meaning the taller portions facing front and the tapered edge faces the back of the vehicle. And as for measuring, you'll know you did a good job if your rubber pad perfectly lines up with the grooves on your Jeep. So this is what that looks like. You'll see that little notch in that rubber pad fits against the wall of that side panel, and you'll want it to look like that on both sides. You're then gonna clean off the end of your vehicle because that's gonna be where your hook makes contact. So opening up this door, we're then going to slide this hook into that opening underneath, and then that hook slides in until it's get caught by the drive bolt. Now, notice here how the hook does make contact with the edge of our door, so we're gonna loosen that drive bolt a bit. We need to loosen this just so that we have enough clearance for this to swing down. And that's what the swing bolt is for up top. So now we're going to tighten down the swing bolt, and you'll see how it lowers your hook. And we're gonna tighten it just until it makes contact with the vehicle edge. So do that on both sides, and now we're gonna tighten down the drive bolt just until the hook makes contact underneath with the vehicle. Now, we're not gonna tighten down that drive bolt because we're gonna go back to the swing bolt and then fully tighten the swing bolt down. But you wanna make sure you're easily tighten down on both sides of the vehicle. You don't wanna pull your whole system one way to the other of the vehicle, and that's why we go back and forth as we tighten down these bolts. So the very first thing you're gonna torque down is gonna be the swing bolt up top. So once that's torqued on both sides, that's when you can then tighten down the drive bolt on both sides. So continue on until your torque tool clicks. And what I always recommend doing too is have it click at least twice, kind of like a gas cap. (torque tool clicks) (torque tool clicking) There we go. Everything looks flush, everything looks secure, everything's been double checked, we're now gonna close that drive bolts door and then close this top door, and then we're going to put our end cap back on. So this goes in from the bottom, pivots up, (end cap clicks) clicks into place. If you have the metal lock cores from the Yakima Same Key System, which is a big pack of cores sold separately, now's gonna be the perfect time to replace this plastic cover with that metal lock core. If you followed all these steps correctly, then don't be worried about slamming the door on those hooks because you've installed your roof rack. And that's gonna be about it. You're now ready to load up this crossbar with all the cargo and all the things for your adventures, and now you can hit the road. This right here was a look at the Yakima Roof Rack System with the 60-inch long CoreBars, the Yakima BaseLine towers, and the custom fit kit for your 2018 Jeep Grand Cherokee with matte black flush rails. My name is Evangeline, and I hope you enjoyed this journey.


Do you have a question about this Roof Rack?
Info for this part was:
At etrailer.com we provide the best information available about the products we sell. We take the quality of our information seriously so that you can get the right part the first time. Let us know if anything is missing or if you have any questions.


Thank you! Your comment has been submitted successfully. You should be able to view your question/comment here within a few days.
Error submitting comment. Please try again momentarily.