
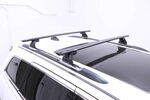
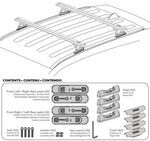
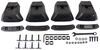
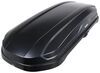
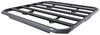
Yakima SkyLine Roof Rack for Fixed Mounting Points - JetStream Crossbars - Aluminum - Black - Qty 2


To see if this custom-fit item will work for you please tell us what vehicle you'll use it with.
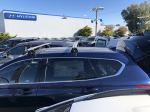
This stylish, aerodynamic Yakima roof rack gives you the space to carry gear on your vehicle. Rubber strips in the top channels push down to load carriers or accessories - no need to trim. Installs to fixed mounting points on your vehicle's roof.
Features:
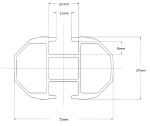
Specs:
 Alternate Instructions
California residents: click here
Videos are provided as a guide only. Refer to manufacturer installation instructions and specs for complete information.
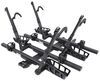
All right, so now it's time to hit that trip. You got your Highlander, you got your family, you got your reservations. Now we gotta figure out how to get all of our gear on the road. So I'm gonna show you the Yakima JetStream Roof Rack System on our 2023 Toyota Highlander. Adding a roof rack system to your vehicle like this is gonna allow you to take advantage of this negative space on top of your vehicle to get those bigger, bulkier items on the road with you. The roof rack is the collection of three different kits.
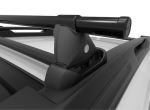
You're gonna have your 50 inch bars. These JetStream bars are actually gonna have a wing design on them that's designed to help minimize wind drag, and also to be lightweight with the aluminum construction. They actually have a powder coating on them that's gonna help hold up against the elements. And as you know, aluminum is rust resistant in most situations. I'm going to pull off our end cap to take a closer look at the construction of our bar.
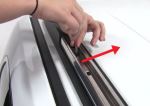
You can see there's channels on the top and on the bottom. You actually have a rubber gap for your T-channel slide slot if you have eye loop accessories, and you'll be able to feed that through. When you receive your bars, you're gonna have a rubber strip that you can put in underneath to fill in that gap. Since it's a demo set that we keep in the studio, it just, you know, we don't put that in. But it's just one extra step to help keep out the the wind noise.
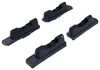
Our towers are constructed of UV resistant materials. It's designed to hold up against the elements. Your cover here is gonna have this hole that you can add in a Yakima same key system key that allows you to use the same key across all your Yakima devices. And then you're gonna have the third part, which is your fit kit. That's a pad and a bracket that your tower rests inside.
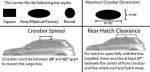
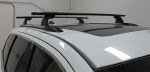
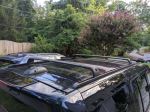
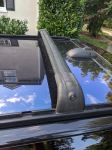
You're actually gonna have rubber that contours along the side of the top of your raised rail, and it actually grips along without making any contact. And your bracket is bolted to the roof of your vehicle. So you know you're gonna have a sturdy foundation as you're going down the road. And since we're test fitting, we'll see on our Highlander, we're right at four inches around our bar. So that's gonna work well for any clamp accessory that you want to add. As far as your spread, you're a little bit over 31 inches. I'd say 31 and a quarter. So that's going to be a fixed spread. So if you have an accessory that does not work with that, sadly it wouldn't work with your cars because of your fixed mounting points. Another cool thing about these guys is that they're removable, and you can leave the mounting points in position. You're just gonna squeeze right here and you can remove it from the top of your vehicle. And then when it's time to go, you can replace it with a cap. Making sure that the yakima's pointing towards you, you can just snap it over, and then you have full access to your roof without having the sacrifice lining up or unbolting anything. Installation's pretty easy, so now I'm gonna kick it to installation. We're gonna start by removing the panels on the top of our vehicle, our fixed mounting panels. Now what I like to do is use a body panel removal tool. We have them here at etrailer.com. You can use a screwdriver if you just wanna be cautious of your finish. And you're gonna match up your pads. So on the driver's side bar, you're gonna have A. On the passenger side pad, you're gonna have B. You wanna make sure your arrow's pointing towards you and you can read "Yakima." And we're just gonna place this right here. And that's gonna align with the hole that's inside of the roof. Now we're gonna take our tower and we're gonna put it on top of our mat. So we're gonna just make sure that our orientation is correct. It's gonna align with these notches on the bottom of the pad, and we just sat her in. And now we're gonna use our flat washer and our five millimeter bolt. I'm just gonna hand tighten it in. Now included in your kit, you actually have an Allen key. And it works fine, you'll be able to get there, but it's a certain point on the bolt itself where you have thread locker on it. And that's gonna kind of make it harder to get it all the way down and tight, so it wouldn't be a bad idea, if you have a socket wrench with an attachment bit driver, you can go ahead and just ratchet it down and just be cautious to not over-torque and crack your towers. And we're just gonna follow that exact same process. We're gonna align our pad, which is the B side, making sure that arrow is pointing away. And we're gonna install our tower and hardware. This bracket is actually where you make the contact between the towers and the vehicle. So it's very important to make sure that you get your hardware fastened in. We're gonna grab our JetStream bar, and we're gonna remove the cap from the end and install our feet. I'm gonna slide this guy in, reinstall my cap, and do the same thing on the other side. And then we're gonna measure for spacing and fasten it down. Now that I have my towers spaced out, I'm gonna install them using my Yakima tool. And once I hit the specified torque requirement, it's actually gonna click to let me know I have it where it needs to be. So now we're good to go. I'm gonna do the same thing on the other side, and throw it up on the roof. And now what you're doing, you're gonna reach over and drop your tower into the base. And you can kind of see where it fits underneath. If you have the door closed, you have these poles that kind of poke out that are getting in your way that won't allow it to fall into the foot. And you just kind of drop it in and then you snap it into place. And as you can see, nice and secure. In general, when you have fixed mounting points on your vehicle, that's gonna be some of your easier installations to add roof racks to. Alternatively, instead of the Yakima, if you we inchesre looking towards Thule or Rhino Rack, you couldn't go wrong. Those are all three solid brands, but what I like most about the Yakima is the same key system that allows you to use one key for all your Yakima products. This has been a look at the Yakima JetStream Roof Rack on our 2023 Toyota Highlander. I'm Ed, this is etrailer.com, and you have a great day.
Ratings & Reviews


Info for this part was:
At etrailer we provide the best information available about the products we sell. We take the quality of our information seriously so that you can get the right part the first time.


Thank you! Your comment has been submitted successfully. You should be able to view your question/comment here within a few days.
Error submitting comment. Please try again momentarily.