


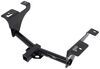
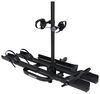
This Thule roof rack lets you carry cargo and gear on your vehicle. Aerodynamic crossbars with split rubber strips in top channels work with channel-mount and clamp-on accessories. Installs to flush rails on your vehicle's roof.
Features:
Specs:
 Alternate Instructions
California residents: click here
Videos are provided as a guide only. Refer to manufacturer installation instructions and specs for complete information.
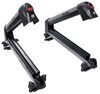
Hey everyone, it's Evangeline, right here at etrailer. Today we have our Thule add-on crossbars. These are gonna be longer bars that secure to the factory-stowable crossbars of your 2020 Subaru Outback. When you have those crossbars included with your Outback, they're great for most situations, but if you find that they sit a little too close to your roof, or maybe you want something that has channels in them, just so you can carry some other items, this is gonna be a really quick and easy crossbar system that you can add on. Now that installation process we'll cover later in this video. First, let's talk about the unique way it secures to your Outback.
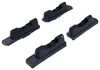
This is a kit that consists of three parts. So you have your aero bar, you have your Evo towers, but what's doing most of the work is gonna be your custom fit kit. This is gonna be a clamp that goes around your factory bars. So your factory bars have to be in the stowed position because this clamps around them, and you can see it set up on both sides. Now for those three parts used, I actually have the 47-inch long WingBar cross bars.
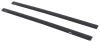
Now, Thule actually recommends the 43 inch, but I think the 47 inch ones give a little bit more space, a little bit more overhang, and it still looks really good on the Outback. So for me, if I was to put a roof rack on our Outback like this, definitely going with longer bars, is the way that I'd go. These are gonna be aerodynamic bars with T-tracks or channels on them. So for those T-track-mounted accessories, they can slide right on here. And then with these being the longer bars, I do have an overhang of about 1 3/4, maybe two inches, depending on how I have this mounted, and where I have this mounted on the roof.
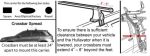
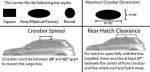
So if you need to, let's say clamp something around here, or you wanna take advantage of that T-track to get things further out and easier to reach, this helps out with that. The downside to securing to the crossbar though is you are kind of limited on crossbar spread. What is that Well, for some accessories like roof boxes or ski carriers, you have to have a certain dispense apart for your crossbar to get the best experience. And our crossbar spread is 25 inches and 3/4 of an inch. That's gonna be measured center two center, which is on the shorter side.
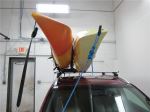
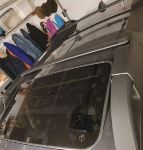
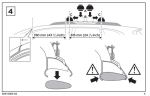
Most accessories will still work with that, but it is something to be mindful of. Also, with not being able to adjust the distance of the bars as far back, the good news is you are gonna have plenty of space from the rear bar to the hatch. In case you have a kayak loaded up, you're more likely to have clearances, since it is further forward. But if you needed to make adjustments of your carrier, you wouldn't be able to push your roof box as far forward, or push your roof box as far back, because you don't have as much space for wiggle room. If you want a measurement of that rear bar to that hatch, front of the bar to the hatch is going to be 28 1/2 inches. You do have a greatly-increased roof rack height though with this. So previously, our crossbars were about two inches up and off the roof. So four of those accessories that had really large U-bolt clamps, you didn't have as much space for that. But now our crossbar is, if you measure from top of the roof to bottom of the bar, 5 1/2 inches. And then the height of the overall crossbar is now 6 3/4 inches. So plenty of space for all those accessories. If you have, let's say skis with extra tall bindings, you now have clearance for that. And the one thing I would say is it may sit a little higher up than you are used to, which may or may not be a good thing, depending on the look that you prefer. This is what your roof rack system will look like from the front. I personally think it looks great. You don't have too much overhang where it sits too far out. Yes, it sits a bit higher up, but nothing super noticeable. Our sunroof is actually in front of the crossbar system, so nothing to worry about there when it comes to wind shooting on in. If you do prefer a more sleek look, but you still want the Thule premium features, check out the WingBar Edge version, which won't have any overhang and will sit a little bit more flush. If you're looking to upgrade your factory-stowable crossbars, because maybe you want something that is a little taller, has more features, and feels a bit beefier, well, our Thule roof rack here is gonna be a great way to go. Again, I have the 47 inch long version, but you can always go down to the 43 inch if you want a sleeker look, or, like I mentioned, the WingBar Edge. Now personally, if I was looking to upgrade my roof rack, I would actually take a look at the Yakima roof rack system because of how it mounts into those mounting holes on the roof. Now that does involve a little bit more of an installation and takes a lot more time. If I was just going on a quick little trip every now and then, and I needed a taller roof rack for that, these Thule ones go on so quickly. Once you have all the hooks and the pads lined up in the right spot, it takes about two minutes to put this on or to take that off, and that's really impressive. So Subaru and Thule have always had a really good working relationship, where their items look well on each other, and this Thule rack, I think, looks pretty good on our Outback. Now hopefully this video just showed you how it looks, how it works, and then you can make that decision for yourself. If you have any thoughts on it, maybe you do prefer the Thule bars, maybe you like the longer ones or the shorter ones, please send us your review or your thoughts on it. We'd love to hear your story about how you are using your Outback with your Thule rack for all kinds of adventures. Now, I talked about the installation and how quick and easy that is. So if you're curious about that, stick around. Now installing this is very simple, as long as you know the process to it. There are gonna be different clips with different numbers, different pads, things like that. So I'm gonna guide you through that process. I already installed the rear crossbar on our Subaru, so we're gonna install the front one together. We then need to orient ourselves, because there's gonna be front, rear, left, and right that we need to keep track of. And there will be stickers included. So once you have it figured out, you can always sticker up your things. So we'll start with the crossbars. You will need to attach the rubber strips to the bars. These will have two pieces, 'cause they split apart, so it can slide things through. The arrow on the wind strip will be facing the front of the vehicle, but that will also line up with the taller portion of the crossbar where your Thule logo is, and the tapered end, that's gonna be facing the rear of the vehicle. And then we set up the towers according to if they're front left, front right, rear left, rear right. And left is gonna be driver's side, right is gonna be passenger side. So we take out the end cap, we get the tower. We then go over to the pieces that it's gonna need. In the case of our front left or front driver's side, we're gonna need the clip 075 as well as 073. Now you probably won't see this on the video, but they will be stamped into the clips. You're also going to need the foot pad 126. So to put it together, you start with this large hook here and see how it has little tabs that fit into the towers, just like that. It'll also have an A on it. You're gonna secure that clip with a rubber pad. And this rubber pad is gonna clip in where it has just little tabs that fit into the tower, just like that. And then you're then going to have this other hook. So this goes into the first hook, goes over that bolt, and then you will secure that with one of these nuts. So they're gonna just screw on there. You don't need to tighten this down just yet, you just need this to be threaded on there so it doesn't pop out. That will apply to all the different towers. What I do is I just set them all up. I put the sticker on them so I know which one is which as I move on to the next tower. So here we have our crossbar, again orienting ourself so that it's facing forward. I know this side is left and this side is right. So when I flip this over, I know that I can line up the left tower with the left side. You will have to take out the end cap if you put it on. So push in on that tab and then pull this end cap out. And that way you'll be able to slide your tower in. So notice how this has a metal bracket and this metal or plastic tab to guide you. That will slide in on through, and then I go ahead and put the matching end cap back into the crossbar. Now we get to put this on our roof. And this is why it's important that our crossbar are stowed so that our new crossbar can fit right on over. With this loose, the hook should fit right over your Subaru bars. And then I carefully slide them forward. Now for our front bar here, there's a limit to how far it's gonna go, and that makes it a lot easier to just line it up appropriately, see how it fits right into that groove. Make sure that's gonna be the same on both sides when it comes to position with the vehicle. The next thing I make sure is the same on both sides is gonna be the length of bar. I don't want too much crossbar on the right when there's so little on the left, it doesn't look even that way. So I'm just gonna go back and forth with a tape measure, just to really make sure I'm on the same side, in the same spot on the car. That looks really good, so we're gonna go ahead and tighten this down. Now what I like to do is I like to go on both sides, tighten this down halfway, tighten the other down 75%, and then finish it off on this side. That way you're not pulling the whole system one way to the other. And whenever you use your Thule tool, it is a tort tool, so keep going until it clicks. (tool clicking) When you're done installing everything, I like to make sure that all four towers click again before I continue. You can then put the end caps on, so these end caps just click into place. You can then use a flathead screwdriver or the back of your keys to turn that plastic lock. That secures the end cap really well. That's how I have it on my car. But if you want to, you can replace those plastic locks with metal lock cores, and that way you can use a metal key to make sure they're all locked. We have sets here at etrailer, called the one key system sets. You can get a whole set, so it's all keyed alike. Great if you have other Thule accessories. Finally, I just give all the crossbars a good shake. And that's gonna be it for the installation. You can now load up your rooftop tent, your other cargo, your other gear on top of your crossbar, because you just installed your Thule extended crossbars on your factory-stowable bars of your 2020 Subaru Outback. If you have any questions, my name is Evangeline. You saw this right here etrailer.com.


Do you have a question about this Roof Rack?
Info for this part was:
At etrailer.com we provide the best information available about the products we sell. We take the quality of our information seriously so that you can get the right part the first time. Let us know if anything is missing or if you have any questions.


Thank you! Your comment has been submitted successfully. You should be able to view your question/comment here within a few days.
Error submitting comment. Please try again momentarily.