
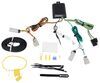
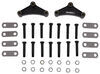
Pro Series Pilot Trailer Brake Controller w/ Custom Harness - Up to 3 Axles - Time Delayed


To see if this custom-fit item will work for you please tell us what vehicle you'll use it with.


Simple and rugged, this time-delay brake controller is able to install in any direction, even upside down. Includes a large digital display with a dark smoke lens that can be read even in direct sunlight. Activates brakes with a preset intensity.
Features:
Specs:
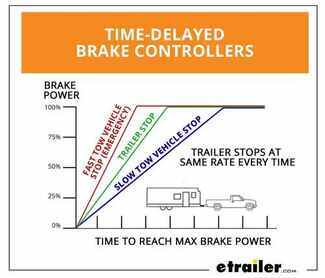
The Pro Series Pilot comes equipped with time-delayed braking. Every time you apply the brakes in your vehicle, a signal is sent - via the brake switch - to the Pilot. The controller then sends power out to your trailer brakes to activate them with an intensity set by you, at a rate determined by you. The amount of braking power (output) can be adjusted to suit your preference, the road conditions, the type of trailer, and the weight of your load. To determine which levels are best for your application, test your towing setup and choose what feels right.
Braking output is the maximum amount of power that will be applied to your trailer's brakes. How much braking output you need is determined by the weight of your trailer; a heavier trailer will need more power to bring it to a stop. You want to set the braking output as high as you can without locking up the brakes. Once you've set up the brake controller the first time, you shouldn't need to adjust the settings until the trailer load changes, you switch trailers, or road conditions change. Use the thumbwheel on the side to change the braking output level. The output setting will appear as a number on the digital display, with a higher number indicating higher braking power.
The Pro Series Pilot keeps the manual override within easy reach on the front of the module, great for stopping sway or controlling your trailer's momentum in emergencies. Push the slide-bar to activate the trailer's brakes and brake lights without you having to apply the brakes on your tow vehicle, perfect for limiting trailer movement while you're cruising.
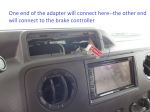
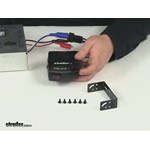
Because inertia plays no role in the functioning of this controller, you do not have to mount the unit at any particular angle. Your mounting options are limitless, so long as you can still easily access the controller and manual override. The Pilot is especially flexible; its microprocessor allows the controller to even be mounted upside down, and it will still give you a readable display. The Pilot can go wherever you need it. Plus, the included wiring adapter eases installation overall. The custom connector end plugs into the port on your vehicle and the other end plugs into the controller.
You can use etrailer's exclusive 7- and 4-way brake control installation kit (ETBC7 - sold separately) if you don't already have a 7-way plug at the back of your vehicle.

California residents: click here
Videos are provided as a guide only. Refer to manufacturer installation instructions and specs for complete information.
Today on our 2008 Ford F350 Chassis Cab, we'll be installing the Tekonsha Prodigy P2 Brake Controller, part number 90885, along with part number 3034-P, along with our Hopkins adapter 4 pole to 7 and 4 pole, part number 37185 mounted to the universal mounting bracket, part number 18136. Our first step, we'll be starting at the rear of the vehicle, attaching the mounting bracket. We'll be doing a custom install on this particular application. So we'll go ahead and take the mounting bracket and set it on the vehicle. Then we can take a paint marker, mark out the area around where we can attach the bracket to the vehicle and at this particular location it is the cross member. Then we'll go ahead and remove the bracket and pre-drill the holes into the cross member. Next, I'll go ahead and take a pair of vice grips and secure the bracket over the holes that we just drilled out. Now we'll be able to go ahead and pre-drill all the way through the bracket. Now that we finished our pre-drilled hole on the driver's side, we'll go ahead and repeat the same process on the passenger's side.
Now with our pre-drilled holes going through the bracket, we'll move over to our stationary object where we can drill larger holes through our pre-drilled holes through the bracket. This will allow us to take our self-tapping screws, go down through the bracket and into the cross member at our pre-drilled attachment points. Now with our bracket secured to the vehicle, we'll move over and attach the 7 pole bracket to the 7 pole using the hardware provided with our install kit. Note a quick tech tip, if you plan on wrapping up these wires with some electrical tape, I recommend to do it before you attach it to the vehicle. It can make it easier. Now we will not be using the purple wire coming from our 7 pole so we'll go ahead and cut it off short, and wrap it up inside the black electrical tape. The purple wire would connect your reverse trailer lights which will not be needed for this application. Now we're ready to go ahead and attach it to the vehicle. We'll use the hardware provided with the universal mounting bracket to secure the 7 pole bracket to our universal mounting bracket. Now with that done, we can go ahead and start connecting our wires.
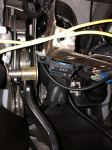
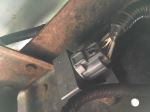
Here on the manufacturer side, we'll be using the red wire, which will be our hot lead, connected directly to the black wire from our 7 pole, and the blue wire which will be the brake control circuit coming from our brake controller to the blue wire on our 7 pole. We'll cut off the manufacturer ends, strip them back, then attach them to the yellow butt connectors already attached to our 7 pole wiring. Next, we'll take the 4 pole on the vehicle side and connect it with the 4 pole on our new 7 pole connector end. Quick tech tip, I recommend to put some Dielectric Grease in between these two connection points to help keep out corrosion. Now with all those connections made, I'll ahead and take some black electrical tape, wrap up our wires to help keep out dirt, dust, debris and moisture. We'll go ahead and use some black zip ties to secure our wiring. Next we'll take the white wire with the pre-attached ring terminal coming from our 7 pole and secure it to the frame or cross member of the vehicle. This will be the ground for our new 7-4 pole connector. Using a self-tapping screw, we can go ahead and attach the ring terminal directly to the cross member. Then we'll cut off the excess from the zip ties to clean up the install look. Next we'll move into the cab of the vehicle.
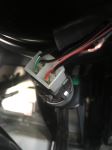
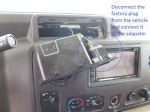
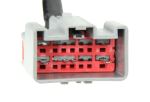
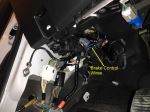
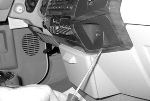
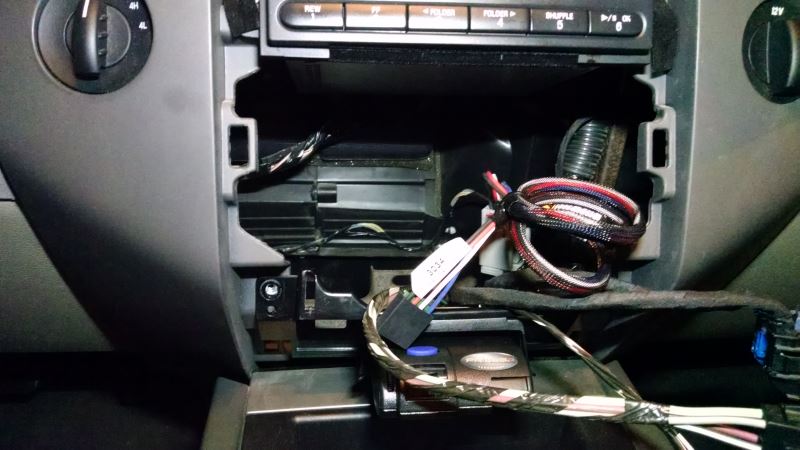
We'll need to locate the manufacturer's brake control plug. For this application, it's located behind the coin holder so we'll need to pop the panel loose holding auxiliary switches, then pop free the coin holder panel. As you can see just behind the coin holder is the grey electrical plug. Pressing on the locking tab, we can remove it from the coin holder. This will allow us to take our direct-fit brake control plug and plug into the manufacturer's wiring.
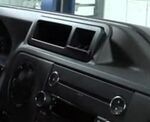
Take the opposite end, which will plug into the back of our brake controller and feed it behind the dash panel underneath where we can gain access to it. Now we'll go ahead and reinstall the interior trim panels. Next we'll take the brake controller pocket holder and secure it to the dash using the screws provided with their install kit. Now we'll take the brake control plug-in, feed it through the pocket holder and make the connection with the brake controller. As you can see, it'll power up the brake controller. Now go ahead and drop the brake controller into the pocket and secure it. Next we'll take a couple of black zip ties and secure the excess wiring up underneath the dash. We'll cut off the excess from our zip ties and this will complete the install of our Prodigy P2 brake controller with direct fit plug, part number 90885, along with part number 3034-P in conjunction with the new 7 and 4 pole connector, part number 37185 and our universal mounting bracket, part number 18136 on our 2008 Ford F350 Cab and Chassis. .
Easy to install
good value but the swivel mount being optional should be made more clear
Product was shipped very fast and arrived well before expected time. Good Service, good products....great experience.
i had to re-pin the truck side plug, etrailer support was prompt and right on the money. ok product, great vendor support.
Outstanding customer service!!! The quickest online shipment I have ever received without having to pay for express shipping. I would recommend etrailer over any other website. The cables plugged directly into the factory harness as suggested to etrailer.
Ordered a #90195 Tekonsha P-3 Trailer Brake Controller and the 3034-P Tekonsha Plug-In Wiring Adapter for my 2009 Georgetown F550 chassis. Excellent shipping time!!! I was desperate to get it before the weekend and it all arrived a day earlier than anticipated ! Also, eTrailer honored their Price Pledge when I saw the same items for a few $ less on another site.
Great customer service ! thanks !
Perfect fit for our Minnie Winnie (on the 2016 Ford E450 chassis). The cable is a perfect fit, and the installation electrically is a breeze. Where to mechanically mount our controller is another story. Taking out the accessory plate was also a slight challenge, the existing battery boost switch is a bit large. The switch wants to stay in the dash as the switch cutout on the dash is a bit too small, it holds the assembly in place loosely on the dash. It requires a bit of moving the trim plate, and the metal backing plate behind it back and forth, up and down to break the switch mounting tabs free from the dash after removing the two trim screws. Once the trim plate has been removed, the factory controller cable is in plain view and is the 3034-P snaps right on.
Since my controller travels between the Minnie and another vehicle, I didn't want to do a permanent installation, thus there is no clean final installation picture shown. There is room for a controller to the right of the existing switch (if I were to make a rectangular cutout in the trim plate, but I may end up just using a Velcro attachment of the controller bracket to the top of the dash. Under dash mount is not an option as you couldn't see the controller or easily reach its controls.

Perfect fit for my 2018 ford e450 jayco motorhome
Etrailers was extemely helpful in helping navigate what trailer brake controller i needed. They pick up the phone when you call and shipped within hours of the order. Got it just a couple of days later. The part was $40 cheaper than on (another site) too.
Wiring harness was great! 0nline vs paper instructions were off as to location where to plug wiring harness into - paper was better.
My factory 2011 F350 integrated brake controller want recognizing any of our trailers, after cleaning and greasing connectors and chasing wires. I just installed the Tekonsha P3 with Ford factory harness. It took all of ten minutes as I already knew where I wanted it placed. I plugged the trailer and was instantly recognized. Super quick and easy. I mounted it on the drop down cup holder; easy to see and use the controller and it doesn’t interfere with the cup holders when in use.
I purchased this harness for a 2012 Forest River Sunseeker Class C RV.
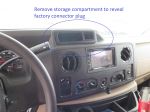
It has a 2011 Ford E450 Van front. I did some research on etrailer about possible locations of the factory brake controller wiring, and found out exactly where it was.
(Behind the coin holder in the dash).
The hardest part of the whole install was freeing the factory harness from the harness tie down behind the coin holder.
Installed a Prodigy P2 brake controller, hooked up the 3034-P harness, and boom!
Everything works great.
PlugNPlay Mini Winnie on an E250 chassis. Easier installation if you ignore all the usual instructions messing with the upper dash panel and just pull back the engine cover. Reach up there, pull the connector down, and you're good to go.
Great brake controller! I installed this unit in my 2016 Ford F250 4x4 in just over 30 minutes. Of course, I spent a little time (about an hour or so) in advance on the etrailer website researching how to install this controller. After watching a few videos and reading a few detailed reviews I was ready to go. I did order a plastic trim removal tool set on [site] prior to this installation. ** NOTE to etrailer: Think about offering a set of trim removal tools for sale to your customers - very important!**. I figured the $25.00 spent on the trim removal tool set would ensure no damage to the interior of my new truck and I was right. This is my second or third brake controller purchased from etrailer. Fast shipping and great products! Thank you!!
Controller and wirering harness arrived in one night. Installed easy and clean in an hour and worked properly ever since. True plug and play with my 2013 E-350 xlt van. Harness plugs into the cable secured on the back of the coin cup.
E trailer is an awesome organization. I couldn’t find this part, gave them a call and they sorted me in about 3 minutes. This product worked right away and has not wavered once.
Awesome products
This is as.good as it gets! I did not have a factory 7 point plug. When this is the case, run two wires and splice them in at the break controller plug.This item made my job much easier! If you have a seven pin factory hitch all you need to do is plug it in.
Good Quality but two wire positions needed to be changed on 2025 E-450
Great deal
Very happy!
Location of connection for 2013 expedition is behind dash trim beneath radio,
This is a replacement for the one I ordered incorrectly. Customer service was great, but I had to pay shipping costs. I recommend you get active help when ordering these items so you get it right the first time. Plug and play worked great when installed.
Fit perfect, the instructions from etrailer are spot on. Combined with the Tekonsha p3 brake controller. Really good set up. Can be difficult to find info on 2017 Ford E450 based motorhomes, but as I said, etrailer knew all about it.

Do you have a question about this Trailer Brake Controller?
Info for this part was:
At etrailer we provide the best information available about the products we sell. We take the quality of our information seriously so that you can get the right part the first time. Let us know if anything is missing or if you have any questions.


Thank you! Your comment has been submitted successfully. You should be able to view your question/comment here within a few days.
Error submitting comment. Please try again momentarily.