

 Arrives before Christmas
 To see if this custom-fit item will work for you please tell us what vehicle you'll use it with.


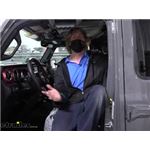
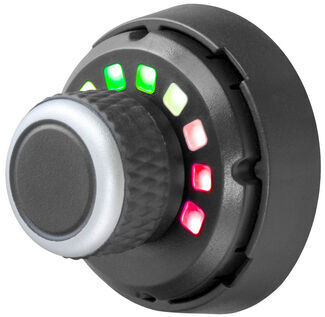
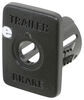
You can stick the control knob to the dashboard, plug in the module, and your brake controller installation is done with no drilling and no hardwiring. The knob is large and easy to use, while the main unit is out of sight behind the dash.
Features:
Specs:
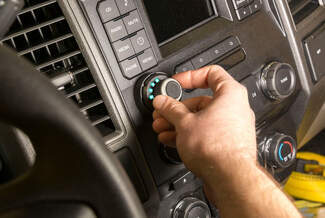
The Spectrum puts control of your trailer's brakes at your fingertips and, with bright LED indicators, you know what your brake controller is doing at a glance.
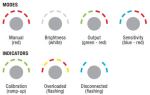
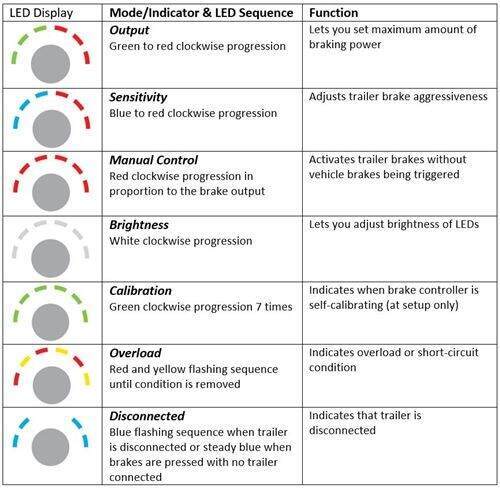
You can adjust all of your settings using the control knob. To switch between modes, press the control button in the center of the knob. Each mode has its own distinct LED display with several different colors and patterns to eliminate any guesswork as you cycle through.
Output: Braking output is the maximum amount of power that will be applied to your trailer's brakes. How much braking output you need is determined by the weight of your trailer; a heavier trailer will need more power to bring it to a stop. You want to go as high as you can without the trailer brakes locking up.
Sensitivity: This controls the aggressiveness of your trailer's braking, meaning how quickly the brakes reach the set output level. This is a great adjustment to make when you're towing a heavy load and the trailer will need more umph to bring it to a stop so it doesn't push your vehicle forward. If your vehicle takes too long to come to a stop, increase the setting. If it stops too abruptly, lower the setting. You may also need to adjust the sensitivity based on your own preferences, or when the trailer load or road conditions change.
Manual Override: The manual override activates just the brakes of your trailer, great for stopping sway or controlling its momentum in an emergency. To engage the manual override, press and hold the button on the control knob.
The Curt Spectrum comes in 2 pieces: the main unit and the control knob. Because the only part that you need to be able to access is the control knob, the main unit can be mounted out of sight and out of the way. You don't have to worry about banging your knee on a bulky brake controller or interfering with your vehicle's lower airbags.
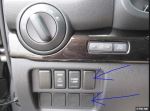
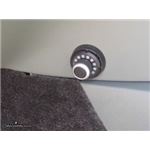
The dash-mounted control knob can be installed in any convenient spot that's easy for you to see and reach. This can be a blank switch panel, an open spot on your center console, or wherever there's space on your dashboard. The knob sits flush against the dash, so you don't have to worry about finding enough clearance behind the dash. You can use either the included screw to mount the knob, or the adhesive pad for a drill-free installation.
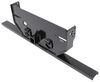
Once you've decided where you want to put the control knob, you'll need to find a good place to install the main unit. Your only restriction is the 4' plug-in cable that has to be able to reach between the main unit and the control knob. Thanks to the 3-axis accelerometer, the main unit can be positioned at any angle or position. No matter how you install it, the unit will sense the direction of travel and its orientation.
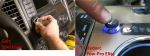
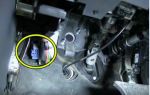
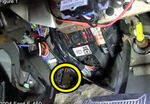
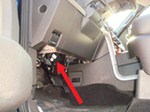
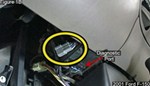
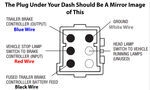
The included custom-fit adapter plugs into the port on your vehicle's built-in brake control wiring harness, which you should find beneath your dash, near the center console. Once you're plugged into your factory port, just plug the other end of the adapter into the main unit. No hardwiring needed!
Note: If you don't already have a 7-way plug at the back of your vehicle, take a look at our exclusive 7- and 4-way brake controller installation kit (ETBC7 - sold separately).
Proportional braking means that your trailer brakes mimic your tow vehicle's brakes. If you slam on the brakes in your vehicle, your trailer brakes will activate with the same intensity; if you brake lightly, your trailer brakes lightly too. The trailer's braking is in proportion to your vehicle's braking. This saves wear and tear on the tires and the brakes on both your vehicle and trailer.
The Spectrum uses an internal 3-axis accelerometer to sense how your vehicle is braking so it can send the right amount of braking power to your trailer. It measures the inertia of your tow vehicle and activates the trailer's brakes to ensure that your trailer slows at the same rate. The result is uniform braking across your towing setup. No push-pull action - just smooth, proportional braking every time.
 Alternate Instructions
California residents: click here
Videos are provided as a guide only. Refer to manufacturer installation instructions and specs for complete information.
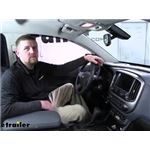
Ryan: How's it going Ryan here at etrailer.com. Today on our 2020 Chevrolet Colorado, we're going to be taking a look at and showing you how to install the Curt Spectrum Trailer Brake Controller. The main thing that really separates this brake controller from many of the traditional style brake controllers like this is a couple of things. One, it's going to be really small and two, you're going to be able to pretty much mount this anywhere that you want and on a lot of today's newer modern vehicles, that dash space is really limited and can be really challenging to find a good spot to mount a brake controller like this that's out of the way, but yet still easy to use.There are other brake controllers that are similar in the design of this one and most of our customers specifically compare this one to the Redarc. I personally like this one a little bit better than the Redarc and that's because behind our knob here, there's going to be nothing behind it as compared to the Redarc, behind the knob, there's going to be a connector that comes out quite a ways. So, you're still somewhat limited on where you can mount that Redarc because you're going to have to have room behind the panel for that connector to fit.
And if you choose not to, this one doesn't require any drilling or anything like that. In our case, where we mounted it, we did drill one small hole to run our wire through. But if we chose to mount this a little further down or if you want to see a wire coming, all you'd have to do is stick this to the dash.Another thing that makes this really easy to use is the fact that it has automatic leveling, so what that means as soon as you plug into a trailer, this is going to automatically calibrate. You're not going to have to scroll through settings or go through the menu and select which trailer that you want. It's just going to do it for you.
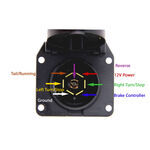
The brake controller is going to work with trailers for up to one to four axles and it's also going to be proportional. What proportional means is the trailer brakes are going to apply at the same rate as how hard you apply the brakes inside the truck. That's just going to provide us with a smooth and predictable stop.The knob is going to have multiple modes as well as indicators that'll let us make some changes and let us know what's going on. For example, whenever you hook up to your trailer, it'll flash green letting us know that the connection has been made. Once it's done flashing green, that also lets us know that it's been calibrated.
Then whenever we disconnect from our trailer, it'll flash blue letting us know that we're unplugged. We're also going to have a few different settings. If we turn our knob, you'll see the LEDs go green to orange to red, and that's going to be the output control. And what that does is determine the maximum amount of power that's going to be available to the trailer brakes whenever we're braking. If you push the button down and hold it, that's going to be the manual override.
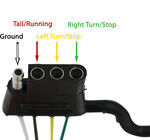
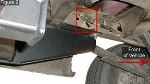
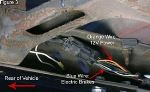
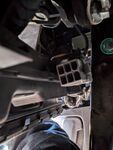
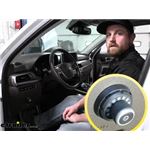
So, if you want to apply the trailer brakes manually, say in the event of a sway situation, you'd simply hold that down.That can be adjusted by holding it down and turning the knob and that'll control how hard the brakes will be applied. If you push the button again, we will get some blue lights that turn to purple and then red. That's going to be able to control the sensitivity and that's going to adjust how aggressive the trailer brakes are applied. If you push it again, it'll then be white. What that's going to do is to allow you to adjust the brightness. Here it's on full power, you'd probably use this setting whenever it's sunny outside that way you can see a little bit better, and then at nighttime you could always turn it down if that light's bothering you.So overall, a really simple, easy-to-use brake controller. It allows us just to hook up to our trailer and more or less be ready to hit the road since it automatically adjusts, but it's still going to give you that capability to fine tune it a little bit if you want to. And since it is so compact, it's going to help keep that nice, clean, factory look inside of our truck. We're not going to have to worry about the traditional style one that's big and bulky, taking up space, banging our knee on it. As far as the installation goes, it's just going to be a handful of wires that we have to hook up and it's really straightforward. You should have no problem doing it at home in the driveway or even your garage. Speaking of which, let's go ahead and put this on together now.Let's begin our installation. We're going to need to first locate our factory brake controller wiring. We're over here on the driver's side, in the front seat, and the brake controller wiring should be right here in this location, underneath this little threshold. We'll go ahead and pop that off and to do that what you can do is grab the end of it here and just pull it up. Just work it up and it'll pop off and we can just set it off to the side. If we follow some wiring up right here. With that panel out of the way, now we can see our factory brake controller wires. They're going to be just right here by our emergency brake pedal. There's going to be four of them. They're going to have some heat shrink on the end. They're also going to be taped to this thicker wiring harness. What I'm going to do is just cut that tape off.We're able to pull the wires further out to give us a little more room to work. Something I do just want to point out, if your truck doesn't have these factory brake controller wires, you are going to need to pick up an ETBC7 to get your install completed. However, chances are pretty good yours will have these as most of them on the road, at least in my experience, do. I went ahead and tested our wires here to make sure we know how each one functions. The black wire, that's going to be the ground. The red wire, it's going to have a little green stripe on it, that's actually going to be our 12 volt power. The blue wire, that's going to be the output, the brake controller. And then the white wire that has a thin blue stripe on it, that's going to be our brake signal. Now what we can do is cut this heat shrink off and get these prepared, that way we're able to hook up our adapter. I'm just going to trim off that heat shrink with a pair of snips.Then we can come back with a pair of wire strippers to strip off some of this insulation to expose the wiring underneath. Now what I'm going to do is take some heat shrink butt connectors, which you can find here at etrailer.com, and I'm going to crimp one of these on each end of our wire here. Twist them, slide that butt connector on, and crimp it down. I'm going to repeat that same process for the three remaining wires. Now what we're going to do is take our wiring adapter for Curt brake controllers and get these wires hooked up to the factory ones. You might think, naturally, that you would just hook these up color for color, but that's actually not the case. So, we'll run through which color goes to which wire right now.We will start with the blue one from our Curt adapter. That's going to go to the factory blue one, so those will actually match up. We'll grab the white one from our Curt adapter and that's going to connect to the factory black wire, so those two will go together. Then grab the black wire from our Curt connector and that's going to get connected to the factory red wire. And then we'll grab the red wire from our Curt adapter and that's going to get connected to the factory white and blue wire. These are going to get connected the same way that we put these butt connectors on. We'll just slide the wire in and crimp it down. I'll do that same thing to get our remaining wires all hooked up. Here's what our wiring is going to look like once we have it connected. Since I used heat shrink butt connectors, what I'm going to do is come in with a heat gun and shrink those ends.At this point, we need to figure out where we want to mount our knob. You want this out of the way, yet easy to see and easy to get to. A spot that I think is good is right here to the right of the steering wheel, on this panel. I'm thinking somewhere in this location. We are going to have to drill a small hole, that way we're able to run our wire through the dash and get it all connected. But before I just start drilling, it's a good idea to see what's behind this panel that way we don't accidentally drill into something of importance, so I'm going to lower this panel down to check that and on the bottom edge there's going to be two 7mm screws that's holding it in place. Once you have the screws out, what you can do is grab that panel and work it out.With it pulled back, there's nothing on the backside of the panel and there's really nothing in the way here that we have to worry about. There's also going to be a gap here that I think would work pretty good to run our wires through. I went ahead and marked the spot where we need to drill out a small hole, so I'm using a bit just a little bit bigger than the wire, that way we won't have any problem getting it pushed through. Once our hole is drilled, since we're using the adhesive to connect our knob to the dash, it's a good idea to really make sure this is nice and clean, that way it'll stick really well. I'm just going to use a little bit of rubbing alcohol to get that area really clean and nice and dry. Now we can take the wires here at the end of our control knob, we're going to feed those through the hole that we drilled.What I'm going to do before we actually mount our knob, is run these wires down by our brake controller adapter harness, down along through the dash here, and I'll do that and show you the path that I took to get there. Here's how I ran the wire. It comes out of the back of the knob and through this little opening here behind our panel and if you push it through there, that'll actually allow it to start to drop down here underneath the dashboard. Here's where our wiring comes down underneath the dash and I ran it along, ending right here where it'll be nice and easy to get everything hooked up. For the time being, we're not going to worry about completely securing our knob just yet, what we're going to focus on doing now is hooking up these wire ends to our plug connector. The way you're going to do this is take the wire and simply push them into those corresponding slots to get them all hooked up.The one that we're going to do first is this white wire and that's going to go into slot two, so more or less we're not going to be using the very end slots on each side. We'll take the white wire and push it all the way in and then just lightly pull back on it to make sure it's completely seated. There's going to be a little bit of movement, but that's not really a big deal. The next one after the white wire will be the green wire. Again, these are all going to work the same way. They are a little small, so you have to finesse it a little bit, get that plugged in. Now moving on from the green wire in that same direction that we're going, we're then going to plug in the brown wire. After that, the blue wire. Following that, will be the black wire and after the black one we'll plug in that red wire.This is what the wires are going to look like once they're all plugged into our connector and once we have them all plugged in, we can just flip it over and take this cap and close it down like that. Now we're going to grab our main module here and get this plugged in, that way we can figure out a spot to mount it. One end of it will simply plug into our wiring adapter. The other end we'll plug in our wiring that comes from our knob. At this point, you can look underneath the dash or somewhere out of the way that we're able to secure our module box. Here's where I mounted our module box and I did that using the included two-sided tape as well as a zip tie. From there, I just took all of our extra wiring that we had and tucked it off to the side and secured it to help clean up our install look. At this point, we can go ahead and resecure our dash panel and then we can go ahead and put back in place our threshold here.The weather stripping is supposed to go over the threshold, so you might have to work it up with your fingers. At this point, we can secure our knob to the dashboard, so we'll take the included two-sided sticky tape, pull one side back, put it in the center there, make sure it's pushed down, peel that other side off, and simply we'll just line it up how we want it, nice and straight, then push down to get it stuck to the dashboard.With everything hooked up, it's a good idea to test it to make sure it's working properly. You could either just hook up to your trailer or use a tester box like we have here today. Once you do plug it into your trailer, what you should see is some green lights that ramp up, and that'll indicate to us that the brake controller is calibrating itself to your trailer. Just to verify that this is sending a brake signal back to our trailer, what I'll do is manually override it and apply the brakes. To do that, we'll simply just push down and hold the center button. You can see it lighting up. We now have power to our brakes. That'll finish up our look at and our installation of the Curt Spectrum Trailer Brake Controller on our 2020 Chevrolet Colorado.


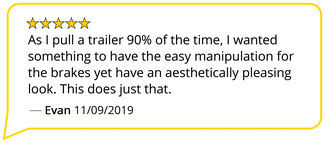
A wonderful customer experience. Worked with professionals who guided me in selecting the correct product. Thank You!


Do you have a question about this Trailer Brake Controller?
Info for this part was:
At etrailer.com we provide the best information available about the products we sell. We take the quality of our information seriously so that you can get the right part the first time. Let us know if anything is missing or if you have any questions.


Thank you! Your comment has been submitted successfully. You should be able to view your question/comment here within a few days.
Error submitting comment. Please try again momentarily.