
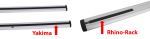
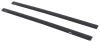
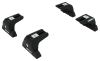
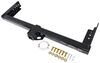
Yakima SkyLine Roof Rack for Fixed Mounting Points - CoreBar Crossbars - Steel - Black - Qty 2


To see if this custom-fit item will work for you please tell us what vehicle you'll use it with.


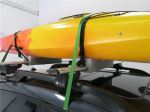
These crossbars combine the strength of steel with an aerodynamic shape to create a heavy-duty yet quiet roof rack for your vehicle. Full-length bars work with most clamp-on accessories. Install to fixed mounting points on your vehicle's roof.
Features:
Specs:
 Alternate Instructions
California residents: click here
Videos are provided as a guide only. Refer to manufacturer installation instructions and specs for complete information.
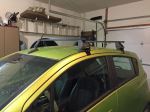
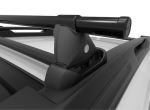
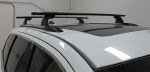
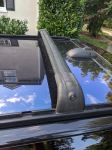
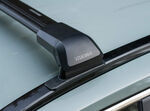
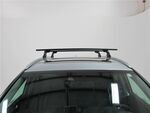
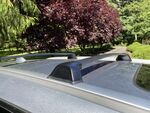
Hello neighbor, this is Curt at etrailer and today we're gonna be taking a look at the Yakima crossbar system using SkyLine towers and a CoreBar crossbar on this 2023 Jeep Grand Cherokee L. Now the Jeep Grand Cherokee L is a three-row vehicle. So if you're using that third row and you've got passengers loaded all over, it really does not leave any room for storage in the vehicle at all. In that case, one of your better options is to go with a roof rack system like this. Now this Yakima CoreBar system does not have a T-channel on the top like a lot of bars do. What it will allow you to do though is use the clamp-on accessories that are available on the market to work up here with this particular rack system.
Now while I'm up here, I also want you to notice here on the SkyLine tower, this portion right here can be replaced with replacement key cores. Yakima uses what they call SKS, or Same-key System. Now you can buy lock cores and keys that are all keyed alike. You can also get them keyed alike to a lot of the Yakima accessories that can go up on your roof rack as well. Now Yakima's CoreBar system, again, does not have a T-channel across the top.
These aero-style bars, which are great for wind resistant and noise reduction, compared to square or circle bars, are made of steel, as opposed to aluminum. So it gives them a capacity of 220 pounds. Now bear in mind you always wanna check your owner's manual, because your roof capacity may be different than the bars themselves. We are limited to whatever the lower capacity is. So if your roof capacity isn't 220 pounds, the bars can still be used, but you have to keep in mind that the roof dictates your minimum capacity.
Now while we're up here, I'd like to take a few measurements so that we can take care of what kind of clearances we might have, both between the bars, under, and total clearance above the car as well. So if you're concerned about low-clearance areas, these bars are going to give us a measurement off of the roof at about just a hair under 5 1/2 inches. So a decent amount there up on the top. Now anytime that you want to be concerned about that is if you're going into a low-clearance area like a garage. It's also something that you don't wanna run through a car wash.
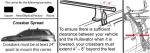
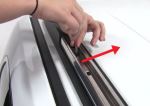
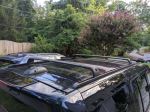
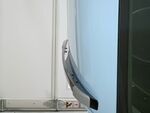
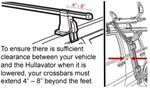
These would wanna be removed for that. So that's a little side note that you wanna keep in mind. So basically that's gonna add about 5 1/2 inches to the overall height of your car. So clearance under the bar, if you're concerned with a sunroof or moonroof working for you, is going to come to about 4 1/4 inches, maybe just under 4 1/2. So bear that in mind if you have any concerns about working with your sunroof or moonroof. One of the other concerns that we might have is the crossbar spread. A lot of rooftop accessories have a minimum and a maximum crossbar spread that you're allowed to use. So we're gonna go ahead and see if we can get these about as close to center to center as possible. And that measurement is gonna give us about 26, maybe 26 1/4 inches. And that's actually a great spread. Usually what we want is somewhere in between 24 and 30 inches. That's about where most rooftop accessories are limited to, as far as how far apart you can use the mounting points. But given all that, this is a great setup for this particular vehicle. It should work with a lot of different accessories, and really help you out with those storage issues when you have a full car with all the passengers inside. So this is an overhang crossbar system, and overhang has a lot of great advantages, one of which is that if you wanna fit more items up on the roof, you do have the option of mounting on the outside of the towers. In this particular case, we're gonna end up with about five inches of overhang on this. So that really gives us a good option to clamp something on outside of the tower if we wanna put something else side by side with it on the passenger side of the vehicle. Now one of the big disadvantages, well not really a disadvantage, but a concern that a lot of people have when they're using overhang bars is, am I in danger of hitting my head on it Well, in the case of these 50 inch bars that we have on this system, they really don't even go past the door threshold. So I wouldn't feel in any danger at all of hitting my head on anything up there, much less the bars themselves, as I'm getting in and out of the vehicle. Now that we've gotten all that, and talked about all that, why don't we take a look at exactly how we got these mounted on the roof. So now that we're up here on the roof of the vehicle, we're gonna have to go ahead and prep these rails. We have already installed the front bar, but you may wanna take a look on the '23 Grand Cherokee L. You actually have three sets of mounting points up here. If you're gonna do a roof rack like we're doing today, we would suggest the front two mounting points. That way you get the proper crossbar spread, and loading and unloading it is gonna be a bit easier since the door, the rear door on this vehicle, is much closer to this area right here. So to get that ready, what we're gonna do is take a simple flathead, if you don't have a trim tool, and we're gonna go ahead and lift under and pop these little plugs out to expose the bolt holes that are gonna allow us to mount our landing pads. Now that we've got that done, we'll grab our landing pads and mount them up here on the rail. Okay, so we brought our landing pad up along with the bolt and washer to mount it, and the Allen key that comes with the kit as well. So you're gonna notice that there are two holes up here in this slot. And what we've found is this front mounting point here, despite this interfering with it a little bit, actually still fits the best. So it's a bit of a tight fit, but being that this is a a rubber on the landing pad, you can actually kind of squeeze it in there and make it fit properly. So we're gonna go ahead and take our first bolt and washer, thread it through, and we're gonna put it through this mounting point right here. Once we get that in, we'll take our Allen key and we'll go ahead and tighten that down. So you see there's a few options as far as the front mounting hole that you can use. We played around with a little bit. And while you can use this front mounting hole, these tow hooks really do interfere with how it goes on. It's possible, because of the soft rubber back here, to really maneuver it. But honestly, mounting it through this hole here, you do have to press it down a bit to get that mounted right, but we're finding that this is the proper mounting hole for the back. In the front, however, the proper mounting hole does look like it will be the front hole here, and then of course the slotted hole, so that you can maneuver it back and forth a little bit if necessary to find it. But now that we've got the proper mounting holes in position, we're gonna go ahead and tighten this down, and then we'll get our crossbar prepped to put up here as well. Now we we inchesre mentioning how it could be a little bit tricky to get these mounted, and there will be times when you wanna perhaps drive the vehicle without the bars on them at all, whether it be for clearance, or any other issue similar to that, or running it through a car wash, because you really don't wanna do that with crossbars on your vehicle. The Yakima cat comes with these covers though, so you can leave these on after removing the bars, and protect them by just simply snapping these covers on, and they look really nice and clean on the car. And you're ready to hit the road without the bars, if necessary. So now that we've got our landing pads up, we're gonna go ahead and attach the SkyLine towers to the CoreBar, and I'm gonna show you exactly how that's done. Now because of the way these mounts are made, you could see that they're made in kind of a specific shape, we're gonna have to be very careful about which side of the vehicle these go on, and that's gonna reflect the direction of the bar. So being an aero-style bar, we do wanna make sure that the wider part of the bar is always facing the front of the vehicle. Therefore, I've got these set up so that we've got our passenger side here, again with the wider side in the front. And I'm gonna show you how to assemble the driver's side here before we put them on the bar itself. So it's really very simple. You'll find this bolt in the middle here, and you'll find in there we've got the head that we can use our torquing tool from Yakima to adjust. So what we'll wanna do is make sure that the opening here is facing the outside of the vehicle. We're gonna go ahead and attach it so that the wider side is forward by putting it down in that slot over the bolt, turning it over and tightening it down from there. Now I do advise we don't wanna tighten this down all the way just yet. Reason being is that the way that this is made, we wanna be able to have room up at the top. If we go down too far, we won't be able to have room to slide the bar through. So we wanna attach it so that it's secure, but leave enough height that the bar is actually going to slip through. So now that we have those together, we're gonna go ahead and take the end caps off of our bar. As such, we're gonna simply glide it in from there. And again, I left it looser, otherwise this would be very difficult to do. And once I have that over a bit, I'm gonna go ahead and repeat the process on the other side. So again, we're gonna take the end cap off of the CoreBar. We're gonna take our SkyLine tower with the attachment and feed the bar right through as such. Again, if you tighten this down too much on the offset, you will not be able to slide this on. We need that slack. Now that we have these on, let's go ahead and go up to the roof and show how we'll mount it from there. So now we're gonna go ahead and mount these up in the rear bar position. We already have the front bar mounted. And the way that we're going to attach these to the landing pads is through this piston mount right here. So as the SkyLine tower opens or closes, that piston is gonna move. In the closed position, it will engage and lock in. So we're gonna leave it in the open position so that we'll be able to mount it in the gaps on the landing pads above. So again, we put everything on, making sure that the wider part of the bar is in the front position, going toward the front of the vehicle. We're gonna reach over and just try to slip that right into place over there. Sometimes it might be easier to let it rest while we mount one side and go over and find the other. But it's gonna slip right in between those gaps, just like so. Now we're gonna go ahead and leave this here. We're gonna do the same adjustment to the other side, make sure they're both mounted up and in position. So once we've got everything in the proper slots, we're able to maneuver the bar back and forth a little bit, 'cause we left it a little bit loose, back and forth a little bit until we measure an equal amount of overhang on either side. Once we get to that point, like we have here, inside the tower, we're gonna take our Yakima torque tool and we're gonna go ahead and tighten this down so that it all locks into place nice and snug. And being a torquing tool, once we get it tight enough, we are gonna hear a pretty audible pop once we get it to the correct torque. So once we have everything mounted, tightened down, evened out, it's always a good idea to grab it and give it a good shake test. Make sure you don't have any slack or play anywhere, such as the case now. We've got everything locked down nice and tight. So we're ready to put our accessories up on the roof and embark on our next adventure. So the Yakima CoreBar system for the 2023 Jeep Grand Cherokee L is actually, I think, a wonderful system to use with it. The 50-inch bars give us plenty of space to put a lot up here, along with a high weight capacity for those longer trips when you have a vehicle full of passengers, or you wanna transport something that you really don't feel like traveling in the vehicle with. So with that said, I would think that this system would be an A+ system for this vehicle. Once again, I am Curt at etrailer. Thanks for stopping by.
Ratings & Reviews


Do you have a question about this Roof Rack?
Info for this part was:
At etrailer we provide the best information available about the products we sell. We take the quality of our information seriously so that you can get the right part the first time. Let us know if anything is missing or if you have any questions.


Thank you! Your comment has been submitted successfully. You should be able to view your question/comment here within a few days.
Error submitting comment. Please try again momentarily.