
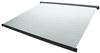
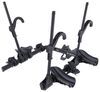
Inno Aero Roof Rack for Flush Rails - Aluminum - Black - Qty 2


To see if this custom-fit item will work for you please tell us what vehicle you'll use it with.
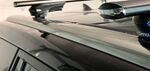
This sleek, aerodynamic roof rack provides space to carry gear on your vehicle. Crossbars with push-down rubber strips in top channels work with channel-mount and clamp-on accessories. Installs to flush rails on your vehicle's roof.
Features:
Specs:
 Alternate Instructions
Videos are provided as a guide only. Refer to manufacturer installation instructions and specs for complete information.
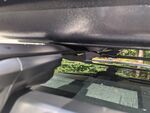
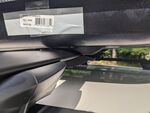
Hi, I'm Danny with etrailer, and today we're gonna take a look at, and I'm gonna show you how to install the Inno Aero Roof Rack on our 2024 Audi Q5. If you're somebody who's gonna want to utilize the top of your Audi with maybe a cargo box or a kayak rack, then getting these Inno racks is going to be a great idea. This roof rack system has a nice, low, sleek design, and Inno actually has a 48-inch bar and a 51-inch bar to perfectly match the contour of your roof. Speaking about looks, as you can see, with this fit kit, it wraps perfectly around the existing rails on your Q5, and there's no really gapping here, which is really nice. Now, another thing is, it's got this end cap here you can take out easily by pushing up on the tab, and it's got this weather stripping to reduce noise, and for it to not get rain inside here. And you can actually just push this down when you put your T-slot in there for when you put your accessories in.
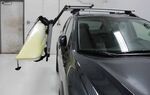
Inno also included a locking core for the cover on these towers, and they're super easy to take on and off, you just get the key included, and take 'em off for when you need to remove your rack. Now looking at these overhangs, I'll give you the measurement here. This front one is about two inches, and the back one is about an inch and three quarters. (tape measurer swishing) So that may not be enough for clamp-on accessories for the outside of these rails. And speaking of clamp-on accessories, from the top of your vehicle to the bottom of your rail here is gonna be about two inches, so that should be enough for most clamp-on accessories in the middle of these bars.
But these do sit pretty low, so you won't be able to use your moon roof, but most of the time you're not gonna want to, because it's gonna be a little bit noisy, especially if your accessory's up here as well. I'll go ahead and get you one more measurement you may need to know. So, from the top of your existing rail here to the top of the rack is just under three inches. So that's gonna be important to know if you know your height of your accessory, and you wanna make sure that when you pull into a garage you're not gonna hit anything. The total weight capacity of this rack system is going to be 165 pounds.
Now, do make sure you check your owner's manual and make sure your roof can handle that much weight. I personally really like how these Inno racks look on the Audi. And if you decide to get them for your Audi, please let us know what you're using 'em for, and how you like them, and review or comment. But without further ado, let's get into the install. So we went ahead and installed the rear rail, and now I'll go ahead and show you how we're gonna install the front rail.
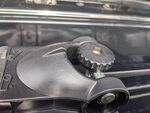
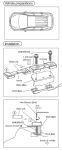
So first off, you're gonna wanna grab your keys that come in the kit, and you're gonna unlock the cover that's on the foot. And now, on the rail, you're actually gonna wanna push back on the slider. There's gonna be a square button, push it all the way in. And in this opening is where you're gonna put the foot in. So you're gonna pull up on this latch, put that in that opening, (foot clacking) and slide it forward. Next, you're gonna get the rubber from your fit kit, and you're gonna put this in place. Making sure it's seated properly. And once you get this in place, you're gonna want to grab the two brackets that come in your fit kit, one's going to have a barrel nut on it. And this could be a little bit askew, so you're gonna want to align that properly so it's aligned with the hole. You're gonna make sure the pad is facing in. And we're gonna put that on the inside here. And then this one is gonna be on the outside. Now we're gonna grab our bolt, put it through that hole, and we're gonna screw this into that barrel nut. Now we're just about ready to put this on the roof. Do keep in mind that the rails in this kit are two different sizes, so it will be in the instructions, but we have the longer rail in the front of the vehicle and the shorter one in the back. So now that we've got both the feet on, I'm gonna actually lift up on this latch, this will allow me to move it back and forth, so I'm gonna lift it up on both sides, just so when I get it up there, it's easier to get into place. Now I'm gonna go ahead and put this on loosely here. Like I said, I can use this to slide it where I need it. Now I got this square to the vehicle and where I want it. I'm gonna go ahead and measure from the tower to the end of our rail. So on this side, got about three. So I'm gonna go to the other side and make sure this is centered between the two towers. So once you have this in a spot you like it, you can go ahead and tighten this down. So it does come with this tool in the kit. It's an allen key, and you can tighten this down. Now you don't want to tighten down one side fully, you're gonna want to go back and forth and tighten 'em down evenly. Now the reason being is if you tighten one side fully, it could actually move your rail to one side or the other, so this will keep it centered. And once you get 'em good and tight, this device will actually make a clicking noise, and then you know it is torqued down properly. (device clicking loudly) Once you get everything tightened down, you can go ahead and put your end caps back on and get 'em locked down. All right, now you're good to go, and you're ready to put your accessory on the roof of your vehicle and hit the road.


Do you have a question about this Roof Rack?
Info for this part was:
At etrailer we provide the best information available about the products we sell. We take the quality of our information seriously so that you can get the right part the first time. Let us know if anything is missing or if you have any questions.


Thank you! Your comment has been submitted successfully. You should be able to view your question/comment here within a few days.
Error submitting comment. Please try again momentarily.