
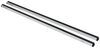
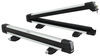
Inno Aero Flush Roof Rack for Naked Roofs - Aluminum - Black - Qty 2


To see if this custom-fit item will work for you please tell us what vehicle you'll use it with.
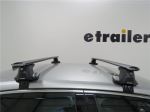
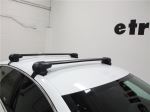
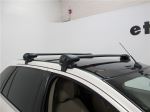
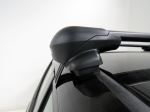
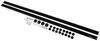
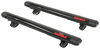
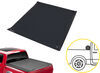
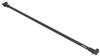
This aerodynamic roof rack mounts flush on your roof for a factory look. Crossbars with push-down rubber strips in top channels work with channel-mount and clamp-on accessories. Installs on your vehicle's naked roof.
Features:
Specs:

Videos are provided as a guide only. Refer to manufacturer installation instructions and specs for complete information.
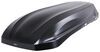
Hello neighbor, this is Curt with Etrailer and today, we're gonna take a look at the Inno aero roof rack on our 2025 Ford Maverick. Now if you've had any experience with this roof rack or if you watch this video and you have some questions about it, go ahead and leave those in the comments below. We'd love to take those experience and questions and use them to help our other neighbors, make the best decision possible. Now, there are gonna be times when you're planning your next adventure in your Maverick and you're gonna come across, perhaps you don't really have the space in your truck bed in the back of the vehicle for you to store some of that extra gear that you're taking with you. In that case, a roof rack is going to be a good friend. You're gonna be able to put up here, maybe some bikes that you want to get outta the way that you don't wanna put in the bed or on a hitch receiver, perhaps a cargo box.
Perhaps you're taking a kayak somewhere. These are all good options to use on a roof rack. Now as far as weight capacity, you are gonna want to double check your owner's manual. Between the rack weight capacity and your owner's manual roof capacity, you're gonna have to go with the lower number. So if you're planning on carrying, you know, heavier loads, my suggestion would be rather than a roof rack to take a look at a bed ladder rack.
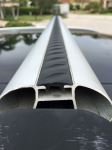
Now this is a flush roof rack, which means that the crossbars come to a dead end. They don't overhang. And that is good in a lot of cases because, you know, people tend to have an issue with clearance getting in and out, maybe worrying about bumping their head on something. With this, you don't have to do it. It actually dead ends right at the door.
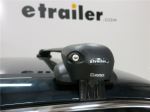
Seems either you're not in any kind of danger of that, you're gonna be able to mount things on these crossbars either with a clamp system or there is a weather strip up the top that's gonna allow you to use T track accessories. That's gonna be accessed right here through the tower. All you would need to do is push this track down and slide your accessories across. Now as far as how your roof rack is going to fit on your Maverick, let's take our measuring tape and have a look. Now the front bar there is just a little bit shorter because of the contour of the roof.
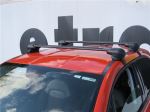
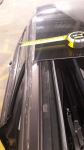
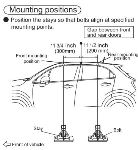
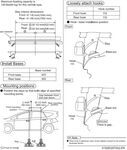
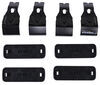
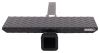
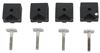
It's just a little bit shorter than our back bar. It's going to give us 42 inches of usable bar space for clamp accessories, and just under 46 inches of track space for any of our T track accessories. So bear that in mind when you're looking at different accessories and considering what you're gonna be carrying on your roof. The other important measurement to know is what is our crossbar spread, meaning from the center of the front bar to the center of the back bar, where are we at And we are right at the 28 inch mark, and that's a good place to be. Most roof rack accessories require a spread of somewhere between 26 and 32 inches. So a 28 inch spread is one that's gonna accommodate most rooftop accessories. The other thing we're gonna want to talk about is basically height. How much height is this going to add to your vehicle It's gonna give you an extra three inches above the vehicle, and that actually makes this a very low profile type of bar. A lot of bars actually come up to the four, maybe four and a quarter inch mark, so these do sit pretty low for you. However, the downside of that is what kind of clearance do we have underneath And underneath, we've got about one in three quarter inches. So just bear that in mind. That shouldn't give you a problem with any of the clamp on accessories that you might want to put up here, but it is something to be conscious of. The one obstacle that we have on our roof that might give us some trouble depending on what we want to put up here is going to be this antenna back here. The antenna, the body of it is actually just about as tall as the top of the crossbars, so bear that in mind when you're putting things up here. This is gonna come almost flush with the top of your bars. One upside though is that you can actually unscrew and remove the extension to the antenna, meaning that a lot of roof boxes are still gonna be able to be used up here. And that's important to know because with a flush mounted crossbar like this, you are gonna be kind of forced to mount your accessories toward the middle. So that is something to keep in mind, this antenna right here. Now, one of the biggest things that I like about Inno is all of the added value that you get with it. One of the biggest things is that you will get lockable towers. They'll all come with a metal key core, you'll get a set of keys to unlock all of 'em. And remember, this is gonna be how we get into our track, so it's gonna keep your accessories safe as well. The reason that's big is 'cause other manufacturers make you purchase your own, separate key cores and keys, and that just adds to the expense. Having it all come with it out of the box, I think is an enormous value from Inno. The other great thing about Inno is, they're consistently easy installs. No matter what kind of roof you have, if Inno has a kit for it, they go up pretty easily compared to other manufacturers. And with that in mind, why don't you stick around and we'll show you exactly how we got this roof rack on our Maverick. Now, as we begin our installation process, we've kind of got everything laid out here that we need. Keep in mind that with the bar, the wider part of the bar is gonna be facing the front of the vehicle. And with that in mind, our towers are going to be side specific. They're gonna be indicated by an R, or by an L, R meaning the passenger side. So with the way that we have this laid out, we're gonna go ahead and turn this over. We've already got our left hand or our driver's side on. We're gonna go ahead and get our passenger side on right now. Now to prep the bar, the first thing we'll do is come right over here. We've got this open area here. We're gonna slide that over all the way out to the end so that this tray is exposed. Once that's out, we're gonna be taking this piece here, we're gonna insert it into the end there, and slide it in all the way back into place. And to do that, we'll push this tab down and slide it all the way in. Now if you notice here, we'll have an open tab area here. We've got a hole for a bolt here. We've got another tab right here. And what those are gonna line up with on our tower is, this tab here is gonna go into this slot and then the bolt hole and this tab are gonna line up here and here. So we'll start by putting it in at a little bit of an angle and getting that bigger tab that's closest to the middle. Once we get that locked in, we're gonna go ahead and slide it all the way to the end here until we can lay our tower flat. And once that is done, we've got the bolt hole lined up. We're gonna take our Allen tool here. We're gonna go ahead and tighten that down just until we get a little bit of resistance because we still wanna be able to maneuver this, but we also don't want it going everywhere because we're gonna be taking some measurements. So that's got it nice and snug in there. We're still able to move it back and forth to get our measurements. So the next thing we're gonna do is go ahead and put on our rubber foot pad. Now this is pretty easy to line up. If you're worried about which way this goes, you can actually line up these different bolthead tops here to tell you, and this actually pops on very, very easily, just like so. And this is gonna be contoured to fit the edge of your roof and just give a nice soft pad so that any weight that we put on our roof rack isn't gonna do any damage to our vehicle. The next step in the process is going to be to measure how far apart these feet need to be and then lock them down into place. Now the install guide that comes with these crossbars is giving us measurements for the overhang style. These bars are a flush style, so we're gonna have to kind of take some measurements on our own. So what I'm doing is I'm getting the towers spread out as far as they go. We're gonna get it up on the roof. And because we left them a little bit loose, we're gonna be able to maneuver a little bit, get 'em in the right position and get our proper measurement before tightening them down. So we got our measurement figured out as far as how far apart the feet need to be. We figured it would be pretty close to the rear bar measurement that we already installed, but it turns out it's exactly the same. So what you'll do is you'll measure from this center mark here, 20 and seven eighths inches to the edge of the tower on both sides. And now that we've got that all set, we got our foot pads in place, we're gonna go ahead and lay this into position up here on the vehicle. Now they do give us specific place for that to be as well. So we're gonna go ahead and get our measuring tape and we're gonna measure from this, from between the two doors here, from where they split right here in the middle. So the measurement that we needed to take for our set of crossbars was 15 and three quarter inches from where the doors come together here. Our front bar placement is gonna be 11 and three quarter inches up to the center of that tower. So I'm gonna get a roundabout idea of exactly where that is. So we'll be putting 'em about right here. We're not clipping them in place yet. So I just wanna get 'em in the right area. Once I have 'em exactly where we want 'em, we'll go ahead and clamp them down onto our roof. So getting 'em up on the roof, I'm not all that worried about any damage going on the roof, mainly because the only contact that's gonna be made are these rubber foot pads. And I'm trying to put them right here along this trim line in that spot where they indicated they should be. So I'm just gonna go ahead and kinda lay this over the top. We're gonna do the same right over here. So now we've got it right in the general area that we want it to be. And what one of the things that I was looking for was to make sure that the lip of our rubber foot pad comes right over the edge here, and it does, it actually fits really, really well. But now what I want to do is get down. I'm gonna take those measurements from the door seam to the center. I'm gonna make sure that they match up on both sides. That's very important. You do wanna make sure that these bars are perfectly parallel with each other. And the best way to do that is to match the measurements from both sides. So we're gonna go ahead and do that now. Now the next step in the installation process is going to be to put our clamps on, but before we do that, Inno does provide us with some adhesive pads to put here just to give us some extra protection on the vehicle paint. However, we're not doing a permanent install on this vehicle, today. So to substitute for that, we're just gonna put a bit of painter's tape up here just to help protect it a little bit more. Okay, so we're gonna start by removing this bolt right here. We're going to put our clamp up in its place just like so and get in here and start rereading it. Now we're gonna be tightening these down on the driver and the passenger side kind of incrementally. We don't wanna overtighten one side and lose our padding. So once I get this snug, I'm gonna go ahead over to the other side and just start kind of tightening down a little bit on each end. So now we've gone ahead and gotten everything tightened down on each side. Now all we're left doing is taking the provided Inno tool and getting it to torque. Now what you'll hear is a loud, audible pop out of this tool when we have it torqued down to spec, just like that. Now we've got it good on both sides, and we are ready to place our end caps. So the end caps are side specific. You will have to look where this is going to line up on the tower to make sure that you've got the right side. So we're gonna go ahead and slip it right on over. We're gonna use the provided lock and key. Now we're set to load up and hit the road. So these Inno crossbars, I think, are an excellent choice for the Maverick. I love how low profile they are, which to me fits the vehicle style perfectly. We just wanna bear in mind our rooftop capacities and things like that when we're loading up. So this is the Inno Roof Rack on our 2025 Ford Maverick. I'm Curt with Etrailer. Thanks for stopping by.


Do you have a question about this Roof Rack?
Info for this part was:
At etrailer we provide the best information available about the products we sell. We take the quality of our information seriously so that you can get the right part the first time. Let us know if anything is missing or if you have any questions.


Thank you! Your comment has been submitted successfully. You should be able to view your question/comment here within a few days.
Error submitting comment. Please try again momentarily.