

 Arrives before Christmas
 To see if this custom-fit item will work for you please tell us what vehicle you'll use it with.


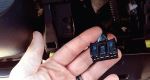
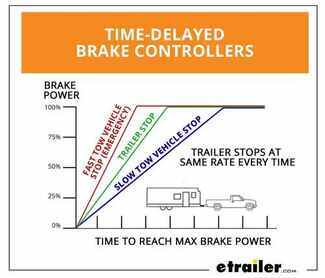
Simple and rugged, this time-delay brake controller is able to install in any direction, even upside down. Includes a large digital display with a dark smoke lens that can be read even in direct sunlight. Activates brakes with a preset intensity.
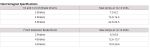
Features:
Specs:
The Pro Series Pilot comes equipped with time-delayed braking. Every time you apply the brakes in your vehicle, a signal is sent - via the brake switch - to the Pilot. The controller then sends power out to your trailer brakes to activate them with an intensity set by you, at a rate determined by you. The amount of braking power (output) can be adjusted to suit your preference, the road conditions, the type of trailer, and the weight of your load. To determine which levels are best for your application, test your towing setup and choose what feels right.
Braking output is the maximum amount of power that will be applied to your trailer's brakes. How much braking output you need is determined by the weight of your trailer; a heavier trailer will need more power to bring it to a stop. You want to set the braking output as high as you can without locking up the brakes. Once you've set up the brake controller the first time, you shouldn't need to adjust the settings until the trailer load changes, you switch trailers, or road conditions change. Use the thumbwheel on the side to change the braking output level. The output setting will appear as a number on the digital display, with a higher number indicating higher braking power.
The Pro Series Pilot keeps the manual override within easy reach on the front of the module, great for stopping sway or controlling your trailer's momentum in emergencies. Push the slide-bar to activate the trailer's brakes and brake lights without you having to apply the brakes on your tow vehicle, perfect for limiting trailer movement while you're cruising.
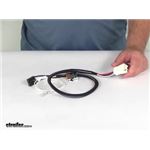
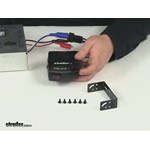
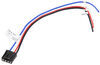
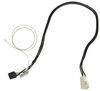
Because inertia plays no role in the functioning of this controller, you do not have to mount the unit at any particular angle. Your mounting options are limitless, so long as you can still easily access the controller and manual override. The Pilot is especially flexible; its microprocessor allows the controller to even be mounted upside down, and it will still give you a readable display. The Pilot can go wherever you need it. Plus, the included wiring adapter eases installation overall. The custom connector end plugs into the port on your vehicle and the other end plugs into the controller.
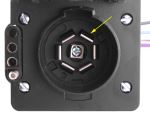
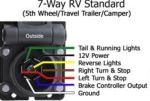
You can use etrailer's exclusive 7- and 4-way brake control installation kit (ETBC7 - sold separately) if you don't already have a 7-way plug at the back of your vehicle.

California residents: click here
Videos are provided as a guide only. Refer to manufacturer installation instructions and specs for complete information.
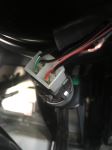
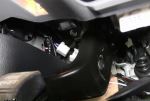
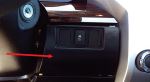
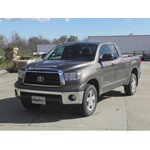
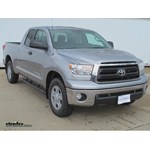
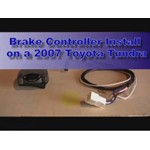
Today on this 2010 Toyota Tundra we are going to install part number 90885-3040P. First thing we will do is show you where the port is on the vehicle, this has a factory tow package. It is going to be underneath the dash on the left hand side. First thing we are going to do is plug the adapter cord into the factory port right here. Next, we are going to take our ground wire and ground it to the piece of sheet metal right here next to this fastener. :31
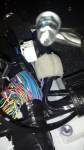
Then we will take our cord and route it behind the dash and over to our location where we are going to install our brake controller. We will let that sit for now. There is not much room to install the brake controller. This is because we can not do anything in this area here because that is where the air bag is. So what we are going to do is mount it offset. We will mount it to the flat spot here on the plastic. Make sure there is nothing in the way. We will have the bracket offset this way. 1:08
Now when we install this we are going to use just one side of the bracket. We are going to put our screw on this side and this side to help hold it up. Now that a second to set your brake controller up, make sure it is straight and aligned with the vehicle. Then we will use the other screw to help set it in place. Now we will plug the adapter cord into the back of the brake controller and then install the brake controller on the bracket. Snug up the screws. 1:56
Now this is tight quarters, what you can do is use a bit and a 1/4 inch wrench on the end to help you get a little extra torque in. With that, our brake controller is already installed. There you have it for part number 90885-3040P.
2 minute installation. Nice product.
Great unit, plug and play!
Easy to install. Great service. Thank you.
Easy to install and works great!!
It was just what I wanted
great item
Made install super easy.
works good
Pleasure to do business with.
Just what I needed!
High Quality.
Makes brake control insall a snap!
all arrived quickly without any problems
Did the job just fine. Easy to install
made install less than 10 min!!!
Fit perfectly, good price, sent quickly.
Fast, fast service. Great customer service .
Made installation a snap!
the plug in wiring adaptor makes it super easy.
plugged right in where it was supposed to
Piece of cake to install. Worked as advertised.
Item was as advertised, easy hook-up with plug & play.
worked as advertised pluged right in hassel free
good value but the swivel mount being optional should be made more clear
Plug-N-Play / '09 Land CruiserPlug-n-play, no splicing. Worked w/ the P3 straight-away.


Do you have a question about this Trailer Brake Controller?
Info for this part was:
At etrailer.com we provide the best information available about the products we sell. We take the quality of our information seriously so that you can get the right part the first time. Let us know if anything is missing or if you have any questions.


Thank you! Your comment has been submitted successfully. You should be able to view your question/comment here within a few days.
Error submitting comment. Please try again momentarily.