
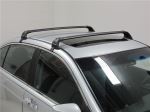
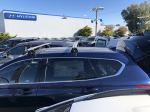
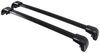
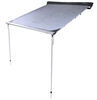
Yakima BaseLine Roof Rack for Naked Roofs - JetStream Crossbars - Aluminum - Black - Qty 2


To see if this custom-fit item will work for you please tell us what vehicle you'll use it with.

This stylish, aerodynamic Yakima roof rack gives you the space to carry gear on your vehicle. Rubber strips in the top channels push down to load carriers or accessories - no need to trim. Installs on your vehicle's naked roof.
Features:
Specs:
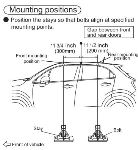
 Alternate Instructions
California residents: click here
Videos are provided as a guide only. Refer to manufacturer installation instructions and specs for complete information.
Hey everyone, I'm Angeline right here at etrailer. If you're looking to load up your Acura with all kinds of cool gear for all kinds of cool adventures, we're gonna be taking a look at this specific roof rack. Now, every roof rack is designed a little differently and designed for different adventures. So this is gonna be the Yakima BaseLine Towers or system and we'll see how it fits on the 2023 Acura MDX. Now there's different types of Acura MDXs. This one specifically has a naked roof where it's flat and there's nothing or no rails to clip onto.
So our custom fit system here is designed to follow the curves of the roof and then has hooks that go into the size of the doors, and that's where we get our stability and our system here. Now with this Yakima roof rack, what makes them different compared to the other options for your MDX is they have the most adjustability of all the other roof racks to really adjust to the curve of your roof. You'll see, especially over here where our front crossbar is pivoted and angled a little bit here at the top tower, but that top crossbar there is flat and you can see how it matches the angle of the bar in the back. So with this, you can get a longer crossbar spread and this is gonna be best when you need to get longer items like kayaks, canoes, or ladders. The downside to this though is in order to get all that adjustability, the install process is a little involved a bit more compared to other brands.
I'll guide you through that process later in this video. So definitely stick around if you're really curious about that. But first, let's cover things like how it clears around the top of your roof. Notice here that we have our sunroof and this does come up and go back. So you need a lot of space here if you're gonna be putting a crossbar.
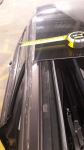
Good news is from the top of the roof to the bottom of the bar here in the back, I have around three inches, three and a quarter inches depending where you measure on the curb. That's pretty good clearance. But even then I would still recommend try to get things that clamp around the roof, but they don't use large hardware. They'll have smaller clamps, they'll have rubber straps, or you can even look into tee track mounted accessories and that way there's zero clamps whatsoever that go around. The next thing you'll want to know is the height of your cargo.
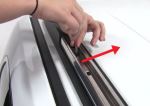
So here it's gonna be about four inches and that means you have a good amount of height here, but not too high up where it's super in the way. So just be mindful of things like skis with tall bindings, make sure you have enough clearance and that they're not scratching up your roof. And for those accessories, sometimes they specify a certain crossbar spread like those skis and snowboards or roof boxes, things like that. Crossbar spread is measured from the front of one crossbar to the other unless stated otherwise. In our case here, ours is 30 inches apart, which again is gonna be on the longer end compared to some other brands that make roof racks, but it's still gonna be very versatile for most things. 30 inches is on the larger versatility range, so chances are your accessory will be great with that crossbar spread. These are also the 60 inch bars, so you do get a decent amount of overhang. So from the tower to right before the end cap here, that's four inches. So you'll still be able to clamp some accessories to this overhang if you want. Now for things like lotuses kayak carriers and some rooftop tents, they do not recommend securing those too naked roof style roof racks. But for other things that do work with the style of a roof rack, mounting it to the overhang makes it a lot easier to reach. I like longer bars. So if this is something that you're interested in, this is a full kit that we put together designed specifically for your vehicle, and that includes the 60 inch long bars, the baseline powers, and the hooks that fit to your car. Now you can get this kit in slight variations, like different colors or you can get the flush baseline FX design instead, which looks like this but does not have that overhang. Those are all available on our site. And if you find that this is super helpful for you, maybe getting this means you can finally take those kayaks out on that next paddling trip, I'd love to hear all about it. Send us a picture and a review of how you're using your roof rack and maybe you can inspire some other people along the way and help them see what fits best on their Acura. Now I did mention that I'm gonna show you how to get this installed. So here we go. Now getting this installed might be a little confusing at first because there's a bunch of different boxes, and different numbers and hooks, and pads, and pieces. So I'll guide you through the process. I already installed the rear crossbar, so we're gonna install the front crossbar together. In fact, the front crossbar is usually where you start 'cause that's where the measurements start for the rest of this system. First thing you want to do is grab your crossbar. You'll see up top there's a rubber strip, and then you're gonna have a taller and a more narrow portion. And then when you flip the crossbar over, you're gonna see some numbers. Now we have our test fit crossbar here, we use this a lot. Yours will definitely be a lot more sleek and the numbers will be a lot more visible. And you're gonna have these rubber strips that you will be installing throughout this video to keep all the air out. Included with your crossbars is gonna be your tower adapter, and that's gonna be this plastic piece and then this metal piece. So the plastic piece you're gonna bring over to your tower and you're gonna fit it over that bolt. See how that pushes into place and also how it slide side to side You're then going to secure the metal piece first by, you see how this has a door We're gonna flip it over upside down. We're gonna open up that gray panel that I push in earlier and that's gonna reveal this bolt here. So grab your tool, push it up against that bolt, and that way when you put this block into place, you're then able to thread onto the bolt. And I won't tighten it down all the way yet. Just get it pretty loose. You'll be able to slide the tower into the bottom track of your crossbar. Notice the orientation of our tower. We are gonna have that mechanism facing out. And we're gonna slide this up to the number 45. So in your fit guide, you're gonna have a number for the front and the rear bar, and you wanna line up the end of your tower with that number. Once you've done that, go ahead and tighten it down here in the center. Now something you do need to take note of is going to be the pitch. The pitch, you can see where that bolt sits inside the tower, allows for a change in angle on your roof. Before we specify pitch, go ahead and look for the arrow underneath your crossbar. Actually painted this one gold so it is a bit more visible. You want that arrow facing away from you. So as you adjust the tower, A, is gonna be from the top so that's gonna be the notch furthest away from you, B is gonna be the center, and then C is the one closest to you. So again, making sure it's lined up with the correct number and the correct pitch, go ahead and tighten that down. Next in your fit kit, you're gonna have these pads. So there's gonna be rubber on the bottom. Then you're gonna have this piece that snaps onto the tower. So push that on there and it should snap on both sides. And then you're gonna want that arrow facing out. And this is how you affect the toe. So you can actually rotate or pivot the pad over and you can see that tab pivoting as well. So for here, the toe is similar to A in that it is gonna be one. So again, with the arrow facing away from you, that's gonna be the tab that's furthest away from you. Tighten that down as well. And remember, as you tighten these down, since you have a torque tool, you can tighten until that tool clicks. Now you're ready to lift this onto your roof. With both bolts tightened down, your towers are in place and we're gonna put this front crossbar right on the spot on our roof that's gonna be 11 inches away from the front glass. Open the doors. You'll also see that once you measure it on both sides, and you're also looking for these towers to sit on the outside of the track, you'll then be able to, let's flip this door open and then fit this hook right in there. So it should have a spot where it kind of like fits into that hook and that will hold it in place. So do that on both sides. And then tighten down to right where the hook just barely makes contact with the side of the vehicle. And don't go any further than that. It is very important that you go back and forth on both sides of your car as you tighten this down, because when you first make contact with a hook on that side of the door, you wanna do the same thing on this side. And then when you go back and forth, you're not pulling the whole system one way to the other. This is very precise in where it sits on your roof and you wanna make sure that evenly distributed weight all the time. This bolt over here pulls the hook up and then you also have your swing bolt, which adjusts the angle of the hook. So you want to tighten down both of them. And I also push down on the hook with my hand to make sure it's truly flat and flush against the vehicle. So keep securing both of those, and again, do that on both sides. And remember, whenever you use this torque tool on any bolt that it fits on this system, you keep tightening down until the tool clicks and you need to make sure that both sides click and it's secure. And then you can cap it all up. So start by pushing this door into place. And then you have your end caps. Those will go right onto those crossbars. You also have your rubber strips. Those will be cut underneath and will secure all of your crossbar tracks. And then finally, you have your tower door. If you so choose to use the metal lock cores, you can switch those pieces out now, and this will go up into the tower hinged from the bottom and then click into place up top. And that's gonna be it for your installation. Hopefully this was able to guide you through the process of setting up your crossbars. If you felt like you needed to make any adjustments or if you need to take this roof rack off, I recommend holding onto that special torque tool and just keeping that in your glove box. That way you can use this in order to continue installing or uninstalling this roof rack as needed. But now you're ready to load up your roof rack and hit the road. You just saw a look at the Yakima BaseLine Towers rack on the 2023 Acura MDX.


Do you have a question about this Roof Rack?
Info for this part was:
At etrailer we provide the best information available about the products we sell. We take the quality of our information seriously so that you can get the right part the first time. Let us know if anything is missing or if you have any questions.


Thank you! Your comment has been submitted successfully. You should be able to view your question/comment here within a few days.
Error submitting comment. Please try again momentarily.