
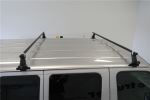
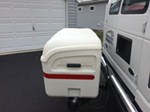
Yakima Roof Rack for Rain Gutters - RoundBar Crossbars - Steel - Black - Qty 2


To see if this custom-fit item will work for you please tell us what vehicle you'll use it with.


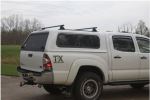
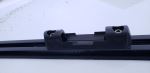
These strong, galvanized steel crossbars supply the backbone for this Yakima roof rack. The rack works with accessories that clamp around the bars. Vinyl coating helps resist corrosion. Installs to the rain gutters on your vehicle's roof.
Features:
Specs:

California residents: click here
Videos are provided as a guide only. Refer to manufacturer installation instructions and specs for complete information.
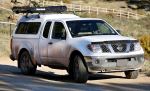
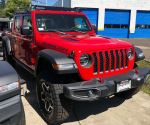
Hey, everyone. I'm Evangeline right here at etrailer. Today, we're taking a look at this Yakima gutter system roof rack here on our 2025 Jeep Wrangler Unlimited. If you're looking for a super easy to install as well as very lightweight roof system, this will be a good option for you. This works within the gutters on the hard top Jeep. So if you have a Jeep that looks like this and you're curious about how this will work for your adventures, stick around.
This is gonna be a kit with 66-inch long round bars as well as our rain gutter feet. So this will fit into the sides of your hard top. If you wanted to remove your hard top panels, you still can. In fact, you can even leave this tower system on there, but can also just really quickly and easily loosen the system and lift it up and off of your roof. So if sometimes you need to carry around a roof box or a cargo carrier or some kayaks, you throw those on your Jeep.
But when you don't need to carry things around, this is very easy to uninstall too. With the 66-inch bars of this kit, you do have a fair amount of overhang. Helpful if you wanna clamp things around those bars, it's easier to reach, and you have more crossbar space. But it also sticks out a fair amount past the sides of your vehicle. So if you want a sleeker look, you can also find a smaller kit with 58-inch long bars here on our website.
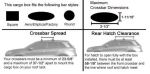
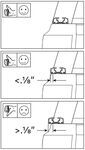
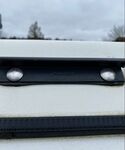
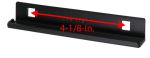
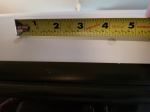
The rain gutters lift up a fair bit off of your roof, so let's take some measurements real quick. If you are measuring from the bottom of your crossbar to the top of the roof, I have it at around three and almost a half inches. And that's gonna be how much space you have for clamps, things that go around the bar. So plenty of space there. Where your cargo sits is gonna be top of the roof to top of the bar around four and a half inches.
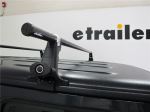
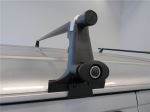
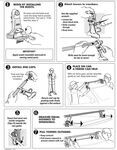
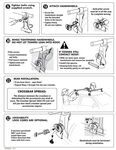
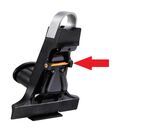
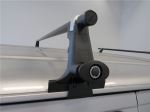
And that sits pretty high up. If you're carrying, let's say, skis with haul bindings, you should be good in most situations. If you're not, we have plenty of accessories that give you that extra height to help out with that. And if you are carrying, let's say, even taller things, like kayaks or roof boxes, just double check that height there to make sure you can clear for your garage door. Now special note needs to be made for the Soft One-Touch Top, and that's gonna be a top that opens up and does fold up a fair amount. That one does sit a little higher than the clearance here, so you may need to look into that. If you have the Sky One-Touch Top, we do have options for that as well. You do have to be mindful of that round bar design because many roof racks have upgraded to a more aerodynamic design where they're wider and just as tall, but then they have extra functions like a channel mount or being able to be used with other accessories. Round bars are just clamp on only, and some accessories require a round bar adapter so that the accessory does not slide backwards on that round surface. But with this being a round bar, you're gonna get something that your aerodynamic bars don't have, which is gonna be really easy to store, really lightweight when it's in your garage, and makes it easier to install and uninstall. So there's definitely there pros and cons there. If you're looking to carry around some gear on top of your Jeep, there's plenty of options here at etrailer for a roof rack system. You can get as involved as drilling into your roof and creating a whole platform system with a lot of weight capacity and a lot of space for all types of cargo. Or you can go the other end where you have this smaller, more sleek version, which is great for every now and then needing to carry around gear. So it really does depend on where you are going, what you are carrying, and how often do you need to use a roof rack. If it's not as often and you just wanna focus on quick and easy, that's where this Yakima roundup bar, gutter mounted system comes in handy. So if you're curious about how to get it all installed, stick around. Start your installation by setting up your towers and your crossbars. So these are gonna be the gutter mount feet and they will fit onto your crossbar system. The first thing you need to do though is to set up the feet where you have the rubber sleeves on them and then to loosen that top tower. So you are gonna have an included wrench. What I like to do so I don't have to twist the wrench in different positions all the time, just hold the wrench in place and then twist the top piece so that it is loose enough where you can then run it through your crossbar, just like that. So once your two towers are on the crossbar, you can then go ahead and put the end cap on. (metal clanking) Having the end caps on there means that your tower is less likely to slide off of the crossbar, which makes putting it onto your roof a bit easier. Now this process will be a lot easier with a second person, but you can still do it on your own as long as you're careful about getting this into the gutters. So that one's sort of sitting on the gutters so that I may then able to bring the other tower into position. Where you put it is totally up to you, depending on how you want this to sit, as well as how far apart your accessories need your crossbar spread to be. But I also like to see, of course, making sure I can stand inside the Jeep and reach the crossbar, but also when I am entering the doors, I'm not hitting myself against the bars. Once you have it in the spot that you like and then you've measured that you're in the exact same spot on both sides, you also need to measure for your overhang. So overhang is gonna be from your tower to the end of the crossbar, making sure that's equal on both sides so that you have a good looking fit. So for example, here, we are about a little too long on the passenger side, so you have to lift up on the tower to make sure that's loose and then move that on over. Once you're happy with the placement, then go ahead and use your included wrench to tighten down underneath. So make sure to tighten down on both sides. This will secure your crossbar in its spot. And if you get tired of having to readjust with this included wrench, you can always grab a 14 millimeter ratchet wrench, which will do the exact same thing. You'll then secure the hooks with the included knobs. Now this comes all set up for tightening down, but if you are using Yakima same-key system lock course, which is a pack, of course, you do have to purchase separately, so everything's keyed alike, you can switch them out now. But this will fit into your tower system where you just tighten that down and it will pull things secure. Now I also noticed that sometimes the hook wants to lift up while you do that, so just keep a hand on it in a down position so that it fits nicely over the gutters as we see here with our Jeep Wrangler Unlimited. For some other vehicles you may need to put a spacer. I don't think that is necessary for this specific vehicle. And with this tightened down on both sides, just give it a good old-fashioned shake, and that's gonna be it for the installation of your roof rack system. From this point onwards, if you wanted to take off the roof rack, you just turn the knob and then it just lifts up and off of your vehicle. This, in fact, would be even easier than having to lift off your panels, which is how quick it is. If you do use the same-key system lock course, I always recommend just keeping a key in your glove box and keeping another key on your key ring. Hopefully, this video help you out with just seeing how this works, how this fits, and how to install your Yakima rain gutter system on your 2025 Jeep Wrangler Unlimited.

Asadvertised.
Heavy Duty bars .
So far so good! Cant beat the price!
Great product and great service.
great racks
great service
Excellent quality and looks very good.
Good Product Easy Install Thank You

Do you have a question about this Roof Rack?
Info for this part was:
At etrailer we provide the best information available about the products we sell. We take the quality of our information seriously so that you can get the right part the first time. Let us know if anything is missing or if you have any questions.


Thank you! Your comment has been submitted successfully. You should be able to view your question/comment here within a few days.
Error submitting comment. Please try again momentarily.