Not sure what TST TPMS you're looking at but the best way to prevent stem failure is to be sure to use the proper air pressure in the tire. A system like the TST TPMS for RVs item #TST-507-RV-4-C can be used on rubber, steel, chrome, or nickel…
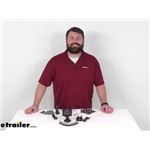
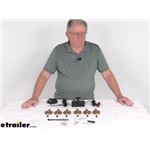
Hi Christian! We have replacement sensors in one, two, and four packs, which I have linked below. I would grab a two pack and a four pack as it will be the most economical way to go. Brass Tire Sensors for TST TPMS - Qty 1 #TST47FR Brass Tire Sensors…
We have two really great options for monitoring 10 motorhome and trailer tire pressures with the part #TM56FR which comes with its own monitor or the #TM79FR which syncs to your smart phone and displays the pressures of all tires on your phone screen…
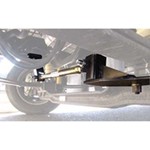
It sure does Brian. The Lippert Hub and Drum Assembly item #LC57DX will indeed work with a threaded grease cap. It has a hub bore of 2.722". This hub is designed for 8,000 lbs axles and has a 8 on 6-1/2 lug pattern. It fits spindles with a inner…
According to my contact at TST, going with the internal sensor would have the following benefits: • Battery Life. The internal sensors can be expected to last 5+ years, versus about 1 to 1-1/2 years for the external. • Protection: By virtue of the…
Hey Greg. Since your 2019 Pace Arrow LXE 38K is a class A motorhome with a diesel engine, TireMinder says you need to mount the repeater, included with item #TM98FR, as close to the rear axle as possible. Their website specifically states to avoid…
Hey welcome back, Jody. So your best option here will be to get a new 50 amp surge protector for your new travel trailer. If you did end up at a camp ground with 50 amp service you would want to have it. I know a lot of sites do have just 30 amp but…
The typical tire should run about 158 degrees (Farenheidt) once you get going down the road, but this can vary greatly depending on the weight of the trailer, how fast you're traveling, and also driving habits. So while 158 is probably…
Hey Robert, thanks for reaching out! Since your Sprinter has aluminum wheels it wouldn't be a good idea to use a kit like the TST TPMS #TST34FR that uses the stainless steel bands as that would eventually cause galvanic corrosion. For your…
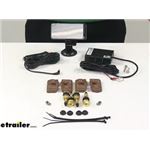
Hi Rick; the TST TPMS for Trailers and Cars #TST35FR with 8 sensors is the largest one we have that comes together. Since you want 10 sensors all you need to do is pick up two more Replacement SE2 Cap Sensors #TST47FR. The system itself can handle 10…
Not sure what TST TPMS you're looking at but the best way to prevent stem failure is to be sure to use the proper air pressure in the tire. A system like the TST TPMS for RVs item #TST-507-RV-4-C can be used on rubber, steel, chrome, or nickel…
Hi Christian! We have replacement sensors in one, two, and four packs, which I have linked below. I would grab a two pack and a four pack as it will be the most economical way to go. Brass Tire Sensors for TST TPMS - Qty 1 #TST47FR Brass Tire Sensors…
We have two really great options for monitoring 10 motorhome and trailer tire pressures with the part #TM56FR which comes with its own monitor or the #TM79FR which syncs to your smart phone and displays the pressures of all tires on your phone screen…
It sure does Brian. The Lippert Hub and Drum Assembly item #LC57DX will indeed work with a threaded grease cap. It has a hub bore of 2.722". This hub is designed for 8,000 lbs axles and has a 8 on 6-1/2 lug pattern. It fits spindles with a inner…
According to my contact at TST, going with the internal sensor would have the following benefits: • Battery Life. The internal sensors can be expected to last 5+ years, versus about 1 to 1-1/2 years for the external. • Protection: By virtue of the…
Hey Greg. Since your 2019 Pace Arrow LXE 38K is a class A motorhome with a diesel engine, TireMinder says you need to mount the repeater, included with item #TM98FR, as close to the rear axle as possible. Their website specifically states to avoid…
Hey welcome back, Jody. So your best option here will be to get a new 50 amp surge protector for your new travel trailer. If you did end up at a camp ground with 50 amp service you would want to have it. I know a lot of sites do have just 30 amp but…
The typical tire should run about 158 degrees (Farenheidt) once you get going down the road, but this can vary greatly depending on the weight of the trailer, how fast you're traveling, and also driving habits. So while 158 is probably…
Hey Robert, thanks for reaching out! Since your Sprinter has aluminum wheels it wouldn't be a good idea to use a kit like the TST TPMS #TST34FR that uses the stainless steel bands as that would eventually cause galvanic corrosion. For your…
Hi Rick; the TST TPMS for Trailers and Cars #TST35FR with 8 sensors is the largest one we have that comes together. Since you want 10 sensors all you need to do is pick up two more Replacement SE2 Cap Sensors #TST47FR. The system itself can handle 10…
TPMS Sensors are essential for monitoring tire pressure and temperature, providing peace of mind on the road. Easy to install and program, they help prevent tire-related issues, ensuring a safer journey. Consider factors like sensor type, display options,
Some users experience occasional false alarms or connection delays, especially at the start of a drive. However, these are generally minor and do not detract from the overall reliability and effectiveness of the system. Regular updates and proper installation can mitigate these issues.
Most TPMS Sensors are versatile and compatible with a wide range of vehicles, including RVs, trailers, and motorhomes. It's important to check the specific compatibility with your vehicle type and ensure the system supports the number of tires you need to monitor.
Installing a TPMS Sensor is generally straightforward, with many finding it user-friendly and quick to set up. Some systems may require tire dismounting for sensor installation, but most come with clear instructions and support. A few might need initial programming assistance, but tech support is often readily available.
A TPMS Sensor offers peace of mind by continuously monitoring tire pressure and temperature, crucial for RV safety. It helps prevent blowouts and other tire issues, making long trips more enjoyable and stress-free. The system alerts you to any irregularities, allowing for timely interventions.
Look for features like a clear display, ease of programming, and the ability to monitor multiple tires, including spares. Some systems offer additional benefits like temperature monitoring and a dashboard cradle for easy storage. Consider whether you need a signal booster based on your vehicle size.


 Filters