Testing a Vehicle Side 7-Way Trailer Connector for Proper Function
Updated 10/12/2011 | Published 10/11/2011
Question:
How is checking a trailer connector done, specifically, and what tools are needed? I have a probe/clip/light tester circuit and a voltage tester with the black/red probes, and box with a dial on the side and a knob with different settings on the front. Will either of these items work?
asked by: Carol
Expert Reply:
To check the pins on the vehicle side 7-Way, you can use a circuit tester or the volt meter. The circuit tester will show you if a signal is coming through on the pin you are testing while the volt meter will tell you that and how much voltage is being sent. When you test the brake circuit pin on the 7-Way, it may be more beneficial to see how much voltage it is sending through.
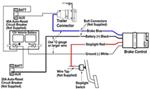
If you are facing the 7-Way, using either tester, you will test for the proper signal as follows:
1 oclock position = 12 volt hot lead
3 oclock position = right turn/brake light
5 oclock position = brake controller output
7 oclock position = ground
9 oclock position = left turn/brake light
11 oclock position = tail and running lights
Center = reverse lights
You will need to have someone sit in the truck and run through each function while you test the pins. In order to determine the configuration on the trailer side, you will have to trace the wiring back from each pin. You an use the wiring diagrams I have linked for you.
While checking the connectors if you notice any corrosion build up or dirt inside or or in back of either connector, clean it out. A wire brush like a battery terminal brush works well.
You can also check the adjustment on the brakes to make sure they are not adjusted too tight. There is a a little wheel with teeth in it at the bottom back side of each assembly. Using a flathead screwdriver you can turn the wheel to adjust the brakes. I have included a link to a video that features our installer adjusting the brakes. Go to the 4 minute, 55 second mark.


Product Page this Question was Asked From
Dexter Electric Trailer Brake Assembly - 12" - Right Hand - 6,000 lbs

- Accessories and Parts
- Trailer Brakes
- Electric Drum Brakes
- RH
- 6000 lbs
- Brake Assembly
- Manual Adjust
- 12 x 2 Inch Drum
- Dexter
more information >
Featured Help Information
Miscellaneous Media


Continue Researching
- Search Results: trailer jack
- Shop: etrailer Electric Trailer Jack w/ 7-Way - Drop Leg - A-Frame - 18" Lift - 3.5K
- Shop: etrailer Electric Trailer Jack w/ 7-Way - Drop Leg - A-Frame - 18" Lift - 5K
- Video: etrailer 5K Electric A-Frame Trailer Jack with 7-Way Comprehensive Review
- Search Results: electric jack
- Search Results: brake controller
- Shop: etrailer Electric Trailer Jack w/ 7-Way and SnapPad - Drop Leg - A-Frame - 22-1/2" Lift - 5K
- Shop: Brake Controller
- Article: Trailer Wiring Diagrams
- Video: Review of etrailer Trailer Jack - electric Trailer Jack - e74GV
- Video: Hands-On with the etrailer Electric Trailer Jack with 7-Way and SnapPad
- Q&A: Can etrailer Electric Jack e74GV be Used with 7-Way of 2025 Ford F-250
- Q&A: Electric A-Frame Jack for 2019 Jayco SLX 212QB
- Search Results: scissor jacks camper jacks
- Search Results: electric jacks
- Search Results: stabilizer jacks trailer jack
- Search Results: stablizers
- Q&A: Recommended A-Frame Electric Jack w/a 7-Way Connector for a Trailer w/out a Battery
- Shop: Trailer Wiring
- Video: etrailer 5K Electric Trailer Jack with 7-Way and SnapPad Feature Review
- Article: Brake Controller Installation: Starting from Scratch
- Article: Wiring Trailer Lights with a 7-Way Plug (It's Easier Than You Think)
- Shop: etrailer Electric Trailer Jack w/ 7-Way and SnapPad - Drop Leg - A-Frame - 18" Lift - 3.5K
- Shop: etrailer Hydraulic A-Frame Trailer Jack - Round Tube - Bolt On - 7K - Preorder
- Shop: Vehicle Tow Bar Brake System
- Q&A: Can I Plug the etrailer Electric Trailer to the OEM 7-Way On a 2016 GMC Sierra 2500
- Shop: Fifth Wheel Hitch
- Shop: B&W Patriot 5th Wheel Trailer Hitch w/ Slider - Dual Jaw - 18,000 lbs
- Shop: etrailer Electric Trailer Jack - Drop Leg - A-Frame - 22-1/2" Lift - 3,500 lbs
- Shop: Trailer Hitch

on Accessories and Parts