


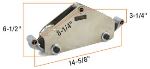
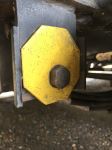
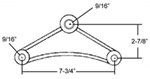
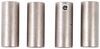
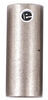
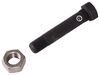
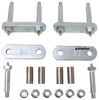
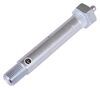
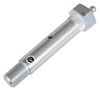
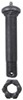
3" Long suspension bolt comes with a locknut to secure equalizer to hanger. Grease zerk allows for easy lubrication to keep moving elements functioning properly.
Features:
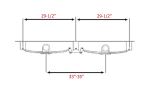
Specs:
California residents: click here
Videos are provided as a guide only. Refer to manufacturer installation instructions and specs for complete information.
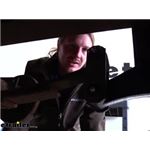
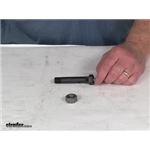
Hi there trailer owners. Today we're going to be taking a look at Redlines replacement shackle wet bolts. These bolts will make a great replacement for standard bolts or wet bolts if you are performing suspension work here on your equalizers and leaf springs and you find that they're all wore out. Over time your bushings can wear out, and once the bushings start to wear out, play will develop inside which will allow movement of the bolt inside of your suspension components. And that small movement will allow the bolt to travel up and down. And this little bit of movement is going to cause wear on both the bushing and the bolt and over time it will eventually destroy the bushing and it will also make our bolt a smaller diameter with an uneven wear pattern on the inside, so you'll need to replace it when you're putting a new bushing in or else you're still going to have that play from the bolt wear.What's nice about these bolts is that they do have a grease fitting on the end so you can grease your bushings.
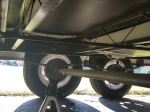
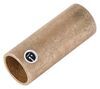
Many of your factory suspension setups will have non greasable bolts with bronze bushings. And if you have that combination, those bushings are eventually going to wear out. They need lubrication. So upgrading to these will allow you to lubricate your bushings and your bolt to ensure that they don't seize together and also provide a lubrication coating between the two so we have no metal on metal contact, which greatly reduces the amount of wear.Wherever these bolts are installed, we have bushings in them and these are the design movement point for your suspension system. The bolt will pivot inside of the islet here on our leaf spring.
Same with our equalizer in the center and at the bottom here, all of these components move. And over time they will eventually wear out the bushings on the inside. But being able to lubricate them greatly decreases the amount of wear.What I also like about these bolts as they can be used with any type of bushing, too. If you're going to be using with a bronze bushing, they're great because they will fit in there and you also have a way to lubricate them, but you can also use them with plastic bushings. Many of your plastic bushings are self lubricating, so you don't want to lubricate them because the grease can potentially break down the plastic of those types of bushings
It is a 9/16 diameter bolt. Included with your bolt, you are also going to receive a lock nut, so when you're replacing the bushings on your worn out suspension system, I highly recommend replacing the bolts at the same time. It's going to make the installation easier. Often when you're taking apart your old suspension and you're planning on greasing 00:02:46 those bolts, the threads and things like that can easily get nicked and damaged because you do have to drive out your old hardware. And you can use the nut to help protect it when you're driving it out with a hammer.
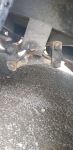
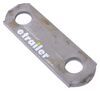
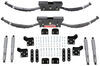
But depending on how tightly they are seized inside your suspension system, you may still end up mushrooming the end and needing a replacement anyway. Replacing it with the lubricatable end here is going to further increase the life, so that way once you're done fixing your trailer, you can just keep maintaining it so you don't have to make those repairs down the road.They're fairly easy and straightforward to install. You can pick up as many as you need for however many bushings you're replacing in your suspension system. Let's go ahead and go over the installation together so you can the confidence to do it at home. We'll begin our installation by getting our tires out of the way. We're just working on the back axle for this one. So we don't need to remove our front. But depending on what all you're doing, you may need to remove yours as well. When removing your wheels, you want to make sure you got your trailer supported on the frame by jack stands. So you can use just a regular floor jack to lift it up.Once you've got all your tires out of the way for the area you're going to be working in, we can then start removing the bolts for wherever we have damaged bushings. We recently just had a new equalizer installed here and you can see we've got new bolts and shackles and an equalizer, but the bushings weren't replaced inside of the leaf spring here. So we're going to tackle that as well because we still got a little bit of a clunk noise because that bushing's wore out. To replace the bushings, you just needed to remove the hardware first. So for this particular set up here, the bolts are pressed into these shackles on the head of the bolt side. So we're going to remove both of these nuts and take the two out at the same time.We're going to take our bolts off. The bolt sizes can vary depending on your particular trailer. For ours, we're going to be using a 7/8, and you may or may not need to hold the backside of the bolt when removing these. They are supposed to be stuck inside of here, but over time they do rust and things wear out and they may not be. So it's not a bad idea to put a wrench on the other side to hold it.If we place our floor jack underneath the U bolt on our axle, we can relieve a little bit of pressure on it to make it easier to get the bolts to come out. Now what I'd like to do to get them out is I like to just thread the nuts back on there just a little bit and then tap them out with the hammer. Putting the nuts on it just helps prevent you from damaging your threads when you're tapping on them. And we can just slide it out there and you can see on our equalizer, we've got a brand new bushing in there, but on our trailer here, we've got an old one. And this old one here is so worn out that I can actually just push it out. Now if you we're unable to just slide out your worn out bushing like this, one of the best things to use to take them out as you can use an old bolt.So if we use another bolt that's slightly smaller and just place a flat washer on it, we've got a nice flat solid surface to drive it in. And we know since we're hitting all the way around, we're not going to ding up the outside of our bushing here with our hammer as we're driving it in. So we're just going to hold it in place and we're just going to tap it in with our hammer. A lot of times these tap in pretty easily. Every now and then you got to hit them pretty hard depending upon the rusty condition of your leaf springs.We can now take our new wet bolts and we can slide them into our shackles. Now if your old shackles are all worn out and the holes all wallowed 00:06:53 out, then I would recommend replacing them. We've got replacements here at etrailer, but if they're just a little bit of surface stress on them and the holes are fine, then you're okay. You can just slide your bolts right into them. Once you've got them slid in, we can come over to our bushing here and align them up. It is a bit of a snug fit. Sometimes you need to adjust the jack a little bit. WE're just going to line those up until they slide through.On the other side. Now we can take the other shackle and place it on there and then thread our nuts on. We can now tighten up our nuts. Now what you're going to want to do is hold the backside of your bolt with your wrench, because our bolt does have splines in it and it's going to spline into the inside shackle here, because the head of the bolt here has got those splines. And we don't want it to spin while we're tightening it down because it's going to rip the splines off and prevent it from working like it's supposed to. So we want to hold it steady, and then tighten it down and that will draw the bolts into the shackle and draw them tight together. And I do like to work back and forth with them just a little bit just to make sure that they are going to get pulled in.Once you've got them tightened down, it's always going of you to double check yourself and look here on the backside. You want to make sure the head of the bolt is flush all the way up against the shackle here. Sometimes the splines will prevent the bolt from going all the way in and it's not that it's preventing it from going in, just means you need to tighten it tighter until it draws it all the way flush.We can then go back and lubricate our bushings. Now we're only going to be greasing the bronze bushings, so that's going to be just this top one here on the leaf spring. Now that we've got our wheel back on, we can torque it to the manufacturer specifications and we're ready to hit the road.And that completes our installation of Redlines replacement shackle wet bolts.

Fit perfectly
just what we needed
Great product and service.
Everything I ordered on Sunday arrived Wednesday morning & of very good quality
Exactly the same as original from the 1 980's.
Short time to get and good product
well made.
Great product !!! Speedy delivery
Got the part I ordered and it was delivered quicker than expected.
Just as represented. Promptly delivered, ready to install.
Perfect fit !! Quick delivery (which I needed !! )
Do you have a question about this Trailer Suspension Part?
Info for this part was:
At etrailer.com we provide the best information available about the products we sell. We take the quality of our information seriously so that you can get the right part the first time. Let us know if anything is missing or if you have any questions.


Thank you! Your comment has been submitted successfully. You should be able to view your question/comment here within a few days.
Error submitting comment. Please try again momentarily.