
To see if this custom-fit item will work for you please tell us what vehicle you'll use it with.


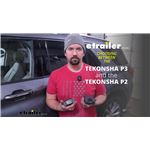
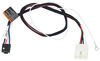
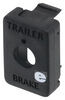
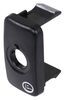
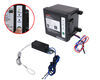
The Tekonsha P3 is a brake controller beloved for its reliability and useability. You're able to save your settings and multiple profiles. It's easy to install, and with the custom harness, it's plug-and-play.
Features:
Specs:
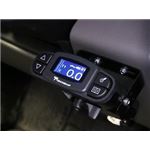
Braking output is the maximum amount of power that will be applied to your trailer's brakes. How much braking output you need is determined by the weight of your trailer; a heavier trailer will need more power to bring it to a stop. You want to go as high as you can without the trailer brakes locking up.
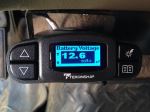
Use the arrow buttons on the front of the module to set the output.
The boost setting controls the aggressiveness of your trailer's braking, meaning how quickly the brakes reach the maximum braking level. If your vehicle takes too long to come to a stop, increase the setting. If it stops too abruptly, decrease the setting.
Depending on the level of boost, your trailer brakes can start at either 13 percent or 25 percent of the set braking output. So instead of starting at 0, the brakes will start at 25 percent and get to 100 percent sooner. This keeps the trailer from pushing your tow vehicle forward.
Boost Levels:
| Approximate Gross Trailer Weight | Boost Level | Increase in Initial Power Output |
|---|---|---|
| Less than tow vehicle GVW | B1 | 13% |
| Equal to tow vehicle GVW | B1 or B2 | 13% or 25% |
| Up to 25% more than tow vehicle GVW | B2 or B3* | 25% |
| Up to 40% more than tow vehicle GVW | B3* | 25% |
*Both B2 and B3 offer a 25-percent boost in initial power. But the braking curve for B3 is more aggressive than that of B2. This means that, even though you will start out with the same intensity when using these boost levels, you will get an overall more aggressive braking experience with the higher level. So if you use B3, you will reach maximum braking sooner than if you use B2.
To engage the manual override, twist the rotary-style lever from right to left. This will activate the trailer's brakes and brake lights independently of your vehicle, great for stopping sway or controlling your trailer's momentum in an emergency.
The P3 is able to store your settings in multiple profiles so that you can have them ready to go for different trailers and drivers. Even the display is super customizable: you can change the screen color, brightness, and language to make it easy to use.
The P3 makes it easy to troubleshoot problems as they come up, with comprehensible and detailed diagnostics displayed on the screen.
Diagnostic troubleshooting messages include:
Diagnostic warning signs include:
The Prodigy P3 offers advanced safety features to prevent damage to various components of your towing setup.
-Integrated reverse battery protection shields the brake controller and your trailer's breakaway system from shorts.
-When the P3 is not in use, it draws only 3.6 milliamps, minimizing drain on your vehicle's battery.
-Any time your vehicle and trailer are at a standstill with the brakes applied for more than 5 seconds, the hold feature will kick on and reduce power to just 25 percent. This will keep your trailer in place without your brakes overheating.
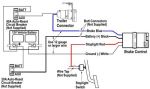
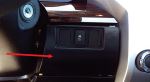
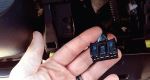
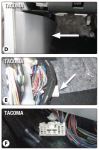
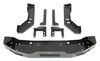
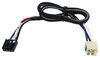
Installing the P3 is incredibly simple. You'll mount the bracket to your dashboard then mount the unit to the bracket. Plug the custom harness into your vehicle and into the unit. Done!
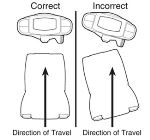
Keep in mind that the P3 must be horizontally level and parallel with the direction of travel to work correctly.
With a replacement wiring harness (sold separately) and replacement bracket (TK5906 - sold separately), you can even transfer the Prodigy P3 to another vehicle.
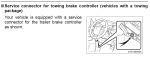
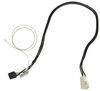
Note: If you don't already have a 7-way plug at the back of your vehicle, take a look at our exclusive 7- and 4-way brake controller installation kit (ETBC7 - sold separately).
Proportional braking means that your trailer brakes mimic your tow vehicle's brakes. If you slam on the brakes, your trailer brakes will activate with the same intensity; if you brake lightly, your trailer brakes lightly too. The trailer's braking is in proportion to your vehicle and trailer.
The Prodigy P3 uses an internal inertia sensor to detect how your vehicle is braking so it can send the right amount of braking power to your trailer. It measures the inertia of your tow vehicle and activates the trailer's brakes to slow at the same rate. The result is uniform braking across your towing setup. No push-pull action - just smooth, proportional braking every time.
 Alternate Instructions
California residents: click here
Videos are provided as a guide only. Refer to manufacturer installation instructions and specs for complete information.
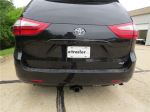
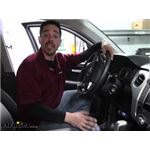
Rob: How's it going everybody Rob here at etrailer.com and today we're going to be taking a look at the Tekonsha P3 Trailer Brake Controller on our 2015 Toyota Tundra. Here's what our brake controller looks like once it's installed and we chose to mount ours on the right-hand side of the steering wheel, just so we could see it pretty easily when we're driving and we have access to everything we need to. This is what we consider a traditional style brake controller, because it is going to be a box that has to mount on the dash.There are a lot more newer styles that are coming out where either is a remote style mounting system, where it's not mounted on the dash, or a very small button or dial that's mounted on the dash rather than such a big box. But with this being a traditional style brake controller, it's still is a really nice, very good functioning brake controller. Partially because it's a proportional brake controller. What that means is that when we push on the brakes in our Tundra, it's going to apply the brakes to our trailer in the same time and intensity.
If we have a panic stop and really mashed on the brakes really quickly, it's going to apply the brakes very quickly and pretty firmly to our trailer. But, at the same time, go into a stoplight and we're just easing into that stop and slowly slowing down, it's going to do the same thing to the trailer because there's actually an internal inertia sensor that detects the deceleration or the slowing down of our truck and applies the brakes accordingly to the trailer.I liked the fact that the display is extremely easy to read and this brake controller is actually loaded with a lot of features. If you have a lot of different trailers that you tow or a lot of different people that tow with your vehicle, this can actually store up to five different profiles. So if you have more than one trailer, you can pick which one you want or if a certain driver likes the settings differently than the other, you can have a profile for each driver. It's just really nice that we don't have to go in and start messing with all the settings, resetting all the gain and boost settings.The way we are going to adjust our gain settings is with the arrows on the side.
it's going to have a maximum power of 14 and it'll go all the way down to zero. This is going to be displayed in volts. So that's going to be the maximum output, going to the trailer brakes. At the same time, we also have what's called the boost setting. Now there's a few different levels of this.
Right now it's off and we can see because there's no dots on the screen, but as soon as I go to boost level one, we'll get a little B1 in the corner. You'll also notice that the trailer and that truck got bigger. We go to boost two. Again, we can see the trailers getting larger. And finally on boost three, it's an extremely big trailer compared to the truck.What the boost settings are going to do is it's going to allow the brakes to ramp up to the maximum power quickly.
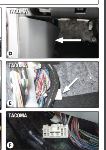
It's not going to put more power out than you have maximum setting at, but it's just going to allow it to get there quicker and have a little bit more aggression when it first starts out. Because typically the heavier the trailer you have, the more initial braking you're going to want so that you're not putting so much stress on your tow vehicle.Like most brake controllers, this does have that manual override. This is a lever style. I really actually like this because it's very intuitive. You just reach down and you can grab it and it just rotates over to the side and you can apply however much brakes you need to the trailer alone without having to press the brake pedal. That comes in handy a lot if you get trailer sway going on and you just really need to slow down the trailer without having to slow down the truck. But also at the same time, if you have a 5th wheel and you need to get that slider to move back, you can use this to hold the brakes on the trailer and get everything to move.One thing I really like about this is the fact that since it's a proportional brake controller, we do get that really smooth, consistent braking action. But at the same time, if you think about it, if we're not moving at a stoplight, the trailer brake controller is not going to sense any slowing down because we're already stopped. But Tekonsha knows that and they know that you still need that braking power when you're sitting still. So if you apply the brakes in your Tundra and you wait a few seconds after so much time, the brake controller is going to hold the brakes on the trailer at 25% because it's assuming that you're at a stoplight, but it doesn't want to put the maximum power out potentially causing damage to the brakes and really we don't need that much power when we're just sitting at a stoplight.Another nice thing that I really like about this controller is that it works with one all the way up to four axles or eight brake assemblies. If we go into the menu here, you can really see how many options and features are built into this. We can go into the display. We actually have the option of changing the brightness, the color, and the contrast. So if you want to change it to match your dash or the dash lights, there's tons of different colors in here or you can find one that maybe stands out a little bit. You can set the brightness or if you do a lot of night driving, you can turn it down to where it's not blinding. There's just a lot of different things you can do in here. Also in the menu, if we go into brake type, this will let us know that it's going to work with electric or electric over hydraulic brakes, which is really nice.As far as the installation goes, this is one of the easiest brake controllers I've put in because if your Tundra already has the factory tow package, all you're going to need to pick up is the brake controller and the adapter to plug it in. There is a factory port underneath the dash that the adapter will plug right into. All we got to do is mount the brake controller up. In fact, let's go and walk through where that plug is and we'll show you how we got everything in place.To begin our installation. We need to find where we want to mount our brake controller. For us, we're going to be mounting ours on the right-hand side of the steering wheel. We got a nice flat spot on the dash, right underneath these buttons. So we're going to go ahead and put ours right about there.In your kit, you're going to get a few different brackets. We have the traditional style brake controller bracket and that'll work just fine. However, we want to use the, kind of like a pocket style, where it's going to hold the brake controller just like that and it gives you the option to pull it out real easily. So we'll use these small bracket that'll attach to that clamp and it'll have a smaller footprint on the dash if we do ever want to take the brake controller out. The main thing when we go to mount our brake controller is that it's nice and level going across. We have plenty of adjustment so we can mount it at any angle like this, almost any angle, but a pretty good viewing angle. We just need to make sure that it's level and it's not crooked when we're lining it up.You want to make sure when you mount your bracket, that it's nice and straight. Since we're going to be mounting our brake controller in this lower panel, right by this almost like a vent right here, we need to double-check that there's nothing back there before we start drilling and mounting the bracket. I'm going to take a plastic trim panel tool and I'm just going to start pulling on this panel, releasing those clips, and then just verify that there's nothing behind here because that little hole or the speaker grill hole right there, there's nothing back there. There's no electronics. There's no wires. But if we do go down further there is a sensor, some wires on there. We need to make sure we're not down too far. We'll go and click the panel back in place and we grab the bracket and a couple of the screws that come in our kit. I like to get one started, leave it kind of loose, just like make sure it's nice and level.Let me make any small adjustments angling it and then put the second one in. I'm going to take the cradle and we're going to have some machine screws in our kit. They got little washers on them. We're going to pass them through the bracket and you want that cradle to be on the inside. Most likely it's going to be easiest just to get it started a few turns by hand. Obviously, you're not going to have enough room to get a full-size screwdriver in here just because of the dash so I suggest using a bit driver and a small bit and we should have enough room to get in there and tighten everything up.But again, I'll get this one started. Just make sure it's in there and secure. Get the other one started and then we can put our brake controller in and before we tighten it up, we'll get that viewing angle we want. Now that we've got our brake controller bracket mounted and it's ready to go in, we need to get the wiring. Fortunately for us on our Tundra, it has a factory tow package so we're going to be using the adapter to plug it in and there's not going to be running too many wires. It also, fortunately, it's right above where our brake controller is. It's right behind this panel here with these switches. If you, again, grab yourself a plastic trim panel tool. You may be able to do it just by grabbing, but I like to use that trim panel tool to help release those clips on the top. And then at the same time if you pull outward, kind of rotate that panel down and pull outward, it'll release the clips on the bottom.If you look inside it may be right here. This is the plug, but it may be tucked back in there somewhere, but we're looking for a plug that looks like this. We're going to take our brake controller adapter and you can see that the plugs are going to match up. I'll go ahead and plug it in, make sure it locks in place. Give it a quick tug. Make sure it's secure. Then what I like to do is I like to take the other end that's going to plug into our brake controller and I'm going to feed it into that pocket, but I'm going to have it come straight down because we're going to need to hook up our ground wire. Fortunately, we have plenty of slack because it's not attached to the rest of the harness just at the very end of the plug. We'll start routing all this down and we can pull all the slack out once we get it out from the bottom of the dash.With that plugged in, make sure all your other plugs are in place. Then we can put that panel back and make sure all the panels are clicked back in. Now we got our wires down here. We need to find a spot for our ground. I like to find a factory ground or a bolt and nut that's already attached to the factory sheet metal. That way we just prevent having to put any more holes in our dash, in the floorboard, or anywhere else. And we do have a good amount of slack. If we look against the firewall right against the brake pedal bracket, there's a bolt that's going all the way through and this would be a really good ground spot. I'm going to grab myself a 13-millimeter socket and remove that nut.We can slide the ring terminal over and secure everything down. One thing to be mindful is when you are running your wire over, you want to try to stay away from all the pedals and make sure that when you are routing it, it's not going to get caught up on anything or interfere with your pedals, your feet, or anything else. Now the ring terminal is just a little bit too small to fit over that stud. So a quick trick to prevent you from having to cut it off and get a new one is if you take a pair of cutters and if you cut the ring terminal to where it's almost a C shape, we can get it to fit around the stud and then put the nut back and be nice and secure. Just a little trick. That'll prevent you from having to go and get another ring terminal or finding another stud to work with. Let's make sure that ring terminal is around the stud. Then we can replace the nut.I just want to make sure that your ring terminal is nice and secure. It's not spinning around and it's not loose on there. Now I want to make sure that I round that black plug towards the bracket where I'm going to mount my brake controller. I'm just going to take a few zip ties and zip tie all these loose wires under the dash. So one it'll clean it up and you don't have to worry about them interfering with anything. We have all of those wires tied up and we're going to make sure that that plug reaches the bracket, we can plug it into the back of the brake controller. Plug it in and we see that it comes on right away so we know that it's working properly. Let me just slide it into the cradle, make sure those tabs are locked in place, and get it at the angle we want it at.Then we come back and tighten up those screws on the side, just to where there's enough tension to where it's not going to be flopping around. But that bracket is plastic so you don't want to go too tight. Just enough to have a little bit of tension so it'll hold itself. Now that we've got our brake controller turned on, the lights are on, and we know everything's working. I'm going to go ahead and plug in my tester and we'll verify that it's working at the back of the 7-Way. With my tester plugged in, if we look at the top needle or the top meter up there that says brake current, that's going to let us know if our brake controller is sending the power out to the trailer. Go ahead and hit the manual override and as I move that lever over, you can see the needle moving up, letting us know that the brake controller is sending power out.All we'll have to do now is hook up to our trailer and hit the road. But now that we know that it's working, that'll finish up your installation. inaudible 00:14:38 look at Tekonsha P3 Trailer Brake Controller on our 2015 Toyota Tundra.


Do you have a question about this Trailer Brake Controller?
Info for this part was:
At etrailer.com we provide the best information available about the products we sell. We take the quality of our information seriously so that you can get the right part the first time. Let us know if anything is missing or if you have any questions.


Thank you! Your comment has been submitted successfully. You should be able to view your question/comment here within a few days.
Error submitting comment. Please try again momentarily.