
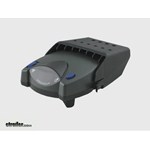
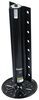
Tekonsha Prodigy P2 Trailer Brake Controller w/ Custom Harness - Up to 4 Axles - Proportional


To see if this custom-fit item will work for you please tell us what vehicle you'll use it with.


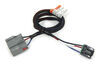
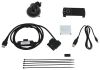
The Tekonsha P2 is a classic brake controller you know you can rely on. It's easy to install, and with the custom harness, it's plug-and-play.
Features:
Specs:
Gain is the maximum amount of power that will be applied to your trailer's brakes. How much braking output you need is determined by the weight of your trailer; a heavier trailer will need more power to bring it to a stop. You want to go as high as you can without the trailer brakes locking up.
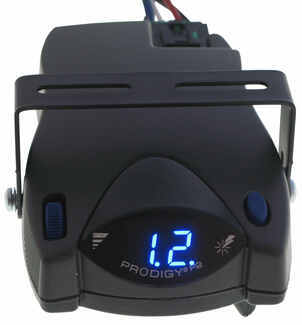
You can adjust the gain by turning the thumbwheel on the front of the controller.
The boost setting controls the aggressiveness of your trailer's braking, meaning how quickly the brakes reach the maximum braking level. If your vehicle takes too long to come to a stop, increase the setting. If it stops too abruptly, decrease the setting.
Depending on the level of boost, your trailer brakes can start at either 13 percent or 25 percent of the set gain. So instead of starting at 0, the brakes will start at 25 percent and get to 100 percent sooner. This keeps the trailer from pushing your tow vehicle forward.
Boost Levels:
| Approximate Gross Trailer Weight | Boost Level | Increase in Initial Power Output |
|---|---|---|
| Less than tow vehicle GVW | B1 | 13% |
| Equal to tow vehicle GVW | B1 or B2 | 13% or 25% |
| Up to 25% more than tow vehicle GVW | B2 or B3* | 25% |
| Up to 40% more than tow vehicle GVW | B3* | 25% |
*Both B2 and B3 offer a 25-percent boost in initial power. But the braking curve for B3 is more aggressive than that of B2. This means that, even though you will start out with the same intensity when using these boost levels, you will get an overall more aggressive braking experience with the higher level. So if you use B3, you will reach maximum braking sooner than if you use B2.
To engage the manual override, twist the rotary-style lever from right to left. This will activate the trailer's brakes and brake lights independently of your vehicle, great for stopping sway or controlling your trailer's momentum in an emergency.
The Prodigy P2 offers key safety features to prevent damage to your towing setup:
- Integrated reverse battery protection shields the brake controller and your trailer's breakaway system from shorts.
- When the P2 is not in use, it draws only 3.6 milliamps to minimize the drain on your vehicle's battery.
- Any time your vehicle and trailer are at a standstill with the brakes applied for more than 5 seconds, the hold feature will kick on and reduce power to just 25 percent. This will keep your trailer in place without your brakes overheating.
The Prodigy P2 also runs continuous diagnostics to check for problems as they come up, including:
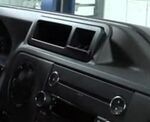
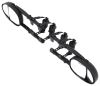
Installing the P2 is incredibly simple. You'll mount the bracket to your dashboard then mount the unit to the bracket. Plug the custom harness into your vehicle and into the unit. Done!
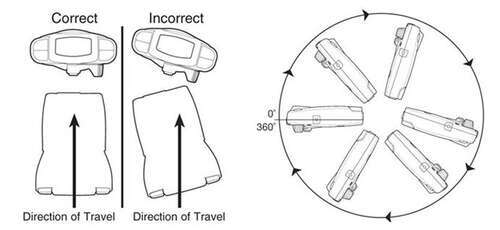
Keep in mind that the P2 must be horizontally level and parallel with the direction of travel to work correctly.
With a replacement wiring harness (sold separately) and replacement bracket (P7685 - sold separately), you can even transfer the Prodigy P2 to another vehicle.
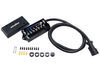
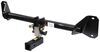
Note: If you don't already have a 7-way plug at the back of your vehicle, take a look at our exclusive 7- and 4-way brake controller installation kit (ETBC7 - sold separately).
Proportional braking means that your trailer brakes mimic your tow vehicle's brakes. If you slam on the brakes, your trailer brakes will activate with the same intensity; if you brake lightly, your trailer brakes lightly too. The trailer's braking is in proportion to your vehicle's braking. This saves wear and tear on the tires and the brakes on both your vehicle and trailer.
The Prodigy P2 uses an internal inertia sensor to detect how your vehicle is braking so it can send the right amount of braking power to your trailer. It measures the inertia of your tow vehicle and activates the trailer's brakes to slow at the same rate. The result is uniform braking across your towing setup. No push-pull action - just smooth, proportional braking every time.
 Alternate Instructions
California residents: click here
Videos are provided as a guide only. Refer to manufacturer installation instructions and specs for complete information.
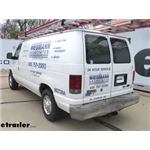
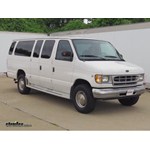
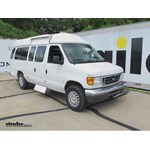
Today on this 2004 Ford Van, we're going to install part number 90885 from Tekonsha. This is a Prodigy P2 Brake Controller. Now alos, we're going to use part number ETBC7 to install this. We're going to start off with that part number first. We'll take the 4 pole to 7 pole adapter, and we're going to attach it to the gray cable that comes with the kit. We're going to connect the black and white wires to our blue and black wires on the adapter.
We'll go ahead and cut the sheath back on the cable, and we're going to match up the colors as follows. Black to black, and white to blue. Then we'll go ahead and tape the assembly together and then add some loom to it to help cover it up. Now we'll install the bracket for the 7 pole adapter. The hitch already has a bracket installed on it, so our 7 pole bracket will go right to it. We'll use the supplied hardware to make our attachment.
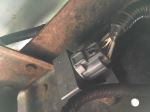
Now we're going to take our wire assembly, and we'll go ahead an attach it to our bracket. After we have our 7 pole connector decked to the bracket, we'll go ahead and take the 4 pole and connect it to the preexisting 4 pole on the van. We'll go ahead and apply some dielectric grease to the contacts before I plug it together. The grease will be part number 11755. We'll plug two 4 poles together, and then use some tape and a zip tie to help make it a semi-permanent connection. Then we'll run our wires over the hitch, and then we'll go ahead and find a location to attach our ground.
Our ground will be the white wire at the ring terminal, so we're going to attach that to the frame. Now you notice on this wire harness, this has a purple wire. This is typically used to reverse light function. In this case, the trailer that the van will be paired with does not have reverse lights, so it will not be hooked up. Now we'll go ahead and start running our gray cable up towards the front of the vehicle. We're going to run it on the inside edge of the frame using zip ties to help secure it in place as we go up towards the front of the vehicle and up into the engine compartment.
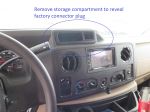
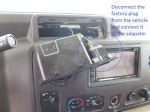
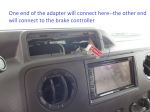
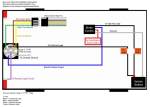
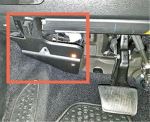
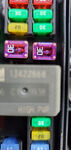
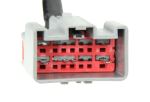
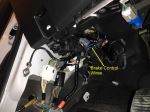
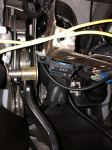
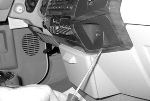
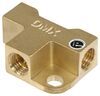
Now to help us pull the wire through the engine compartment, we're going to be using a piece of airline tubing. Now this also could be a fish tape wire, or any other sturdy piece of wire that you can bend as needed. Once we pull up all our excess slack, we'll go ahead and take our wires and cut away the sheath. We'll go back as far as possible and remove the sheath. We'll set our white wire aside for now. That will eventually be ran inside the cabin. Then find a location for our circuit breaker. We'll go ahead and mount the circuit breaker to the sheet metal. Now the circuit breaker we're using is a 40 amp circuit breaker. Once we have it mounted up, we can go ahead an attach our wires. We'll use the provided ring terminals in the ETBC7 kit to make our connections to the circuit breaker, and also to the power distribution box. We'll attach our first wire that goes out to the 7 pole connector to the silver post. Now our wire going to the power supply box will go to the copper post. With those connections made, we can go ahead and turn our attention to the white wire. Once again, we're going to go ahead and use our red airline tubing to help pull the wires from the inside out. Go inside the vehicle, and behind the pedals there's a grommet we'll use to pull our wire through. We'll make a small cut in the grommet with a knife, and then poke our airline tube through. We'll pull it out underneath the hood, and then connect our white wire to it using some tape, then pull it on back through. We'll cut off our excess and leave it alone for now. Now the plug into our port we'll be using part number 3035-P. Now in our adapter cord, we're going to cut the blue wire. We're going to connect the blue wire to our white wire going out back to our 7 volt connector. We'll use the supplied buck connector for that. Then we'll use the tote package to take care of the rest of our connections. We'll plug it into place, since the tote package takes care of the 12 volt power supply and the brake signal. Next we'll find a location for our bracket for our spray controller. There's a small metal bracket underneath the dash towards the right hand side. We'll take our bracket, and using a couple of sheet metal screws, we'll go ahead and attach it. Once that's complete, we'll go back to our adapter cord and plug it to the back of the Prodigy brake controller. We'll plug the 2 together, and then attach it to the bracket. While we're doing it, you can see where we have power going to the brake controller. With our brake controller firmly attached to the bracket, we'll go ahead and zip tie our wires underneath to make sure everything is safe and secure. With everything hooked up and running, let's go ahead and try it out. We'll go ahead and plug our trailer into the back of the van, and you can see before we plug it in, we have NC for no connection. When we plug in the trailer, we'll have a C for connection. Next we'll move the manual override over, and you can see how the numbers count up. That lets us know if it's sending power out to the trailer. We'll also hit the brake pedal, and we should get a small number. In this case, we're on 2, but it lets us know that the brake signal's working and going to the brake controller. With that, that'll finish it for our install of part number 90885, the Prodigy P2 Brake Controller, our ETBC7 kit, and the adapter cord on our 2004 Ford van. .


Do you have a question about this Trailer Brake Controller?
Info for this part was:
At etrailer.com we provide the best information available about the products we sell. We take the quality of our information seriously so that you can get the right part the first time. Let us know if anything is missing or if you have any questions.


Thank you! Your comment has been submitted successfully. You should be able to view your question/comment here within a few days.
Error submitting comment. Please try again momentarily.