bing tracking image
  1. Wiring
  2. Deka
  3. Wire Connectors
  4. Butt Connectors
  5. 12-10 Gauge
Deka Heat Shrink Butt Connector - 12-10 Gauge - Nylon Insulation - Yellow - Qty 5
Deka

Deka Heat Shrink Butt Connector - 12-10 Gauge - Nylon Insulation - Yellow - Qty 5

Part Number: DW05745-5
In Stock
$7.63
Wiring
Add to cart
zoom in icon
slider vertical icon
zoom out icon
Comment field cannot be left empty.
Name field cannot be left empty.

Thank you! Your comment has been submitted successfully. You should be able to view your question/comment here within a few days.

Error submitting comment. Please try again momentarily.

Product Images

Customer Photos

Need help with installation?
Locate installers near me
This yellow butt connector joins two lengths of 12-10 gauge wire. Insulated with heat-shrinkable nylon for adjustability and durability. Great Prices for the best wiring from Deka. Deka Heat Shrink Butt Connector - 12-10 Gauge - Nylon Insulation - Yellow - Qty 5 part number DW05745-5 can be ordered online at etrailer.com or call 1-800-940-8924 for expert service.
  • All Info
  • Reviews (1033)
  • Q & A (0)
  • Videos (2)
  • Photos

Deka Wiring - DW05745-5

Highlights

  • Works with 12-10 gauge wire: Perfect for creating secure connections for heavy-duty applications.
  • Heat-shrinkable nylon insulation: Offers adjustability and long-lasting durability for varied uses.
  • Weather-resistant seal: Provides superior waterproofing to protect connections against elements.
  • Easy to use and reliable: Makes wire splicing straightforward, ensuring dependable performance.
  • Pack of 5 connectors: Ideal for handling multiple connections in one purchase, enhancing convenience.
  • Distinctive yellow color: Easily identify and match wire gauges during installations.

Features to know about

Seal Out the Elements: Heat-Shrinkable Nylon Insulation

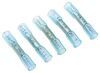
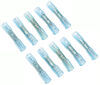
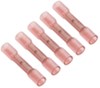
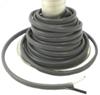
Tired of dealing with moisture and corrosion in your wiring connections? The Deka Heat Shrink Butt Connector features a heat-shrinkable nylon insulation that provides an adjustable, durable seal. This quality fortification not only increases the longevity of your electrical connections but also ensures a weather-resistant barrier, keeping moisture out and your wiring safe. Ideal for applications exposed to harsh environments, this connector is a must-have for any DIY enthusiast dealing with outdoor wiring projects.

Secure Every Connection: High-Quality 12-10 Gauge Compatibility

When it comes to handling wires confidently, gauge compatibility is crucial. Designed specifically for 12-10 gauge wires, these butt connectors provide a secure and efficient connection. By accommodating these common wire sizes, the connectors offer flexibility and reliability whether you're working in automotive, marine, or household applications. This makes them a versatile tool in maintaining seamless electrical connectivity.

Ease of Use: Intuitive and Effortless Installation

Having trouble with complex installations? Users love that these connectors are as easy to use and install as they come. You can count on a straightforward process without any specialized tools—just crimp and shrink. This simplicity ensures that any project, from upgrading your trailer's wiring to replacing vehicle brake connections, is tackled with confidence and ease.

Reliable Performance: Time-Tested Durability

Dependability is non-negotiable when it comes to electrical connections, and the Deka Heat Shrink Butt Connectors deliver just that. Once installed, users often report that these connectors perform as expected, if not better. Count on their robust nature to withstand vibrations and other stressors typical in automotive and utility works, making them an excellent choice for durable and lasting electrical repairs or upgrades.

Versatile Application Opportunities: From Trailers to Boat Electronics

One of the standout features is the connectors' broad application use. Whether you're working on a boat trailer, upgrading a house lighting system, or setting up a new car sound system, these connectors are up to the task. They're particularly favored in areas involving exposure to elements, thanks to their moisture-resistant capabilities, making them indispensable for any wiring project exposed to the elements.

05745 Deka Heat Shrink Butt Connector - 12-10 Gauge - Nylon Insulation - Yellow - Qty 5


California residents: click here


Video of Deka Heat Shrink Butt Connector - 12-10 Gauge - Nylon Insulation - Yellow - Qty 5

Videos are provided as a guide only. Refer to manufacturer installation instructions and specs for complete information.


Video Transcript for All You Need to Know About the Deka Heat Shrink Butt Connector

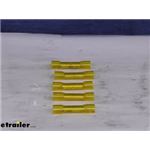
Hello everybody, this is Jeff with etrailer.com. Today, we're gonna take a look at the Deka yellow butt connectors for 12-10 gauge size wire. This is for a quantity of five connectors. Now, these yellow butt connectors will join two lengths of 12-gauge or 10-gauge size wire. It will insulate the connection with the heat shrinkable nylon for adjustability and durability and the yellow color of this connector indicates the size wire the connector will fit which is 12 to 10 gauge size, and also if you don't remember the color, what size it fits, it is stamped on the connector, 12-10 AWG, which it's telling you. But basically when you install this, what you'll do is get your two wires and enough you'll strip about a quarter of an inch of insulation off the end of each wire that you're wanting to connect, and then what you'll do is insert the end of the one wire all the way in into the metal casing until it stops right in the very center, they do have a stopper, so you push the wire in there, once it stops you make sure it's in the metal casing there and then what you'll do is take your crimper and you'll just crimp down on that metal casing until it holds the wire in place, and then you'll take your second wire and do the same on the other side, slide it all the way in, the part that you've stripped off, slide that all the way in 'til it stops, make sure it's in the metal casing, take your crimper, crimp it all the way down.

Once your two wires are in there, what you might wanna do is pull on both wires just to make sure you do have a good connection, that they've been crimped correctly. If that's all fine, then what you'll do is you'll take a heat source like a heat gun and then just apply heat over the whole insulation and what'll happen is it'll cause this nylon insulation to heat to shrink and it'll completely seal around your connection and prevent the elements from causing any problem with your connection. Now this part is for a quantity of five connectors. We do also sell this in a single pack which is part #DW05745-1, and also as a ten-pack, part #DW05745-10. But that should do it for the review on the Deka yellow butt connectors for the 12-10 gauge size wire for a quantity of five..

Customer Satisfaction Score:


Customer Reviews

Deka Heat Shrink Butt Connector - 12-10 Gauge - Nylon Insulation - Yellow - Qty 5 - DW05745-5

Average Customer Rating:  4.8 out of 5 stars   (1033 Customer Reviews)

This yellow butt connector joins two lengths of 12-10 gauge wire. Insulated with heat-shrinkable nylon for adjustability and durability.

by:


by:


by:


by:


by:


by:


by:


by:


by:


by:


by:


by:


by:


by:


by:


by:


by:


by:


by:


by:


by:


by:


by:


by:


by:


25
936
Show More Reviews

See what our Experts say about this Deka Wiring

  • Best Trailer Wiring Harness for a 2016 Toyota Sienna XLE
    I do have an option for you but the T-One Vehicle Wiring Harness with 4-Pole Flat Trailer Connector part # 118334 that you have will not work on your 2016 Toyota Sienna XLE. Instead, you will need to use the T-One Vehicle Wiring Harness with 4-Pole Flat Trailer Connector part # 118648. You can reference the attached install video if you need help with this. The Universal Installation Kit for Trailer Brake Controllers part # ETBC7 can however be transferred onto your new Sienna. In order...
    view full answer...
  • Fuse Box Instructions for Installing a Brake Controller on a 2003 Chevy Silverado
    Whether your 2003 Chevrolet Silverado came with a factory 7-Way or not, the wiring for both the brake controller and the 12V power pin on a 7-Way is already run. If you check out the video I attached of the Prodigy P2 # 90885 being installed on a similar 2003 Silverado you can see what needs to be done with the wiring under the fuse box at the 3:20 mark. You will just need to connect the Blue wires together and you will be good to go since you already took care of the Red wires. The P2...
    view full answer...
    Image 1 for
  • Wiring Location For Trailer Brake Controller On a 2021 Buick Enclave With Factory Trailer Package
    Your 2021 Buick Enclave has a wiring pigtail and not a connector for wiring a Redarc Tow-Pro Elite Trailer Brake Controller # RED44FR. The 4 wires are located below the OBD2 port behind the side kick plate(see Image). This is where you will be able to attach the included pigtail using the Heat Shrink Butt Connectors # DW05744-5 and # DW05745-5. You will only need 2 of each connectors for the 4 wires that connect to the brake controller pigtail.
    view full answer...
    Image 1 for
  • Replacement 4 Way Trailer Connector for my PWC Trailer
    The Hopkins Endurance 4-Way Flat Trailer Connector part # HM48110 is the perfect solution to solve your problem. Use heat shrink butt connectors like DW05745-5 to ensure a water tight connection.
    view full answer...
  • Troubleshooting Voltage Drop from 12V to 7V When Trailer Brakes are Installed
    It sounds like you may have a poor ground connection which is causing low voltage when you are testing. Sometimes it may look like we have a really good ground point but some paint or debris is getting in the way and causing issues. What I recommend doing is taking your trailer brake ground wires and running them up to your main trailer ground location. You will likely need more 10 Gauge Wire # 10-1-1 and I recommend using Heat Shrink Butt Connectors # DW05745-5 because they hold up much...
    view full answer...
    Image 1 for
  • How to Use the 7 Way Plug to Power a Fuel Pump
    Good news! I can help you wire your 12 volt fuel pump to work with your 7 way vehicle plug. To accomplish this task you will need a few things: 7-way plug # A7WCB 10 gauge wire # 10-2-1 2 pole flat wiring # HM47965 butt connectors # DW05745-5 First thing you will want to do is wire the 7 way plug with the 10 gauge wire to the ground and 12 volt power wire. The 12 volt power will be in the 1 o'clock position and the ground is in the 7 o'clock position. I've included a picture for you...
    view full answer...
    Image 1 for Image 2 for
  • How Does Prodigy P3 Brake Controller Install in 2018 Chevy Silverado 1500
    The install process of the Prodigy P3 # 90195 with the # 3016 in your 2018 Chevy Silverado 1500 is just like the install video I attached which happens to be the same as the on you referenced. You do not have to run any wires to the rear of the truck as they are already ran from the factory! The # 3016 plugs into the 4-pin connector in your Chevrolet Silverado 1500's junction box. The box is located underneath the dash, to the left of the steering column, just above the carpeting.
    view full answer...
    Image 1 for
  • Replacement for Damaged 7-Way Trailer Connector
    By damaged power cable, I assume you are referring to your trailer's 7-way being severed, and while there likely isn't going to be any electrical damage, you will need to replace the 7-way connector from the trailer. You didn't specify what was severed, but this is the most obvious culprit based on how they connect. For that you would be able to splice in a new connector, depending on the length you need: - 4 feet: 7-Way Molded Trailer Wire Connector # H20043 - 6 feet: Mighty Cord 7-Way...
    view full answer...
  • Compatibility of Curt Easy Mount Bracket on Draw-Tite Trailer Hitch and J-Pin of 2015 Subaru Outback
    The Curt Easy Mount Bracket for 4- or 5-Way Flat and 6- or 7-Way Trailer Connectors - 2" Hitch # C58000 is a great option for you and won't interfere with your J-Pin # 63201. This mount fits the collar of the hitch snugly so it will not interfere. This combination will give you the stability you desire for your ball mount, the location accessible for your 7-way connector, and compatibility with the Draw-Tite Trailer Hitch # 76227 on your 2015 Subaru Outback
    view full answer...
  • What 5-Way Wiring Harness do You Recommend for My 2021 Jeep Wrangler Rubicon without Tow Package?
    I have a great 5-way solution for you. Unfortunately, we do not make a 5-way customized harness, but we do carry the parts needed to create one for your application. For this route on your 2021 Jeep Wrangler without a factory tow package, I recommend using the T-One Vehicle Wiring Harness with 4-Pole Flat Trailer Connector # 118786 along with the Curt Trailer Connector Adapter - 4-Way Flat to 5-Way Flat - Vehicle End # C57187. If you are using this setup for a boat trailer application,...
    view full answer...
  • What is the Wire Gauge on 10 Inch Electric Trailer Brake Magnets
    The magnet wires on Electric Trailer Brake Assembly # A35W42B are 18 gauge. The wiring going to the brakes from a trailer connector is usually larger such as 10 gauge # 10-2-1.
    view full answer...
  • Installing a 7-Way Connector at the Rear of a 5th Wheel Trailer with a 4-Pole Connector
    To get a functioning 7-Way at the rear of your 5th wheel trailer that has a 4-Pole you will want to install the Adapter 4-Pole to 7-Pole and 4-Pole # 37185 which can be mounted to your bumper using the No-Drill Mount Bracket # 18140. To get the 12V Power and Brake Controller signal from your Chevy Duramax you will then need to run Jacketed 2 Wire (Brake Wire) # 12-2-1 up to the 7-Way on your Duramax and splice it in. If Butt Connectors are needed use part # DW05745-5. If the Auxiliary pin...
    view full answer...
  • Upgrading Big Tex #35SA Trailer With Brakes
    It sounds like your Big Tex trailer did not come with brakes. Based on this, to convert your trailer with no brakes, to adding electric brakes, on your Big Tex 35SA trailer, the first thing you need is a left and right brake kit. You could use the Dexter 23-26-27 kit (includes left and right) which matches your Dexter axle 4” X 4” brake flange. However, for a little more I would recommend Dexter # 23-468-469 Nev-R-Ajust self adjusting brake kit. Most people do not want to have to periodically...
    view full answer...
    Image 1 for
  • Wire Size Butt Connectors is Needed to Connect Wiring for Electric Trailer Brakes
    Electric brakes, like part # 23-26-27, use 16 gauge wiring. However, we generally recommend using 10 gauge, like part # 10-2-1, to connect to the brakes because of how far the wiring generally has to be run. So you need to use butt connectors large enough for the 10 gauge wire, like part # DW05745-5. They'll still be able to be crimped down onto the smaller 16 gauge as well, especially since they're heat shrink. Between the two grease seals, parts # 58846 and # RG06-050, we prefer our...
    view full answer...
  • Parts Needed To Install 7 Way Plug on Trailer
    Since a 4 way connection does not provide you with the capabilities to control the trailer's brakes, you would need to convert your boat's 4 way connector into a 7 way using something like the Epicord # 277-000143. In order to make wiring a bit easier and more organized, I also recommend using a Junction Box like the # 38656 so that you can connect all of the trailer wires to the box and then neatly wire the Epicord to the box. This will help ensure that all of your wiring is cleanly installed...
    view full answer...
  • Curt Adapter # C57674 and Tekonsha Prodigy P2 and P3 Operation
    If you have the Adapter 4 Pole to 7 Pole and 4 Pole w/Test Lamps # C57674 correctly installed then the 12V light will remain on as that is 12V of constant current going to the adapter. The way that the Tekonsha Prodigy P2 # 90885 and P3 # 90195 brake controllers work is that they have to have a trailer connected and there has to be movement for the inertia sensor to actually send output to the brake controller pin on your 7-Way when the brake pedal is pressed. The way to test one of these...
    view full answer...
  • Connecting separate reverse trailer lights using 5-pole wiring harness
    You are definitely on the right track. Start off by installing the Tow Ready 4 Pole to 5 Pole Trailer Wiring Adapter # 20036 on your tow vehicle with the Blue wire running to your reverse light signal. Once that is done I then recommend cutting off the 4-Way Flat connector on your trailer side and installing the Hopkins Endurance 5-Way Flat Trailer Connector # HM47910 using Butt Connectors # DW05744-10 to secure your connections (wires on the 5-Way are labeled). You can either run to separate...
    view full answer...
  • Troubleshooting Passenger Side Running Light On Tail Light Not Working
    Thanks for the picture! Based on the color of the wiring used on the light your red wire should be the turn signal and brake light wire, the black wire should be the running light wire, and the white wire should be the ground. You can confirm this by using a circuit tester like # PTW2993 to test the wires while a friend turns on the running lights, and hits the brakes and turn signals. Now since wire nuts were used, it is possible that the connections are not secure as they can come...
    view full answer...
    Image 1 for Image 2 for Image 3 for
  • Replacement Wiring for a Palomino B-1200 Truck Bed Camper
    Hey Guy, I wasn't able to pin down what exact wiring came on your Palomino camper, but generally the in-bed truck campers use a 7-Way so they are able to provide power to all of the lights as well as any power that the camper requires to operate. To replace a 7-Way you can use the Replacement Connector # e99010 along with Butt Connectors # DW05744-5 and # DW05745-5 to get all of your wiring connected. You'll want to connect the wires by function as opposed to by color. Let me know if...
    view full answer...
  • Installing a Brake Controller on a 2016 Honda Odyssey
    The parts needed and steps taken to install a brake controller, like the Tekonsha Prodigy P3 # 90195, on your 2016 Honda Odyssey will really depend on what they are wiring for your 7-Way. If they have wired all of the functions then you will simply need to connect the 4 wires from the pigtail on the P3 to the following functions: White - Ground (negative terminal on battery) Red - COLD side of Stop Light Switch (wire that gets hot only when brake pedal is pressed) Black - 12V Power (positive...
    view full answer...
    Image 1 for
  • Why is 10 or 12 Gauge Wire Recommended for Electric Brake Assemblies
    The reason that 10 Gauge # 10-1-1 or 12 Gauge # 12-1-1 wire is recommended for 10" brake assemblies, like part # AKEBRK-35-SA, is because they pull more power than the lights on your trailer. I believe the green wire you are referring to carries the right turn/stop lighting functions as you can see from the attached photo of a trailer side 4-Way. The 14 and 16 gauge wires are too small for the amount of power needing to get to the brake assemblies and they could potentially get too hot,...
    view full answer...
    Image 1 for Image 2 for
  • Parts Needed to Add a 4-Way and 7-Way to a 2014 Ford F-150 with a Factory 4-Way Connector
    We have exactly what you need to add fully functioning 4-Way and 7-Way connections to your 2014 Ford F-150. Since you already have a 4-Way on your F-150 you will need to use the Universal Wiring Kit # ETBC7. This will connect to your existing 4-Way and then will have some open ended wires that you will need to connect to the battery of your F-150 and your brake controller, as well as a wire with a ring terminal for a ground. I am attaching a video that shows this process being done as...
    view full answer...
  • Determining The Correct Replacement Axle For 2012 Aliner Classic Camper
    It is possible that the Dexter Trailer Axle w/ Idler Hubs - EZ-Lube - 5 on 4-1/2 Bolt Pattern - 72" Long - 2,000 lbs # 20545I-EZ-72-15 you were looking at will fit your 2012 Aliner Classic Camper but the only way to be sure it to measure your current axle, and find the axle rating of your current axle. Starting with the measurements you will need to know the hub face to hub face and spring center to spring center measurements. For example the # 20545I-EZ-72-15 has a hub face to hub face...
    view full answer...
    Image 1 for
  • Troubleshooting Flashing Error Code 5.H on Tekonsha Prodigy Brake Controller
    The code 5.H (flashes 2x per second or a steady display) on the Prodigy P2 # 90885 indicates the brake wire is seeing a short during idling conditions. This could be due to dirt or corrosion on the pin connections of your 7-way, so I recommend cleaning your connections using sand paper or steel wool and then using dielectric grease # 11755 to protect from moisture and debris. If you are using an LED tester to check your functions, this is likely the issue and you should check your brake...
    view full answer...


< Previous
123. . .19


Do you have a question about this Wiring?


Info for this part was:

Employee Zack K
Video Edited:
Zack K
Employee Jacob T
Video Edited:
Jacob T
Employee Jonathan Y
Video Edited:
Jonathan Y
Employee Jeff D
Installed by:
Jeff D
Employee Ryan G
Installed by:
Ryan G
Employee Adele M
Updated by:
Adele M
Employee Wilson B
Updated by:
Wilson B
Employee Noah M
Updated by:
Noah M
Employee Sabrina W
Updated by:
Sabrina W
Employee Laura H
Written by:
Laura H
Employee Thomas T
Video by:
Thomas T

At etrailer.com we provide the best information available about the products we sell. We take the quality of our information seriously so that you can get the right part the first time. Let us know if anything is missing or if you have any questions.


<