
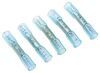
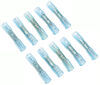
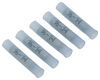
This red butt connector joins two lengths of 22-18 gauge wire. Insulated with heat-shrinkable nylon for adjustability and durability.
Features:
California residents: click here
Videos are provided as a guide only. Refer to manufacturer installation instructions and specs for complete information.
Hey, everyone, Ryan here at etrailer. Today we're gonna be checking out the line of Deka heat shrink style electrical butt connectors. Now these are available in a variety of different sizes. So you have the red, the blue and yellow, so small, medium, large if you will. And you can also pick these up in different amounts. You can get 'em individually, as a five pack, or even a 10 pack.
With these heat shrink connectors, what they're gonna allow you to do is pair two wires together, right, and make a a complete circuit. And we'll show you how to do that a little bit later on with these. But these are my go-to whenever I need to make a connection like that. These are what I always grab, especially if the wiring is gonna be outside or in harsher elements. And I say that because the ends of these heat shrinks will seal up, and actually kind of wrap around the wire, and help prevent moisture and stuff like that from getting inside of that connection and causing corrosion.
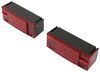
So if you're looking for, you know, the ultimate protection, so to speak, and help keep your wiring connections in good shape, then something like this is what I'd recommend. Now with that said, there are more standard type butt connectors like these ones here, all right And these, when you crimp 'em down, they don't have that heat shrink on it, right So the ends don't seal, and that'll leave little portions of the inside of the connector exposed, and that's what can happen. Corrosion and moisture and stuff can get in there and start to break it down and deteriorate. Now that's not to say these don't have time and a place because they do. If I'm ever doing stuff on the inside of a vehicle, or where I'm not really too concerned about, moisture and things like that, then by all means, these will do the job just fine.
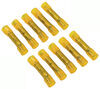
Now, what size butt connector you're gonna need is this really gonna depend on your application, right So I talked about there being three different sizes. The yellow one's gonna be the largest, that's gonna be for 10 to 12, all wire gauge type wiring. So relatively thick stuff. Something like this is where you would use the yellow connector there. So pretty thick wire.
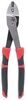
For the blue one, that's going to work with 14 to 16 gauge wiring, something like this, right More on the medium thickness side of things. And for the red one, it's gonna be the smallest, it's gonna be from 22 to 18, all wire gauge. And when you're dealing with wire, the higher the number, the thinner the wire is, right So for example, 18 gauge would be thicker than 22. Just figured I'd share that. So with these, you know, pretty thin wire, that's what you're dealing with there. And sometimes if you're unsure what you got, a lot of times if you look closely on the wire, they'll be labeled what it is. So this one says 20 AWG, so we know that's 2020 gauge wire, and we need to use the red connectors to complete connections with this type. Now that you know how to determine what size connector that you're gonna need, how many are you gonna need, right Now good rule thumb that we always talk about is always get more than enough, right Because you know, no matter how many times you count what connections you got and stuff, it never fails, right You always need an extra one or something happens. And honestly stuff like this anyway, if you do happen to have a few leftover, they're not bad to have laying around, you'll probably find yourself needing 'em in the future for one reason or another. That's really about it with these. You know, ultimately if you're doing wiring that's going to be exposed to the elements, no brainer, use heat shrink style connectors, will keep it protected and make the connection last longer. Now everyone's gonna use these for a variety of different reasons, right They're super universal, cars, trailers, all kinds of stuff, right Today we're using these to do some wiring on the trailer, make a repair, put a new end on it. And so why don't we go ahead, show you how we set ours up and give you a good idea on how to use these on your particular application. Very first thing that we need to do is take the wires that we're gonna be working with and making our connections to, and strip the ends of the installation back. So about like that is what you're looking for, maybe even a little bit shorter. But you then want to twist the wire nice and tight. That'll give us a good connection, and I'm just gonna make that a little bit shorter there. And then you take your butt connector, in this case we're gonna be using a blue one for this size wiring. Slide that over the bare end of the wire. And what I try to do is make it to where when you put the connector on that bare end of that wire, that's where it stops. You know, that way all the wiring is inside of the metal connector there. We'll take a pair of crimps, get this in, crimp down. You can lightly pull on it if you want to, to make sure it's not just gonna fall outta there, which it's good. Then we'll complete our connection here. All right, taking the other end of the wire that we're hooking this up to, putting it in there, and crimping it down. Going to do that same thing for our yellow wire here. Get that attached. And then for these brown wires, so in our case, we have one brown wire for our new trailer connector, right But we have two brown wires for our trailer and these are both taillight signals and this is too. So what we're gonna do, this is perfectly fine to do so, is just twist these two ends together, get 'em nice and tight. And then we're gonna step up one size to a little bit larger butt connector, put that over both ends of the wire, crimp it down. And then for, since we're gonna be putting one end, one wire end on the other side, what I like to do when this happens, is strip the wire back a little long and then double it over. That'll help the butt connector get a little bit better of a bite onto it. Got that connection made. And now we're ready to shrink the ends down. And so in order to do that, I recommend using a heat gun. And you apply heat to these, you know, kind of just consistently move it around. Try not to keep it in one single spot for too long. (heat gun humming) So that's about as long as you need to keep that heat onto it right there. Once it shrinks down and stop shrinking, that's really all the heat that you need to apply to it. You don't just want to keep it on there and continue to warm it up if we don't have to. So hit these other two and should be good. (heat gun humming) Once you have all of your connections made, it's not a bad idea to actually test everything out to make sure that the connections are indeed good. So being that we're dealing with trailer wiring today, in our case, I just hooked up to a little test box, which is simulating a vehicle, turn our lights on, and make sure power to the back where they're mounted up. We'll track our taillights, our left turn, our right turn and our brake lights. With everything working, you know the connection's good. And then if you want to, you can always come back with electrical tape too and tape these up for an additional layer protection. But with that said, I think that'll about do it for our look at of the line of Deka heat shrink style butt connectors.
Ratings & Reviews


Do you have a question about this Wiring?
Info for this part was:
At etrailer we provide the best information available about the products we sell. We take the quality of our information seriously so that you can get the right part the first time. Let us know if anything is missing or if you have any questions.


Thank you! Your comment has been submitted successfully. You should be able to view your question/comment here within a few days.
Error submitting comment. Please try again momentarily.